
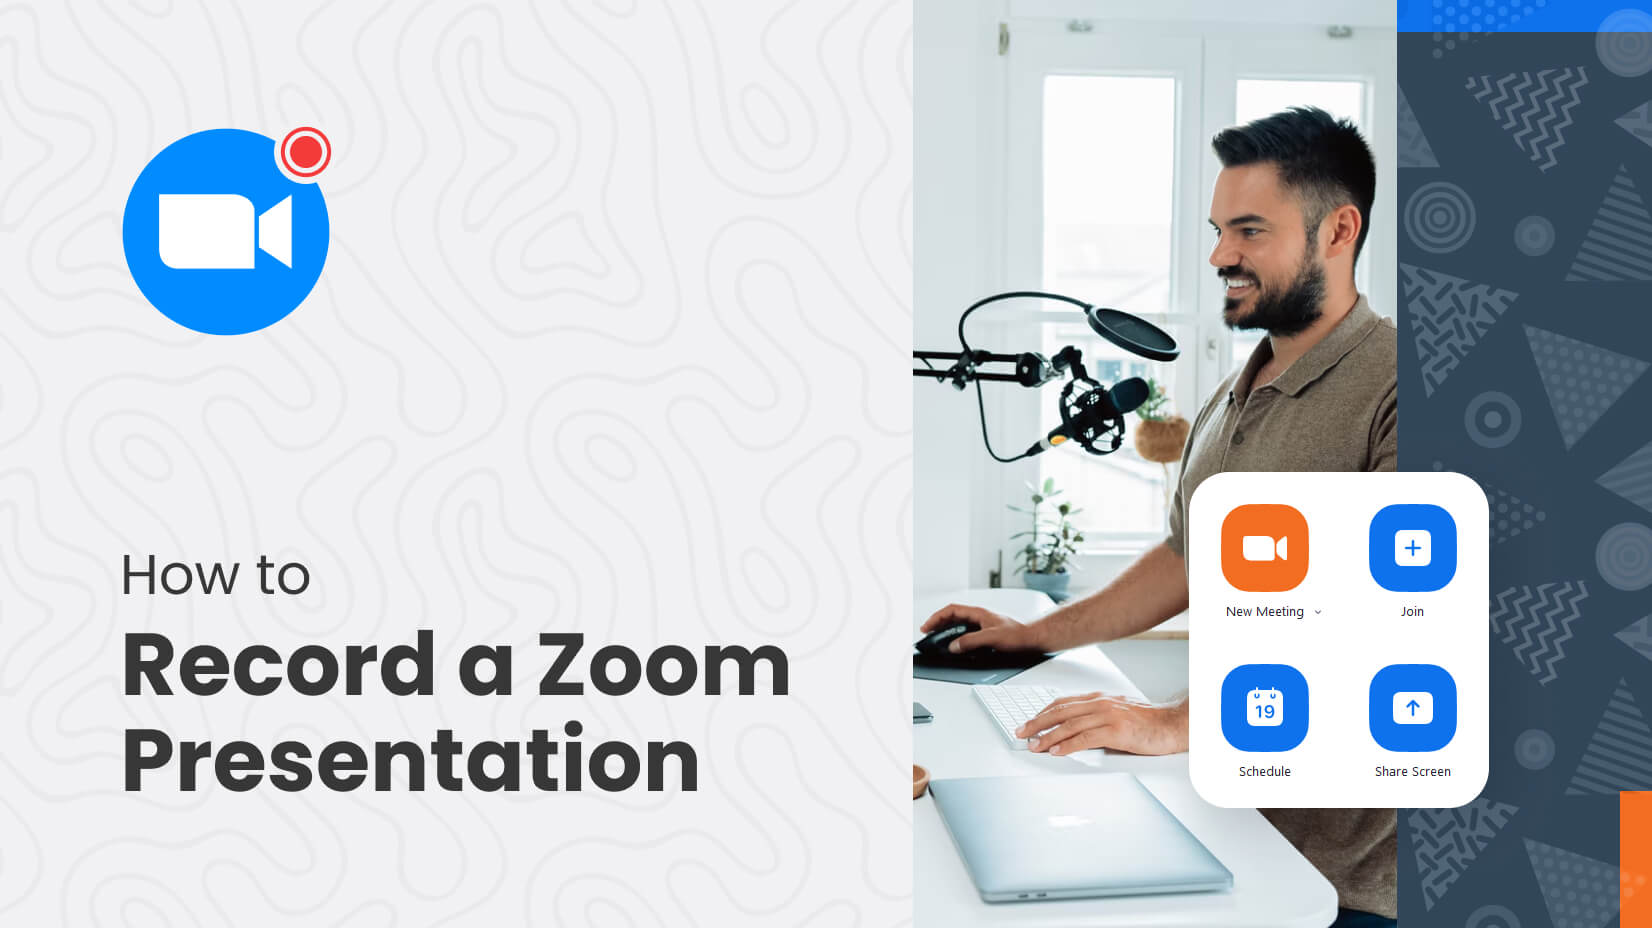
Pre-record Zoom: How to share your recorded video in a Zoom meeting

Zoom is one of the most popular remote collaboration platforms that is being used by a lot of companies and institutions to collaborate with their employees remotely. It is also being used by a lot of educational institutions to conduct classes remotely which is helping students keep up with their classes.
If you are a teacher or trainer that conducts classes and webinars online, then you might have considered recording your lessons and sessions so that they can be easily broadcast to your class or meeting attendees.
If you are looking for a way to pre-record your meeting/class to be later broadcast on Zoom then you have landed at the perfect webpage.
Let’s take a look at how you can pre-record a video for your class or colleagues and then broadcast it over Zoom.
Related: Common Zoom problems and solutions
Why pre-record a Zoom meeting?
Pre-recording your Zoom meetings has many significant advantages. You can manage your time efficiently as you can do any other important work while the recorded presentation or lecture is being given via a pre-recorded video. You can prepare the meeting in advance, at the time you are free.
You can save your time which you can use to prepare for other lectures and meetings. It’s particularly helpful if you know you won’t need to answer any questions during the meeting, meaning it’s a one-way meeting only in-effect.
This will also help you save data too as you can use the same video again anytime you want. You can also share the video for the meeting via other channels so that they can easily refer to the subject material again in the future if needed.
How to record a video for a pre-record Zoom meeting?
Recording a meeting for your Zoom collaboration is a fairly simple process as long as you have a web camera and a microphone. Simply launch your favorite camera (or an app on your phone) and make the arrangement and start recording your session.
You can even add cuts in between if you wish to show external aids or if you end up making mistakes during your session.
On the other hand, you can also record everything in one go and edit out all your mistakes after your video has been recorded. Once recorded, simply use your favorite video editor to snip out all the parts of the clip that you want to remove from your recording.
Once you have recorded and edited your video, it’s ready to be shared on a Zoom meeting.
How to record a Zoom meeting itself?
You can also record a Zoom meeting which you can then later share to your group or class. Simply start a Zoom meeting with only you as the sole participant.
Complete your session and end the recording which should show up in your selected save location (it’s saved in the Zoom folder inside the Documents folder). In case you opted to record the meeting in the cloud, you will find it under the Recordings tab in your web client ( here ).
In case you decided to save it to a location on your local storage then it will be immediately available in your selected location. You can then even edit the recording if you wish to remove certain parts from it to make it easy to comprehend.
One advantage of recording a Zoom meeting instead of a video is that it will give you the ability to record your whiteboard notes as well as other screen share applications which will help you explain the concept much better to your class or colleagues.
How to share your recorded video in a Zoom meeting?
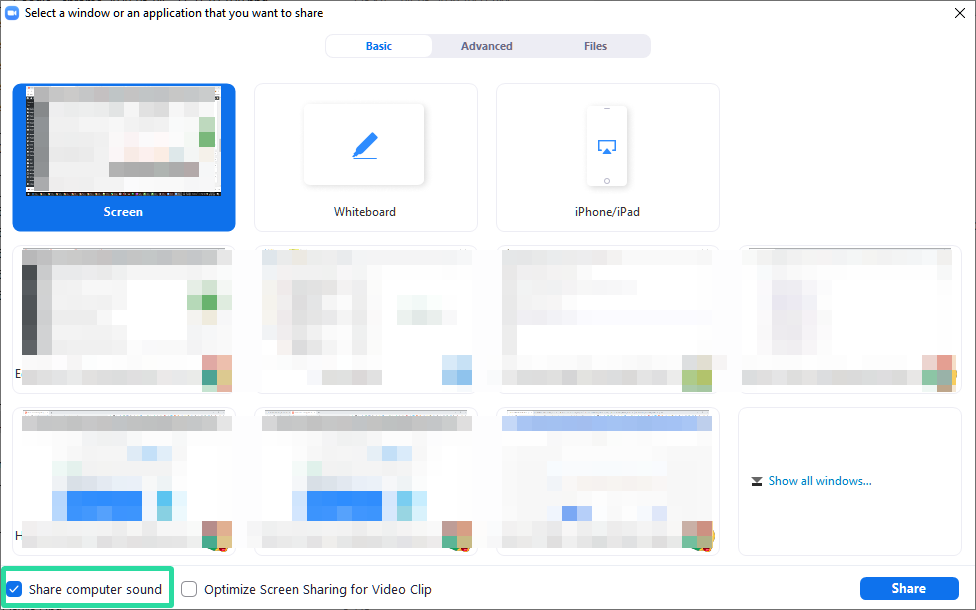
Sharing a recorded video to an ongoing Zoom meeting is a fairly simple process. Simply play the video using your desired video player and share this window in your ongoing Zoom meeting using the ‘Screen Share’ option. Be sure to enable the ‘Share computer sound’ checkbox in the bottom left corner.
Your colleagues and class will then be able to view the video and attend the lecture/session recorded by you without any unwanted interruptions.
This will also allow you to end the video in the desired time format and then take any questions or doubts after the video has been finished. This should, in turn, make the process more streamlined and efficient for both you and your meeting attendees.
How to share your pre-recorded Zoom meeting?
If you have recorded the Zoom meeting over the cloud then you can simply share the cloud recording with your fellow meeting attendees which will give them the ability to watch your session at their own pace.
This will allow you to answer their questions and queries in real-time which should help make your overall Zoom meeting efficient and beneficial for all the parties involved.
If you have recorded the Zoom meeting to your local storage, then you can simply play it using a video player on your PC or Mac and then ‘ screen share ‘ the player to your on-going Zoom meeting.
This will allow all the attendees to view the video in real-time along with you. For questions and doubts, you can hold a small conference at the end and address all the issues faced by your meeting attendees.
We hope this article easily helped you understand the benefits of pre-recording your Zoom meetings and use it to your advantage during the next Zoom session. If you have any queries or suggestions, feel free to reach out to us using the comments section below.

Spectroscopic collection of human cells trying to pave a path via words.
You may also like
YouTube Is Getting a Sleep Timer, Finally! Experiments Begin for Premium Users
ChatGPT Free Users Can Generate Two Images With DALL-E 3 Everyday

How to Hide Webpage Items in Safari in iOS 18
Instagram Testing Its Own Version of Snap Maps
Unsupported browser
This site was designed for modern browsers and tested with Internet Explorer version 10 and later.
It may not look or work correctly on your browser.
- Communication
How to Record a PowerPoint Presentation on Zoom (Audio & Video)
In recent years, we’ve seen the rise of virtual meetings. It’s now possible to connect with a global team from anywhere! When you learn how to video record yourself presenting a PowerPoint on Zoom , your content is accessible to all.

Sometimes, not everyone can attend a Zoom meeting in real-time. This is especially true if your team works across the globe. Luckily, there’s an easy solution! Let's learn how to record a PowerPoint presentation in Zoom.
Why You Should Learn To Record PowerPoint Presentations With Audio and Video
Work has changed. More than ever, you need ways to connect for meetings regardless of your team's location. Zoom is one of the most popular tools to do this.
Zoom is video-conferencing software used by millions. It’s popular because it's got a free tier, with options to upgrade to more robust plans. Zoom supports audio and video sharing, allowing you to virtually meet others face-to-face.
You can also share your screen, to show slide decks, text, video, and more. It’s a top option to share PowerPoint presentations with anyone. Learn how to record PowerPoint presentations with audio and video to pair it with Zoom.

With distributed teams, it's not always possible to coordinate a start time that everyone can agree on. Plus, it’s handy to review a meeting later. Perhaps attendees want to listen to what you said again. Luckily, there’s an easy solution! You need to know how to record a PowerPoint presentation in Zoom.
In moments, you've got an MP4 video file ready for sharing. To record PowerPoint with video in Zoom takes only a few quick steps. Let’s dive in.
Build the Perfect PowerPoint for Sharing
Before you learn how to record a PowerPoint presentation with video, you need a slide deck to share. Premium templates are your best option. These offer styling and features that you won’t get with a free option that you might find online.
Envato Elements is a great option for this. At Elements, you’ll find thousands of PPT templates that you can share on Zoom. As a member, you've got unlimited download access. That means that you’re able to download and use as many of those templates as you want.

For this tutorial, I’ll be using the beautiful Virtually PowerPoint template from Envato Elements. It’s a creative modern design with over 50 slides inside.
With your template open, you can start building a slide deck for sharing. As you work, know that PowerPoint slides meant for sharing online should be special. Keep the following design tips in mind to help ensure success:
- Don’t crowd slides. When you’re sharing to record PowerPoint with video, slides will look smaller to your audience.
- Use larger fonts. Fine print is hard to read on a screen, and even more so in a later video playback. Opt for large, readable text styles.
- Illustrate! Photos, charts, and infographics keep things interesting. You need your slide deck to be clear, concise, and engaging.
With these ideas in mind, you’re ready to learn how to record yourself presenting a PowerPoint on Zoom. Learn more about the art of narration in PPT below:
Prepare Your Zoom Meeting
To record PowerPoint presentations with audio and video slides, you need to open Zoom. You can use the Zoom desktop app, which is available for download. Or you can log into your Zoom account inside your favorite web browser.
If you already have a single meeting scheduled, you’ll see a thumbnail for it on the Home tab inside of Zoom. But if you've got many scheduled calls and invites, you’ll want to navigate to the Meetings tab. Here, you’ll find a complete list of Zoom meetings that you’re invited to.

As you can see above, I've got a meeting scheduled for today at 9:30 PM. The invite has been shared with others, and I'll be the host of the meeting. Imagine in this example that we want to share a PowerPoint deck and record it for others.
To make a good first impression with your audience, it’s helpful to prep your slide deck in advance. This helps you be ready to share when the time comes. You won’t have to scramble around for your files in front of viewers. I like to open my PowerPoint, then minimize it, before starting a meeting. This way, it’s ready to roll when it’s time to share.
To begin the meeting, click Start. You’ll see the Join Audio menu appear. This lets you choose the audio source that you want to use to capture your narration. In this case, choose Join with Computer Audio.

Optionally, you’ll have the option to test your speakers and microphone. If you’re working with a new setup, this is a great way to ensure that you’re capturing clear audio.
Now, you’re in your meeting. Watch as other participants appear. You’re ready to get started!
Learn more about PowerPoint Sharing on Zoom below:

Begin Recording
With your meeting underway, your next step is to begin recording it. Optionally, you can start sharing slides before you begin recording. But I prefer to start the recording first. It’s easy to forget to turn on the recording once you've got slides displayed. And there’s nothing worse than reaching the end of a meeting and realizing that you’ve forgotten to record!
To begin a recording of a PowerPoint presentation, move your cursor over the menu bar in Zoom. It’s the series of options and buttons at the bottom of the app’s screen. First, make sure that your microphone isn’t muted. This setting is controlled by the Mute button, found on the left side of the menu bar.

To record your PowerPoint in Zoom, click Record . From this point on, anything you share on-screen or say aloud will be captured in your recording.
This is also true of other attendees. If they speak or ask questions, their voices will be captured in the PPT meeting recording. You also have the option of sharing video from your webcam. This way, viewers can watch you speak as you share your PowerPoint. This can be captured in your recording too.
It's a good idea to mention to attendees if you're recording the meeting. This ensures they're able to consent to the recording. Plus, it lets them know that you'll have a copy available for review later. Do this at the beginning of your meeting so that all are aware of the recording process.
Share Slides on Zoom
With your recording underway, it’s time to share your PowerPoint slide deck in Zoom. Once again, return to the menu bar at the bottom of the screen. This time, you’ll want to choose Share Screen . It’s easy to find, highlighted in green in the center of the menu.
Click on Share Screen, and a settings window opens. On its Basic tab, you’ll see several thumbnail buttons. These control the source that you want to share from. Usually, there will be tabs for every app open on your computer. Plus, there are options for a whiteboard, to connect an iPad, and more.

To see how to video record yourself presenting a PowerPoint on Zoom, click on the Microsoft PowerPoint thumbnail. Then, click Share.
PowerPoint appears on your screen. You can navigate through your slides as usual. You’ll see that a green box has appeared around the border of the PowerPoint window. This signifies that this area of the screen is being actively recorded. Anything outside of the green boundary won't be captured in your recording.
As you can see, it’s easy to learn how to record a PowerPoint presentation in Zoom. It’s a useful way to share and preserve slide presentations for others in the future!
For best results, keep the following tips in mind:
- Narrate clearly and concisely. Remember, you’re being recorded! Speak clearly, at a cadence that’s easy to follow. Talk too fast and your words will be hard to understand.
- Control sources of audio. Try and eliminate background noise from your environment. This keeps extra sounds from appearing in your recording. And be sure to ask other attendees to mute their mics, unless they've got a question.
- Use a clean, readable template. Premium templates like the Virtually PowerPoint deck have neatly-arranged slide layouts. These are easy for your audience to read.
By embracing these ideas, you’re sure to make a winning impression. They help you build useful, enjoyable recordings for meeting participants to watch later.
Save and Share the Finished Recording
When you’re finished presenting, it’s time to end the meeting and ready your recording for sharing. This is easy to do, and only takes a moment.
You’ll first want to stop sharing your PowerPoint slides when you’re finished. To do so, click Stop Sharing . This is highlighted in red on the menu bar. (It’s only visible when you're actively sharing).
Then, end your meeting when you're ready. Click End , then End Meeting for All. Once you end a Zoom meeting, the app saves any recordings that you made during your meeting. For longer meetings, this may take a few moments. You can monitor the progress on the bar shown in the Conversion popup.
When the conversion process is complete, a Finder window opens. Inside it, you’ll see an MP4 video file. This is your converted meeting PowerPoint! You can watch it on your computer or mobile device. And it’s ready for sharing with others.

You’ve learned how to video record yourself presenting a PowerPoint on Zoom. As you can see, it’s amazingly easy to do! It’s the perfect way to ensure that everyone can hear and enjoy what you've got to share. It only takes a few clicks.
The Top Source for Shareable PowerPoint Templates in 2022 (With Unlimited Use)
As we’ve seen, premium templates are the best PowerPoint decks to share on Zoom. With expertly-built layouts and cool designs, they’re sure to help you succeed. The best source for these templates is Envato Elements .
Elements has a powerful offer: unlimited downloads. For a flat monthly rate, you can download and use as many PowerPoint templates as you want.

With a vast library of thousands of custom PPT templates , you’re sure to find one that’s just right for you.
Plus, Elements offers countless other creative assets. Among them, you’ll find custom fonts, stock photos, music, and more. As a PowerPoint presenter, you can make use of all of these. Together, they help you create stunning slide decks ready for sharing.
Explore PowerPoint Templates

Consider the top advantages of Envato Elements:
- Creative flexibility. Each template is fully editable by you. This lets you tailor each slide to your needs.
- Time savings. Instead of building layouts from scratch, you’re simply filling in blanks. This gives you more time to focus on refining your message and preparing to present it.
- Professional designs . Audiences will appreciate the stylish slides in your presentation. You’ll enjoy them as well, finding inspiring layouts in every template.
Envato Elements is the creative offer that you can’t afford to miss. Join today and start exploring the vast library!
Now You Know How to Record PowerPoint Presentations With Audio and Video
You just learned how to record PowerPoint with video. This is a crucial skill for successful online meetings.
Here's a challenge: before you schedule an in-person meeting, convert it to an online meeting instead. Now that you know how to record a PowerPoint presentation with audio and video, you can skip in-person meetings!

- Accessibility
- Departments
- ConnectCarolina

Zoom To Pre-Record Presentations To Share With Students
Zoom: pre-record presentations to share with students.
Important note: processing time for Zoom recordings has been taking 24 hours or more in some cases.
- Learn about getting started with Zoom .
- Check your Zoom recording settings to make sure that Audio Transcript is checked. If you created a UNC Zoom account recently, this option should already be checked. We recommend not changing other settings on this page.
- Open your PowerPoint presentation in Slide Show view.
- Open Zoom, and click New meeting .
- Select your Join with Computer Audio .
- From the bottom menu, click Share, and select your PowerPoint Slide Show.
- Move your cursor to the ID number at the top of the screen. From menu that appears, click More… > Record to the Cloud . You can pause, resume, or stop recording at any time from the same menu. Note: Faculty and students associated with professional schools may have a time-limit on the length of time Zoom cloud recordings are available. If this applies to you, check with your professional school’s IT department for details.

- Copy the host only link (web address in the red highlighted box, above), and paste this link in a web browser.
- Sharing this recording: Only with Authenticated Users . This will require students to log in to Zoom to access the recording.
- Viewers can download: Yes. Allows students flexibility for offline viewing when their internet connections may be slow.
- On-demand (Registration Required): Yes or No. Enabling this option requires students to enter their name and email address before accessing the recording.
- Password protect: Optional. If you enable password protection, you will be prompted to enter a password.
- Copy the information in the Recording Link window and paste this in an email to your students or to your Sakai site. (For more information about how to use Sakai’s Warpwire tool to host all your videos, please visit the Help Videos section of this site.) Note: Recorded audio will be transcribed automatically . You can improve the quality of the transcription by editing it .
Additional information for Gillings School of Global Public Health Faculty
More Zoom Topics:
- Using Zoom to Teach
- Zoom Settings
- Securing Zoom
Using ZOOM to Record a Video Presentation
- August 7, 2018
- Alex Martinez
Our University paid version of ZOOM allows you to record your computer screen and voice to create a video that you can share with others via Canvas or a private web link. In this tutorial, we will illustrate how to use the ZOOM Cloud Recording option to record a presentation and share the video with someone.
This article covers:
- Using Zoom to record a video presentation
- Using the Zoom virtual slides background feature
How to install and log into your DU Zoom account
Zoom recording instructions, end your recording, share your presentation, related resources.
The videos below illustrates a few different ways to per-record a lecture video.
Using the Zoom Virtual Slides Background Feature
The free version of Zoom has limited features. For example, the free version does not allow for cloud recordings and has limited time restrictions. To get the full version of Zoom, go to http://udenver.zoom.us and click the “Download ZOOM” option.
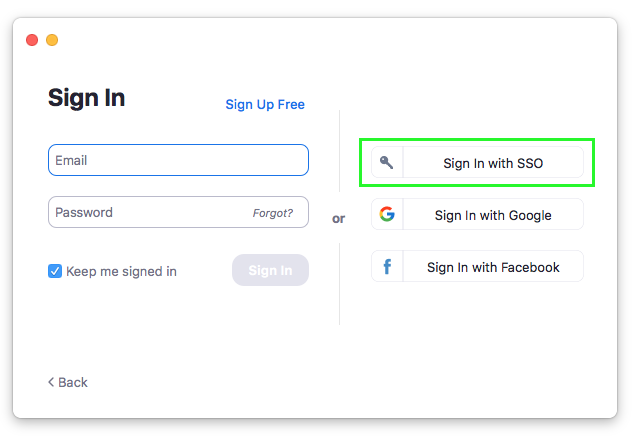
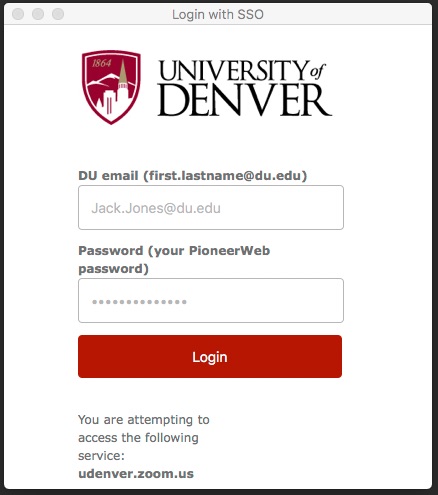
After clicking the Download ZOOM option, you will be taken to the software download page. Select the “ Sign In with SSO ” option, this will allow you to use the fully functional paid university version of ZOOM.
Type in udenver in the box.
Sign In with SSO – Company domain
A new window will open in your browser. Type in your DU email and password and click “Login.”
Click “ New Meeting ” This will open a new window and start your webcam video.
Click the Record button and select “ Record to Cloud ” option; you are now recording. If you wish to post your video on YouTube, Vimeo or some other video sharing website, click “ Record on this computer “, ZOOM will make a mp4 file after you end your ZOOM meeting.
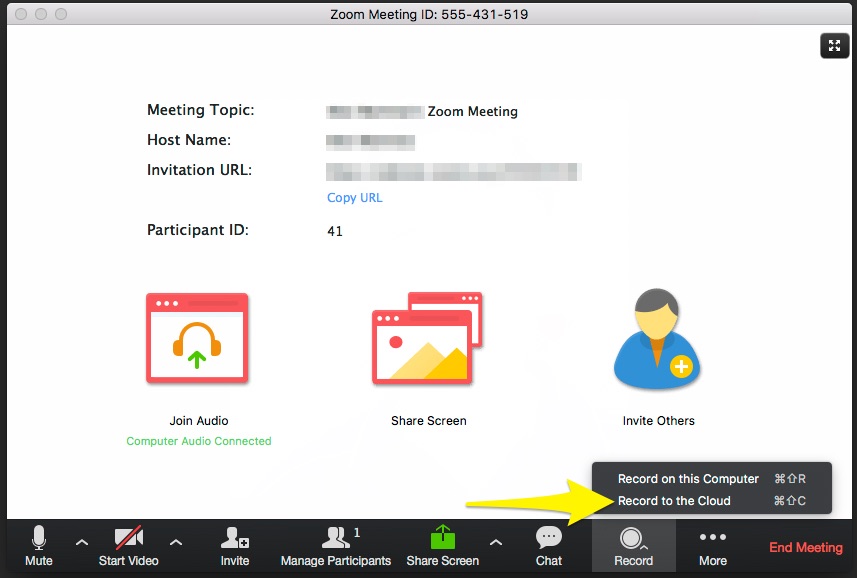
To record your computer screen, click the “ Share Screen ” icon in the middle of the Zoom window. Select your main screen to record and press the “ Share Screen ” button.

To end the recording, press the “ More ” menu option and select “ End Meeting “. Press the “ End Meeting for All ” button. This will end your meeting and start the upload process, so stay connected to the Internet.
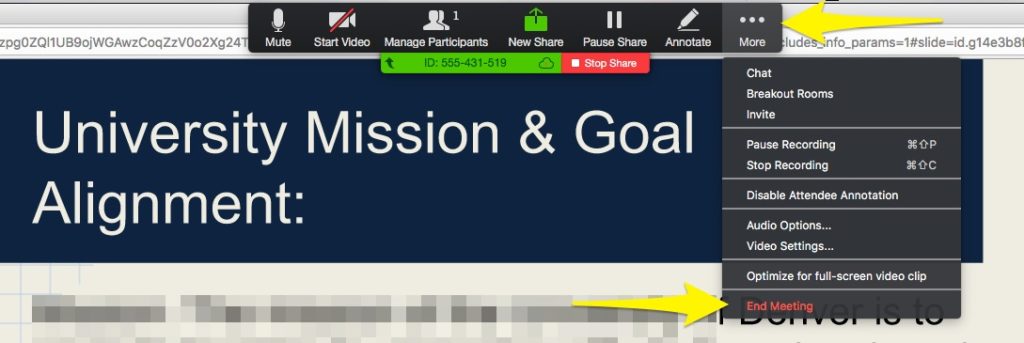
If you selected “ Record to Cloud “, after your pressed the End Meeting button, your recording will automatically will be uploaded into your DU MediaSpace and DU Canvas My Media account. You should get an email sent to your University email after 20-30 minutes.
If you selected “ Record to this Computer “, after your pressed the End Meeting button, your recording will be saved on your computer. ZOOM recordings are saved in a folder called ZOOM within your documents folder. You can upload this mp4 file to YouTube, Vimeo or some other video sharing website.
- ZOOM Cloud Recording Settings and Features
- Getting Started with ZOOM Tutorials
- ZOOM Video and Audio Settings
- Sharing you Zoom via Canvas
- Sharing your Zoom recording without any security restrictions as an unlisted video
Related Articles
How to access zoom recordings in mediaspace, how to obtain a transcript file when conducting interviews using zoom, kaltura or a phone, how to use zoom for asynchronous and unmoderated usability testing, zoom – ways to use avatars in your class, zoom – short answer poll questions to gather student feedback, how to access zoom cloud recordings in canvas.
How to Record a Presentation on Zoom | Easy Step-by-Step

It’s time to start capturing better recordings and transforming your Zoom presentations into fresh content opportunities. There’s so much that you can create.
By learning how to record presentations on Zoom and achieve better audio and video quality, you can take control of your production strategy. You can capture Zoom recordings that allow you to clearly communicate important concepts and ideas with an audience. You can create video materials for use in training, marketing, communication, and more!
Want to record your Zoom presentation but not sure how to start? We’ve put together this helpful step-by-step guide to help you along the way. Here’s everything you need to know about Zoom presentation recording.
Can you screen-record a presentation on Zoom?
You can easily use Zoom’s screen-share feature and recording capabilities to capture a presentation. To record on Zoom, you’ll have to host the presentation meeting, or you’ll need special permissions.
If you’re a participant and don’t have permission, then another option is to use external software. You can use your device’s in-built screen recording tools or another screen recording software platform to record Zoom presentations.
Using a non-native recording tool to capture Zoom content can have some drawbacks. These recordings are likely to achieve a lower overall quality. In your final recording, the sound may be crackly, and video resolution may be low, reducing your content’s professional value.
How to easily record a presentation on Zoom
Recording a presentation on Zoom is easy when you know what you’re doing! In fact, as a presentation host, you can quickly and easily set up recording without ever leaving the Zoom app.
To get started with your Zoom presentation recording, follow these simple steps.
Step 1: Open your Zoom account, and navigate to the ‘ Settings’ menu. Here, select ‘ Recordings’ , and ensure that ‘Local recordings’ are switched on.

Step 2: Next, navigate to your home screen and launch a call by pressing the ‘New Meeting’ button. If prompted, select ‘ join with computer audio’ , or choose another microphone.

Step 3: Before you begin, import and/or open any presentation materials you’ll need, such as slides or images. You can easily share presentation materials by using the ‘Share Screen’ option and selecting the relevant tab where your materials are located.

Step 4: Check that you are unmuted . If you need to record video of yourself, ensure that your webcam is switched on, and select ‘Start Video’ from the bar menu at the bottom of your screen.
Step 5: Ensure that everything you need for your presentation is working correctly before beginning your recording. When you’re ready, select record from the bar at the bottom of your screen.
Choose whether to do a Zoom local recording on your computer, saving your recording to your desktop, or record to the cloud, recording to your Zoom account.
Step 6: Start your presentation, and work through your materials while Zoom records.
When your presentation is complete, press ‘ Stop Recording’ , and then press ‘End’ and ‘ End meeting for all’ to close off the recording.
Step 8: Once your Zoom meeting has ended, locate your recorded files. If you chose to save files locally on your computer, you’ll find them on your desktop or in your device’s documents folder. If you recorded to the cloud, you’ll receive an email when your files are ready.
Step 9: Edit, trim, or refine your recording on your video editor of choice. Then prepare to share it as a training resource, marketing asset, or something else.
How to record a presentation on Zoom as a participant
Generally, speaking, Zoom’s in-built recording tools allow meeting hosts to capture the call.
If you’d like to record a Zoom presentation as a call participant, you’ll need to obtain permission from the host of the call, or you’ll need to be invited as an alternative host. You’ll then be able to use the app’s standard recording tools.
As a standard Zoom participant, it is unfortunately not possible to record content. In this case, it’s best to ask the call host to record content for you. Another option is to use external recording software.
To record your Zoom presentation using an external screen recorder, follow these steps:
Step 1: Choose your software system.
Step 2: Launch your Zoom meeting, and set up your presentation.
Step 3: Follow your software’s instructions to record your screen.
Step 4: Once your presentation is complete, stop your recording and save your files.
Is Zoom your best option for recording a presentation?
Zoom offers great native recording features that can help you easily capture presentation content. However, that doesn’t mean that Zoom is the best recording tool on the market.
In some instances, Zoom recordings can be prone to low recording quality. This may compromise your professionalism, and make it difficult to see or hear your recordings clearly. This is usually because Zoom relies on internet connection for recording. If you have connection problems your resolution suffers. It’s also worth knowing that Zoom doesn’t offer separate video or screen-share tracks which limits your editing flexibility.
If you want to explore Zoom alternatives, there are plenty of great ones to choose from, with some tools offering a range of extra features and functionalities that will help you produce better presentations than ever before.
We have a full guide on Zoom alternatives . Although, with recording files unaffected by your internet connection, and with high-quality resolution, Riverside is a risk-free bet.
“Riverside is far better than Zoom for recording interviews.” - Seth Godin , author, entrepreneur and marketing leader.
Recording presentations with Riverside
Riverside offers a seamless presentation recording experience. This video recording software is best for high-quality audio and video, captured from any location. It’s got all the remote recording tools you need, and with a built-in editor plus separate tracks of your screen, video and audio, post-production becomes much easier.
Riverside features and functionalities include:
- Studio-quality results, offering up to 4K video resolution and 48kHZ audio quality
- Local video and audio recordings which means everything is captured directly on your device and unaffected by unstable internet connection
- Separate screen, audio, and video tracks for each participant, providing better editing control
- Up to 8 participants in one recording and up to 1,000 audience members
- Cloud storage, including automatic uploading, so that you can save time and keep files secure
- User-friendly interface that anyone can use, regardless of skill level
- Desktop and mobile software versions, helping to record content anytime, anywhere
- Native editing tools for customized logos and backgrounds plus automatic audio fine-tuning
- Text-based video editing so you can create professional content as easily as editing a text transcript
- Magic Clips tool for turning your long-form recordings into multiple short clips at the tap of a button
To start experiencing all these benefits and more, start recording on Riverside!
How to record a video presentation with Riverside
Ready to give Riverside a try for your next recording? Follow these simple steps to get started.
Step 1: Create a Riverside account , and start your journey.
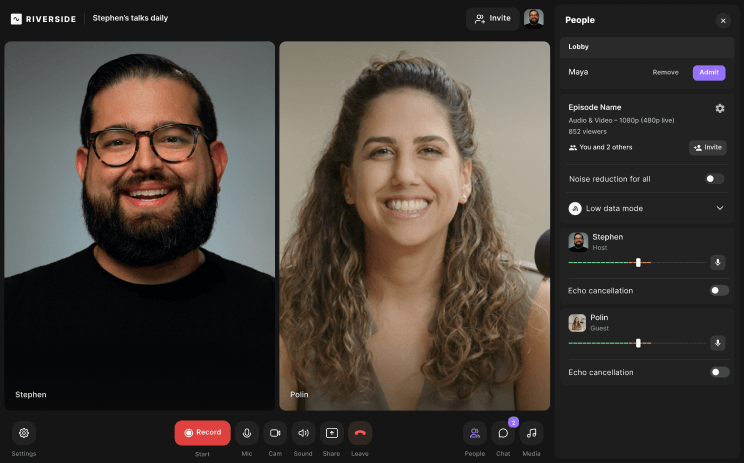
Step 2: Go to your Studios dashboard, and select ‘ + New Studio’ at the top right of your screen. Name your studio, and choose ‘Audio & Video’ as your recording type.
Then you can either choose to adjust settings by selecting ‘Continue set up studio’ or you can select ‘Enter Studio’ to get recording.

Step 3: On the next screen, check that you are joining as a host, and verify your chosen camera and microphone options on the right side of your screen. Select whether or not you’re using headphones. Then press ‘ Join Studio’ .
.webp "how to pre record a presentation on zoom")
Step 4: If you haven’t already, invite your remote guests.
To do this from the studio, simply select ‘ Copy link ’ or ‘Invite by email’ on the right Invite People tab.
If this doesn’t appear or you’d like to add more guests later on, select ‘ + Invite’ from the right Studio dashboard.

Step 5: Next, you can start preparing your presentation.
At the bottom of your screen, use the menu bar to select ‘Share’ . Then select the open tab or window on your device where your presentation materials are located.

Step 6: Once you’ve set up these details, select ‘Record’ from the bar menu at the bottom of your screen, and start recording your presentation.
Step 7: Throughout your recording, use the ‘Mark Clip’ button to mark sections of your recording that stand out and could be used later to create short-form videos.
Step 8: When your presentation is complete, press ‘Stop’ to end the recording.
Step 9: Once the files have finished uploading, go to the right side of your screen, select ‘View recordings’ .
Step 10: Here, use the ‘ Edit & create clips’ button to access Riverside's in-built editing tools. When you’re ready, choose ‘Export’ to save and download your recorded content.
You can also download your files as separate tracks for your own editing. To do this, don’t select Edit, but select the files you want to download and press ‘ Export’ . You’ll also have the option to download files directly into a Descript or PremierePro timeline-suitable format.
Step 11: Prepare to share your presentation recording as part of your training process, marketing strategy, or something else entirely.
FAQs on how to record a presentation on Zoom
Are you still wondering how to record a presentation with ease? Here are our answers to a few of our most frequently asked questions.
How do I record myself presenting slides?
The good news is that you can easily capture your slides as part of your presentation recording! The simplest way to achieve this is by opening your slides in a separate window or tab on your device. Then you can use Zoom’s screen-share feature to record those slides, selecting the destination tab and sharing your screen for the duration of your call.
Can you record a Zoom session if you are not the host?
Unfortunately, Zoom is not designed to allow call participants to record content. If you’re not the host of your call, you’ll need to request hosting or recording permissions from the person who is. Alternatively, you can ask the call host to record on your behalf or use external screen recording if you have the consent of other participants.
How do you record a presentation with camera?
You can integrate webcam footage as part of your presentation recording simply by using Zoom’s native video capture tools. However, if you are screen-sharing to present with slides, these will dominate the screen, with your video only taking up a small portion of the audience’s view.
An alternative is Riverside, which records content on separate tracks so you can capture video and audio in full, then edit as required.
Are you looking for an easy, intuitive way to record your next presentation? Record with Riverside , and capture all your content in high-quality seamlessly.
Kendall Breitman
leads Riverside's community. She has over ten years of experience in television and video production for places like NBC and Bloomberg News. You’ll find Kendall on our webinar, where she shares her expert insights on content production, branding, and more.
Table of contents:
Try Riverside today
Record in studio quality without the studio. Transcribe, clip, and edit within seconds.

Keep reading
---Riverside.png)
Riverside resources
Recording software.
High-quality recording software for professional audio, video, and screen capture.
Screen Recording Software
Capture screen recordings in full HD with constant frame rate MP4s for easy editing.

Video Recording Software
Capture video and screen-sharing online with up to 4k resolution, and get ISO tracks for all participants.
Start creating with Riverside

Podcast guides
© 2023 RiversideFM, Inc.
- Create account
- View source
Pre-record a Lecture with Zoom
- Zoom can be used to pre-record lectures
- Recordings can include screen sharing and/or a view of the speaker
- Sharing computer audio on macOS requires a driver installation the first time it is used
- The Audio Transcript setting needs to be turned on before making the recording
- Add and edit Zoom Captions
Getting Started
- Open Zoom and sign in to your account
- Click the New Meeting button
- Turn on the camera, set the virtual background if needed, and check your lighting
- Unmute your mic and test the audio
Screen Sharing
If you need to share the screen there a few steps to follow. You can read Zoom's Screen Share article for more information.
- Click the Screen Share button
- Select what you are going to share
- If you need to share the audio from your computer check the Share Computer Sound box
- Check the box next to Optimize Screen Share for Video Clip
For more detail read Zoom's Cloud Recording article.
- If you have already started screen sharing go to the top of the screen and click the More button and select Record to the Cloud
- If your microphone is muted you will get a warning reminding you to unmute
- Click the Stop Recording button when you are done.
- Zoom will send you an email when the cloud recording is available.
- You can multiple recordings within one meeting
- The audio transcript might take longer to process than the video
- Manage your cloud recordings
- Download, delete or share cloud recordings
- Trim the playback range of a cloud recording
- Getting Started with Zoom
- Zoom for Students
- Zoom Security
- Schedule a Zoom Meeting in Canvas
- Category:Zoom - All Zoom Docs
No account or having problems logging in? Request help as a guest
Keywords: web conferencing
- Curricular Technologies
- Media Technologies
- This page was last modified on 19 February 2021, at 15:05.
- Content is available under CC-BY-SA unless otherwise noted.
The Evergreen State College
- Maps & Directions
- Search Evergreen
- Directories
- Privacy Policy
- Emergency Info

How to Pre-Record a Presentation (Explained With Easy Steps)
Pre-recording a presentation can be a great way to ensure a polished and error-free delivery. A presentation can be pre-recorded in Microsoft PowerPoint, Zoom, Microsoft Teams etc. platforms.
In this article, we will discuss the steps and process to pre-record a presentation on some of these platforms.

Table of Contents
How to Record a PowerPoint Presentation With Pre-Recorded Audio?
To record a PowerPoint presentation with pre-recorded audio, you can follow these easy steps:
1. Insert Audio on Slides
Open your PowerPoint presentation and go to the slide where you want to add the pre-recorded audio. Then, follow these steps to insert the audio:
- Go to the “Insert” tab on the PowerPoint menu.
- Click on the “Audio” button and select “Audio on My PC” (if the audio is saved on your computer) or “Audio from File” (if the audio is on external media).
- Navigate to the location of your pre-recorded audio file and select it.

2. Set Audio Playback Options
Once you’ve inserted the audio, you can set the playback options to control how it plays during the presentation:
- Click on the Audio icon on the slide to select it.
- A new “Audio Tools” tab will appear on the PowerPoint menu. Click on it.
- In the “Playback” section, you can adjust options like “Start” , “Play across slides” and “Loop until stopped.”

3. Test Audio Playback
Play the audio on the slide to ensure it’s working correctly and set to play as desired. If you have audio on multiple slides, repeat the process to insert and set up the audio for each slide.
4. Save Your Presentation
Once you’ve added all the audio to your presentation, save the PowerPoint file.
5. Present Your Slides
PowerPoint will start recording your presentation. Navigate through the slides and let the pre-recorded audio play automatically as you progress.
6. Finish Recording
After you’ve completed the presentation, press the “Esc” key on your keyboard to end the recording.
7. Save Your Recorded Presentation
Save your PowerPoint presentation again after recording to keep the narration and timings embedded in the slides.
How to Pre-Record a Presentation with Zoom?
Follow these 10 easy steps to pre-record a presentation with Zoom:
- When you are ready to record, start a new meeting by selecting ‘New Meeting’ in the app, or if you are in your browser, select ‘Host a Meeting’ in the top right corner.

- When prompted, click on Join Audio Conference by Computer so Zoom will record your PC’s microphone. Make sure you have both your audio and video turned on.

- Click on the Share Screen button. In the window that appears, select your PowerPoint presentation (you will need to have this open to share your screen.)

- Once selected, click the Screen Share button and the chosen screen or application will have a green border surrounding it to verify that it is being shared.
- At the top of the screen, move your cursor to the green area, where your meeting ID is listed, and a menu will appear.

- Click More (…) > Record . You can now begin to deliver your presentation
- When you’re done recording, go back into your Zoom toolbar at the top of your screen and click on More (…) > Stop Recording
- At the top of your screen click Stop Share .
- At the bottom right of the Zoom application click End , then End Meeting for All
- Zoom will begin compressing the screen recording and save it on your computer
FAQs (Frequently Asked Questions and Answers)
Can you pre-record a presentation with powerpoint.
Yes, you can pre-record a presentation with PowerPoint. PowerPoint can be used to pre-record audio and sync it with the slideshow itself. The resulting slideshow with the recorded audio can be exported into a video file to turn it into a pre-recorded lecture.
PowerPoint offers a feature called “Record Slide Show,” which allows you to record your presentation, narration, timing, and even annotations. This recorded presentation can then be shared with others, making it an excellent tool for pre-recording your content.
Can You Pre-Record a Google Slide Presentation?
No, you can’t record a presentation just using Google Slides. However, workarounds and third-party tools can be used to achieve a similar result.
A webcam or screen recording software must capture video and audio while presenting with Google Slides. Using an app or browser-based program will allow you to record your voice, face, or both with your slide deck.
Pre-recording a presentation is not a hard task. It can be a valuable tool for creating high-quality, well-structured, and visually appealing content that can be utilized for various purposes, such as online courses, webinars, conferences, or marketing materials.
Similar Posts

Why Doesn’t Grammarly Work on Google Slides? Check Out the Reason
Grammarly has become an essential writing tool for students, academics, businesses, and everyday writers. The app integrates with various programs to provide real-time grammar, spelling, punctuation, and style checks. However, one common question and frustration is why Grammarly lacks integration with Google Slides. This article will examine the technical and design limitations that prevent Grammarly…

Does Apple Use Keynote for Their Presentations
Apple is well known for their slick and polished product announcement events. The keynotes delivered by Apple executives like Tim Cook and Phil Schiller are seamlessly executed with impressive visuals and demos. This has led many to wonder – does Apple use Keynote, their own presentation software, to create these presentations? As an avid Apple…

What Are the 3 Dots on Keynote Slide? Everything About It
Keynote presentations allow speakers to go beyond static slides and incorporate dynamic elements that capture the audience’s attention. But with great power comes great responsibility. Understanding the purpose and proper use of builds, animations, and other enhancements is key to creating an effective Keynote presentation. This brings us to the three little dots. Those innocuous…

What Are The Advantages of Digital Presentation? | Explained With Six Aspects
Digital presentations present a great opportunity to engage and captivate the audience with digital multimedia tools. It can be an amazing option to increase the learning curve of concepts among the students as well as captivate the dealers in business meetings. In this article, we will dive a bit deeper into this subject. What Is…

How to Record a Presentation on Teams? 7 Steps Guide
Using Microsoft Teams makes it simple to record a group presentation. This tutorial will show you how to use Microsoft Teams’ video call feature to record a narrated presentation. We may screen share and record our desktop and anything visible on it, including PowerPoint slides, using the video call feature. Let’s dive into the deep of…

Can You Use Apple Pencil on PowerPoint? Drawing the Line
In the dynamic world of presentations, where creativity and engagement are paramount, the Apple Pencil has emerged as a powerful tool for transforming PowerPoint presentations into captivating visual experiences. So yes, you can surely make use of Apple pencil on PowerPoint. This versatile stylus seamlessly integrates with the PowerPoint app, empowering users to draw, write,…
Leave a Reply Cancel reply
Your email address will not be published. Required fields are marked *
Save my name, email, and website in this browser for the next time I comment.
- Skip to main content
We use cookies
Necessary cookies.
Necessary cookies enable core functionality. The website cannot function properly without these cookies, and can only be disabled by changing your browser preferences.
Analytics cookies
Analytical cookies help us improve our website. We use Google Analytics. All data is anonymised.
Clarity helps us to understand our users’ behaviour by visually representing their clicks, taps and scrolling. All data is anonymised.
Privacy policy
Software and online tools
Pre-recording lectures in zoom.
Record a video as a way of delivering teaching to students. You can record videos with Zoom and add it to Moodle.
- Create videos in small chunks (for example 10-15 minutes long) and share them with students.
- Use a USB headset to make your audio clearer.
- Undertake a test of Zoom before embarking on recording teaching materials.
- Listen back to it before proceeding.
Prerecording a video in Zoom
To record a video in Zoom:
- Host or start New meeting in Zoom.
- Click the Record button and choose Record to the cloud .
- While recording, you can share your screen and talk through any materials (for example, a PowerPoint presentation). You can pause or stop the recording at any time.
- Click End meeting to finish your session.
- Zoom will send you an email notification when your video is ready. Sign into Zoom and go to the Recordings tab to find your video.
- You can trim the start and the end of your video before sharing it with others. See Cloud Recording Playback (Zoom website) for how to do this.
Accessibility and transcripts
Zoom will auto-transcribe your content. Transcripts will appear to the right-hand side of your video.
You can edit and improve the transcript when reviewing your video by clicking on the pencil icon next to the text of the transcript. Aim for good, not perfect!
The Digital accessibility guidelines have further information on video and audio accessibility.
Adding a Zoom recording and transcript to Moodle
1. Sign into Zoom . Click on Recordings to find your recording. (Zoom will also send you an email with a link to share from the recording.) 2. Click on the Share button next to the recording you want to share on Moodle. 3. Highlight and copy the URL in the Recording Link Information box. 4. Go to the section in Moodle where you want to add your video. Click on Add an activity or resource. Choose URL. 5. Paste the URL of your Zoom recording that you copied previously into the External URL box and give it a name and a meaningful description so that students know what the link contains. 6. The link will open the video in Zoom with a transcript next to it. Students can also download the video, audio and transcript to access later.
See: Add a Zoom recording to Moodle (Video)
- Scheduling Zoom sessions for teaching
- Meetings, classes or seminars
- Accessing, editing and viewing recordings
- Instructors
- Institutions
- Teaching Strategies
- Higher Ed Trends
- Academic Leadership
- Affordability
- Product Updates
How to Prepare Prerecorded Presentations That Work

Joseph Ferrantelli is a Professor of Education at Hunter College
If you’re teaching a college course online like so much of the country, it’s likely you’ve recorded or prerecorded presentations for your students. But chances are, if you do record presentations, you don’t think too deeply about the process, you just do it. In this article, I examine why we prepare prerecorded presentations in the first place, and outline my typical process for creating presentations that resonate with my students.
Planning Prerecorded Lessons
Prerecording your lessons is ideal when presenting asynchronously, as students can watch the recording at their leisure while recording a synchronous lecture is perfect for persons that can’t attend. Recorded lessons can also be uploaded to a learning management system (LMS) for all to watch after the fact.
Planning is essential in any online or in-person presentation. First, you must ask yourself, to whom am I presenting? What is my topic? Once these questions are clear, you should create an objective for the presentation that articulates what you want students to leave with that they did not know before attending.
A clearly defined presentation objective is the foremost step to a fantastic presentation that works. Once you have a clear objective, you can plan what content you will present. Be sure to script everything and have those notes available while recording your presentation.
Choosing Technology to Record Your Presentations
Next, you’ll want to think of the best way to record this content. There are a few free options available. You can get a free Zoom account, which allows you to record and save your presentation as an MP4 file. Since I teach Math, I like the Whiteboard feature on Zoom, as I can annotate next to each step of the solution. If you prefer not to use Zoom’s Whiteboard, Bitpaper is a dedicated whiteboard program that has a free version.
You can also use Screencast-O-Matic to record yourself, your PowerPoint presentation or both at the same time. A free account will allow you up to a 15-minute recording, which you can save to any drive.
A good rule of thumb is to keep your video presentation short. While it’s easy to watch a fantastic movie or an excellent motivational speaker for an hour, think of how much stamina one would need to view a lecture for that long. If you need an hour to present your content, make sure that you can hold students’ interest, captivate them and keep them engaged. If you don’t think this can be done, consider having some of your content uploaded as reading material to your LMS. Pro tip : You can record your screen using PowerPoint .
Another free option is to record yourself with your cell phone or video camera. With this option, you may need video editing software to fix any mistakes.

If you don’t mind spending money on video editing software, then you have a lot of options. I use Camtasia. In teaching my Math class, I’ve found Lightboards to be a great tool for engaging students. The picture to the left is a still of a lesson I recorded while using my lightboard.
If you use PowerPoint to present your content, remember that your slides are merely a guide. You are the expert; you need to talk the talk. Do not record yourself reading from your slides—individuals that view your recording can read them on their own.
According to an Inc. article by Molly St. Louis , approximately 65 percent of the population are visual learners, so try to use more visuals and fewer bullet points to trigger engagement. Including data in your PowerPoint slide is a plus, but make sure that your graphical representation allows the audience to focus on the data you are describing. Avoid presenting a huge colorful graph. Instead, piecemeal the data out to your audience as you speak to it. Focusing on one piece at a time helps viewers better understand your explanation.
If you have PowerPoint and a webcam, you can record your slides as a movie where you are embedded in the slide while presenting the content. To do this:
- Click on the File tab, then click on Options, then click on Customize Ribbon
- Under the Main Tabs, find the recording tab and check the box to the left
- Click “OK” and you’ll see the recording tab at the top of the screen
- Click on the recording tab, then click on the Record Slide Show button on the left top corner
PowerPoint also has a screen capture capability that you can learn more about here .
My last tip is practice, practice, practice . And when you are done practicing? Practice again . PowerPoint even has a built-in function that can help you practice—and perfect.
For additional strategies that can elevate your virtual instruction, download our ebook, Peer-proven Strategies for a Successful Online Course .
Related articles.

How to record a Zoom presentation and present in a virtual meeting?
- Share on Facebook
- Share on Twitter
By Nikolay Kaloyanov
in How-To Tutorials
2 years ago
Viewed 630 times
Spread the word about this article:
Many big companies had to establish home office practices in 2020 and Zoom became the most popular tool for virtual meetings . Virtual meetings are now crucial for business and education and they are here to stay.
If you’re a teacher and have difficulty maintaining class control, recording your lessons is a great way to save time . Instead of spending hours rehearsing your lessons and guiding students every step of the way, you can record a professional presentation for your students to watch at home. They’ll be able to watch it in their own time, over and over again – so you no longer have to answer questions on the spot!
Also, if you’re a business person, your audience can listen to the presentation afterward , thus they can learn more about your subject, and not embarrass themselves in front of other business people if they dare to ask questions.
And this is where Zoom came in. It successfully replaced physical meetings with digital ones. So, if you haven’t worked with Zoom yet, you will sooner or later get more familiar with it. In this guide, we will teach you how to record a Zoom presentation, so you can share with other people in the meeting your recent work or study progress.
Article overview: 1. Should you use Zoom for presentation recordings? 2. What is the difference between video conferencing and video recording tools? 3. How to record a Zoom presentation? 4. Bonus: How to Make a Transparent Camera Background When Presenting?
1. Should you use Zoom for presentation recordings?
Before we get into the essence of the topic, we need to mention a couple of reasons why Zoom is a good choice for recording presentations.
- It’s secure – popularity plays a huge role. Famous apps receive more updates and are more secure since they want to keep their customers behind them.
- The free version is more than decent – the free version allows you to have a video conference with other people for up to 40 minutes and have up to 100 call participants.
- It’s popular – Maybe you already tried Zoom and you are familiar with the software. Also, it is used by many companies and you can ask a colleague or friend for help.
2. What is the difference between video conferencing and video recording tools?
In one of our previous articles, we showed you how to record a presentation using different tools – like Loom, Panopto, QuickTime, and Game Bar. We highly recommend that you dedicate some time for practice at home before presenting to other people. Stuttering and mispronunciation of words are not good signs for how well you are presenting. On the other hand, video conferencing tools like Zoom and Google Meet are made for people who are recording in real-time.
3. How to record a Zoom presentation?
Zoom is a great application for delivering high-quality presentations with ease. The tool enables you to record your screen, camera, and voice with just a few clicks of a button. You need to follow some steps that we’ll show below.
Step 1. Create a Zoom account
The first step is to create a Zoom account . You are assigned to a free plan by default but you can also explore the paid options if you need to. If you’re assigned to present in Zoom but you’re a guest, it’s often the admin who holds a premium account.
Step 2. Download the desktop app
Once you have opened your Zoom account, you have to download the desktop app on your computer and install it.
Step 3. Create a meeting / join a meeting
When you are all set, you are now able to host your meeting. You have two options to start a meeting: New Meeting is the option used for immediate meetings, or Schedule – to plan your next meeting ahead of time. You can also join a meeting if someone shared a meeting link with you. There is a Meeting Id required for some meetings, so the host should provide you with that in advance. It’s a combination of numbers.

Step 4. Select how to join the meeting
Zoom will ask you to confirm which audio and video settings you are going to use. Many people prefer to present only the slides, while others want a more realistic experience – with the camera on. Start without video and Start with video are self-explanatory, so we won’t dig into details.
Step 5. Click on “Share Screen”
The next step is to select Share Screen from the Zoom control bar. You have to also press Record at the beginning of your meeting (or presentation), and just click Pause/Stop recording. Pausing the recording is reasonable when the others are discussing topics nonessential to the presentation (off topics), stopping the recording is the moment you want to end it.

Step 6. Pick the screen you want to share
You can share your screen (you will have two options if you have two monitors). When you have a Keynote or PowerPoint tab open, you will find them as available options. This is when you should click on them. If your presentation is made in Google Slides, or you have it in iCloud or OneDrive, then you have to find the relevant tab and pick a Slideshow mode for the applicable program. We advise you to remove any unrelated tabs beforehand, as they will be visible to your audience and could distract you to find the presentation file fast enough.

A quick tip : If you hold a lot of valuable info on many tabs, you can create a new Google Chrome window to click on it easily.
Step 7. End the recording
If you have presented everything, you can now end the Zoom recording. If there is nothing else to add, you have two options – Leave Meeting if you are invited or you are admin but you want the meeting to remain, or End the Meeting for all in case you want to end the Zoom meeting and kick other participants.
Step 8. Export the recording
When you are ready with the recording, you will have access to it. In order to download (or export) your recording, you should log into your Zoom account, then select My Account , and from the menu on the left click on Recordings . You will now have access to all recordings that you have made. To download them, you have to checkmark the ones you wish to download and click on Export .
4. Bonus: How to Make a Transparent Camera Background When Presenting?

Who wants to clean the entire room, in order to stream their camera? Nobody. Luckily, there is an option in Zoom where you can present with a webcam without any background. It is working with Microsoft PowerPoint, and it is really simple. (Please, have in mind that this works best with clean color backgrounds such as green or white).
- Start a new meeting.
- Then click on the “ Advanced ” tab.
- Select “ Slides as Virtual Background “.
- Pick your PowerPoint presentation.
- Finish the task by clicking on “ Share “
Recording a presentation requires different skills today. While several years ago, you could get away with a decent presentation design and compensate for it with great speaking abilities, nowadays programs give you plenty of options to add creative visuals and impress the audience. Zoom is an amazing app that enables you to present to up to 500 people at the same time. However, knowing how to record a presentation in Zoom is just one part of being successful.
If you find the guide useful, why don’t you check some of our other presentation-related tutorials:
- How to Calm Down Before a Presentation: 10 Practical Tips and Techniques
- How to Start and End a Presentation: 10 Practical Tips to Grab Attention and Make an Impact
- How to Make an Engaging Infographic: The Full Guide

Add some character to your visuals
Cartoon Characters, Design Bundles, Illustrations, Backgrounds and more...
Like us on Facebook
Subscribe to our newsletter
Be the first to know what’s new in the world of graphic design and illustrations.
- [email protected]
Browse High Quality Vector Graphics
E.g.: businessman, lion, girl…
Related Articles
How to create a simple vector monster in adobe illustrator, color theory basics for non-designers: everything you should know, character animator tutorials part 1: introduction, character animator tutorials part 5: behaviors 1, character animator tutorials part 6: behaviors 2, enjoyed this article.
Don’t forget to share!
- Comments (0)
Nikolay Kaloyanov
Nikolay is a copywriter with vast experience in Technology, Marketing, and Design. When he isn't playing with words and crafting texts, he watches sports and asks questions. He is a funny person...until you put him on a diet.

Thousands of vector graphics for your projects.
Hey! You made it all the way to the bottom!
Here are some other articles we think you may like:

How-To Tutorials
How to create a poster: the best beginner tutorials + useful tips.
by Lyudmil Enchev

How to Turn Yourself Into Animated Cartoon in Zoom.Us

Creating Adobe Character Animator Puppet from Static Character: The Basics
by Iveta Pavlova
Looking for Design Bundles or Cartoon Characters?
A source of high-quality vector graphics offering a huge variety of premade character designs, graphic design bundles, Adobe Character Animator puppets, and more.
How to Record a Presentation on Zoom [Detailed Guidance]

Zoom, as one of the popular online communication tools, is mostly used to launch and record online meetings . Besides the internal recording feature, it also comes with tools that make screen sharing, webcam capturing and annotation process simple. Therefore, it can not only make Zoom meeting recordings but also produce a video presentation. Since you may not hear this method before, here we will talk about how to record a presentation on Zoom with explicit wizard for you.
Using Zoom to Record a Presentation Video
You can initiate a Zoom meeting without any other participants since you still have all of Zoom’s presentation tools at your disposal as well as the ability to record. First and foremost, you need to register a free Zoom account and then follow the guidance on how to record a presentation on Zoom.
Settings about PowerPoint: If you are using PowerPoint, you are suggested to make configuration as below: Open the PowerPoint file >> Click Slide Show>> Click Set Up Slide Show >> Under Show Type choose Browsed by and individual (windows) . This operation will allow you to present in slideshow view without being in fullscreen mode since fullscreen mode will cause more difficulties to make recording with Zoom.
Now let’s turn back to the kernel aspect of Zoom to record presentation videos .
Start screen sharing of PowerPoint slides and webcam Step 1: Open the Zoom app on your computer and then initiate a New Meeting to begin a video conference session. If you’re asked to choose an audio conference option, click Join with Computer Audio .
Step 2: Now you will find the Share Screen option at the bottom of the Zoom window, choose it to enter the next operation interface. In the Share window, you need to select the active window display your PowerPoint slide. Check the box for Share computer sound and Optimize Screen Sharing for Video Clip options if your presentation includes sound and a video.
Step 3: Once you click the Share button, you will see your face on the screen. You can reposition and resize the webcam window as needed. When a window is being “shared” in Zoom, the Zoom control bar will minimize and move to the top of the screen. You need to keep on the sharing status during the recording process.
Start video presentation recording in Zoom Step 1: To begin recording in Zoom, find out the More icon in the Zoom control bar. There are two options for recording: Record on this Computer (files can be saved on your computer as mp4 file) and Record to Cloud (files will be uploaded into the Zoom Cloud server). Here you can decide according to your actual needs.
Step 2: Now you’re recording and ready to give your presentation. It’s highly recommended that you practice using Zoom before recording so that you’re comfortable with the controls before you record your presentation. Here you can do a short 30 seconds test run and publish your video to make sure that it sounds and looks good.
Step 3: You can change the window being recorded with ease during the recording process. When you are finished, click as below to end: More >> tap Stop Recording in the Zoom control bar at the top of the screen >> choose Stop Share >> End Meeting >> End Meeting for All .
Now you’ve got the recorded presentation video with Zoom but there are still some limitations by virtue of this method. 1. The whole process is a little complicated since you need to start a screen sharing process and then record in Zoom. 2. If your video was 10minutes, it could take 20+ minutes to process on the Zoom cloud server. Besides, you need to guarantee the internet connected status all the time. 3. You can’t make changes to settings and parameter like format, quality.
Record a Video Presentation with Better Alternative of Zoom
It can be denied that Zoom owns the basics of recording a presentation video. But if you want to produce professional-looking presentation videos, you are suggested to work with RecMaster . As a multi-function screen recorder, RecMaster is competent for online meeting saving including recording Microsoft Teams meeting , Zoom meetings as well as Webex Meeting capturing. Besides, it also performs well to create presentation involving videos like Keynote presentation video recording , PowerPoint screen recording and more. Additionally, it embeds all-in-one operation feature and carries out screen recording offline. At the same time, some advanced tools like editor, mouse cursor effect and annotation are all accessible. To sum up, with the help of RecMaster you can easily make slideshows as expressive videos . Now let’s see the workflow of RecMaster.
Step 1: Please download and install RecMaster on your computer in advance and follow the wizard to have an overview of this tool.

Step 2: Under Full screen mode you can display the whole content of your PowerPoint. If you only want viewers to focus on the slide at present, you need to choose Custom area option.
Step 3: Using a webcam plugged-in will make your video more reliable and personal. Besides, you’re suggested to turn on microphone button so that your real-time narration can be recorded as well. If you’re making presentation videos for social platforms like YouTube, you are suggested to record as popular formats like MP4. >> Best formats for YouTube upload, download, record etc.
Step 4: Now it’s time to make PowerPoint as videos by pressing REC button. You can highlight key points or add mark-ups by means of mouse cursor effect and annotation tool. Step 5: End the recording process with Stop icon. Here you can perfect your recorded video by cutting out unwanted clips. When all the processes are over, you can upload the video to YouTube or Google Drive in one-click workaround.
Conclusion This article illustrates how to record a presentation on Zoom and at the same recommend the easier solution for presentation video making. You can choose the suitable one as you like to assist your recording work.
See also: How to record Webex meeting on computer How to record GoToMeeting on your computer How to record Google Hangouts/Meet video or voice call
Screen recording made easy.
Record every moment on your PC or Mac within few clicks.
How to Record on Xumo?
How to Record VooV Meetings on PC and Mac?
How to Capture and Save Olympic Event Replays?
How to Record Olympic Games Paris 2024 Lives?
How to Record FutureLearn Videos with RecMaster?
How to Record edX Videos with RecMaster?
How to Record Coursera Videos?
How to Record Big Think Videos?
How to Record Alison Videos?
How to Record Funbrain Gameplay and Videos?
How to Create New Employee Onboarding Videos with RecMaster?
How to Screen Record without Showing the Screen Recorder?
How to Make A Product Demo Video with A Screen Recorder
How to Boost Your Business with a Screen Recorder?
How to Record Full Gaming Screen on Desktop
RecMaster is professional screen recording software which offers different kinds of recording modes. RecMaster is professional screen recording of recording modes.
--> Free Trial --> MacOS X 10.11 or above --> Free Trial --> window 10/8/7 -->