Responsive behavior in Presentation Mode?
Hi, new to Figma, but not new to UX design. I’m very competent with Sketch, JustinMind, Illustrator/Photoshop, and Axure and now my company is trying out Figma.
The question I have is about Presentation Mode.
I see all these great tutorials and functionality around responsiveness when INSIDE the Figma editor. Constrain the button to the parent frame for a variety of responsive behaviors… that’s cool.
But when I launch Presentation Mode I’m only given choices like “Shrink to fit frame” and “Fill to fit” etc.
I need to be able to make some UI that responds like HTML/CSS in Preview Mode.
Like, a responsive data grid where some cells shrink as the window gets less wide and some do not and eventually resulting in a horizontal scrollbar when the grid can get no smaller.
You know, web page style.
I guess I’m confused about why the “drag and watch the objects respond” behavior seems to be limited to only the editor view.
Am I missing something??? I can’t find any info about this. All the search results are about responsiveness in the Editor and none are about the Presentation Mode, at least none that I have found so far.
Unfortunately, in Presentation Mode you cannot change breakpoints to look at the responsiveness of the design.
More info/detail

And if I resized the browser widow to be horizontally smaller, the viewport would, or could if I set the sizing and responsive behavior correctly, respond by getting smaller up to a point where it would stop… again, potentially triggering a horizontal scrollbar.
I’m not seeing anyway to make anything like that happen in Presentation Mode?
In Presentation Mode you can see how your design looks on a certain device (static width), interact with design elements for which you have configured any actions on the “Prototype” tab (click, hover, horizontal and/or vertical scrolling, etc.) and test animations. Changing the size of the Presentation Mode window will not do anything, because the width of your design will be static, and in this mode there are no tools that could allow you to switch between breakpoints in your design, like in Chrome DevTools.
When you have horizontal and/or vertical scrolling in your design, Figma doesn’t display scrollbars in Presentation Mode, but you can still interact.
You can read the article from the help center: https://help.figma.com/hc/en-us/articles/360040318013-Preview-designs-and-prototypes-in-Presentation-View

This would be such a useful feature for Developers (Viewer Role). It would be easy for them to figure our which parts of the design is responsive and which aren’t.
This topic was automatically closed 90 days after the last reply. New replies are no longer allowed.
All of the responsive behaviors we build into our prototypes should absolutely be available in Presentation Mode.
What’s the point of building in all sorts of complex and subtle responsive behaviors if I can’t even show them to Stakeholders & Developers in Presentation View?
Actual Size and Fit-to-Frame are basically the only options?
It’s kind of hard to understand this one… both views are in a browser after all. So why can’t we see our flexing layouts in Presentation? At least let us toggle them on or off?
Please vote this up if you agree.
Hey there, I’ve just changed the category from “Ask the community” to “Share an Idea” so others in the community can vote and share their feedback. Feel free to upvote this feature request.
I strongly agree with @Darth_UX . It seems odd that the functionality is already there, it just needs to be moved into the presentation mode (where it really matters to us). We are an agency and it would be fantastic if we could share 1 link so that the client could experience the responsive design that is built in Figma.
Additionally, this unlocks a whole new feature where you can use Figma to create quick landing pages or website comps.
As a developer, I can’t tell what my visual design team wants, because I can’t see what’s happening at different screen sizes. If this was for print it wouldn’t be an issue, but how is this supposed to be viable for web?
Wow. I’m new to Figma from other tools and was excited to dig into Figma’s Auto Layout because of how it allows for responsive behavior in layouts. Finding out that this dynamic behavior only exists within the editor and can only be used to produce static previews/presentations is extremely disappointing.

Advisory boards aren’t only for executives. Join the LogRocket Content Advisory Board today →

- Product Management
- Solve User-Reported Issues
- Find Issues Faster
- Optimize Conversion and Adoption
Creating presentations using Figma

In the design world, creating effective presentations is crucial. Ask any designer, and they’ll tell you that the ability to articulate design concepts can be the difference between an idea that soars and one that nosedives.

And when it comes to crafting these presentations, Figma stands out.
Not only is it a versatile design tool that lets you customize your slides however you want, but its prototype feature allows you to create the sort of unique transitions you won’t get with any other tool.
Surprisingly, creating stunning presentations in Figma is pretty straightforward. This guide is going to show you how you can do it. We’ll also review the pros and cons of creating presentations in Figma.
So, if you’re ready to start creating presentations that captivate your audience, let’s jump right into the steps involved.
Step 1: Create a Figma account
To use Figma, you’ll need to create an account. If you don’t already have an account, go to Figma and click the Sign up button in the top right corner. Enter your email address and password in the fields provided. Click the Sign up button, and you’ll be logged into your Figma account immediately.
Step 2: Create your first presentation frame
Open a New design file . You can rename the file by clicking Untitled at the top of the page. Next, click the Frame tool (F) and select Presentation > Frame 16:9 from the templates on the right:
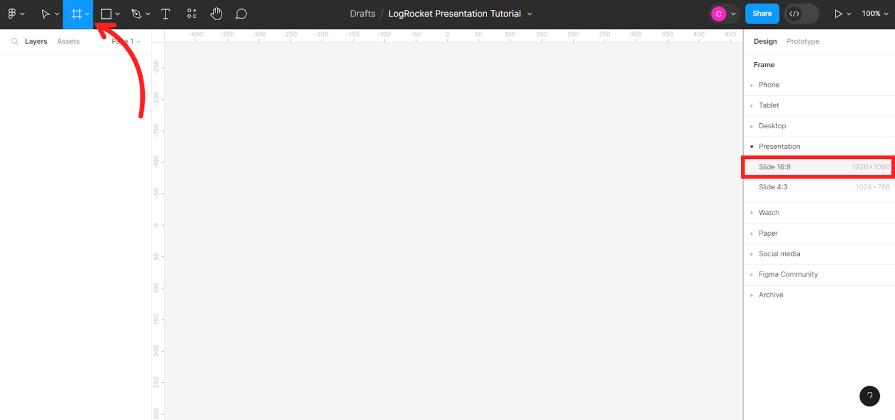
Once you’ve created your first frame, rename it by double-clicking the blue title on the top left of the frame. Enter a new name for your frame and press Enter :
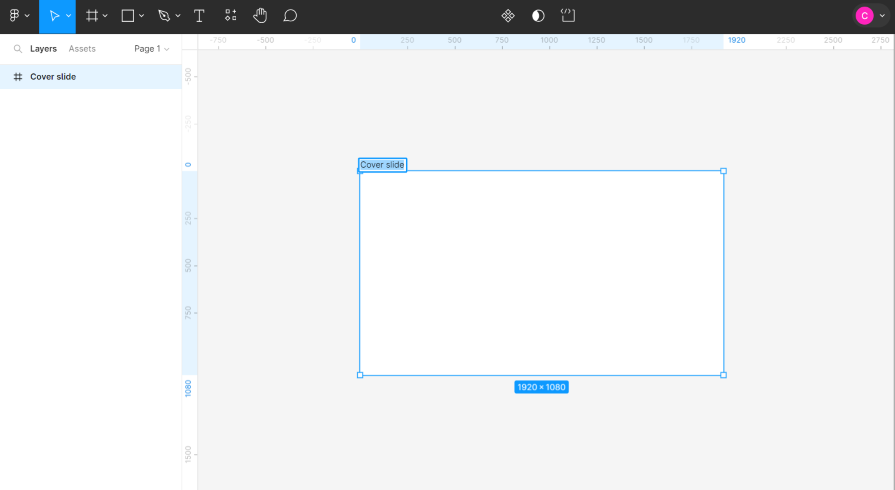
You can also change the background color by selecting the frame and picking a color from the Fill options on the right sidebar.
Step 3: Add your title text
To add title text, click the Text tool (T) and write your title. Stick to one or two words per line and use a different text box for each line. To modify your text size, color, and so on, go to the Text menu on the right sidebar.
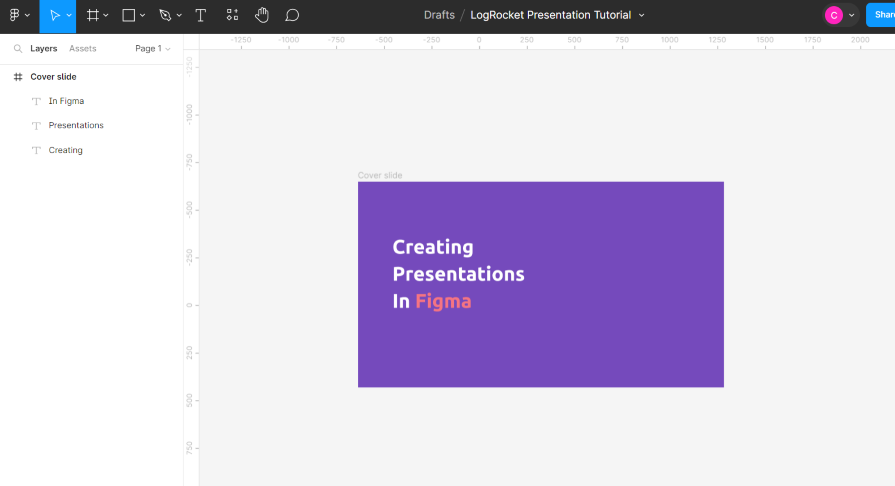
With your title text sorted, it’s time to move on to the next step.
Step 4: Add your cover image
Start by drawing the shape that will house your image. It can be a rectangle, ellipse, or any other shape you prefer. We’ll be using a trapezoid for this example.
Draw a trapezoid by using the Pen tool (P) . Next, click the trapezoid and go to Fill in the right sidebar. Select the colored square to open the Fill properties. Click the image icon and select Choose Image :
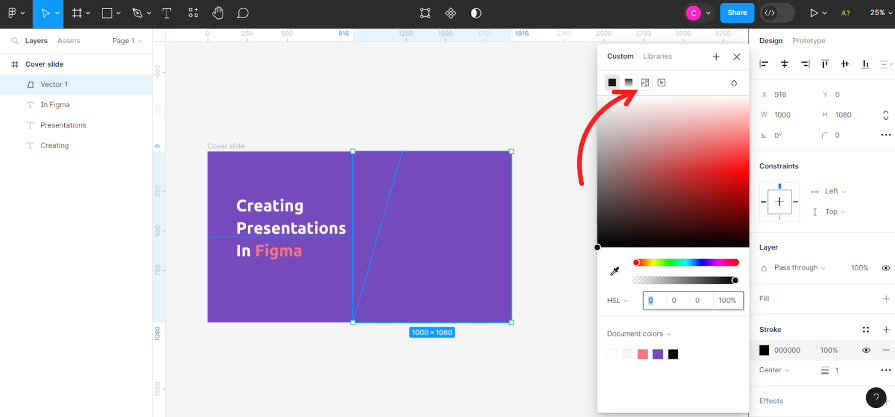
Select the image you want to use and click Open . The image will automatically adjust to fit the shape you drew earlier.

Over 200k developers and product managers use LogRocket to create better digital experiences
Once your image is in place, it’s time to move to the next step.
Step 5: Create your first transition
The first transition will open the image vertically, while the text will slide in from the left. To achieve this, start by duplicating the entire frame. Select the frame and hit Ctrl/Cmd + D .
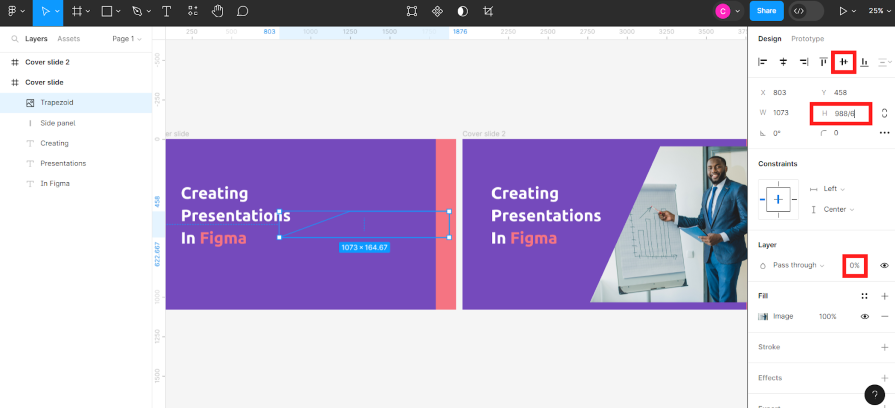
On the left frame, reduce the image height to about 1/6th of its size. To do this, select the image and divide the H attribute by six from the right sidebar. Then, align the image center vertically and reduce the image layer opacity to 0 percent:
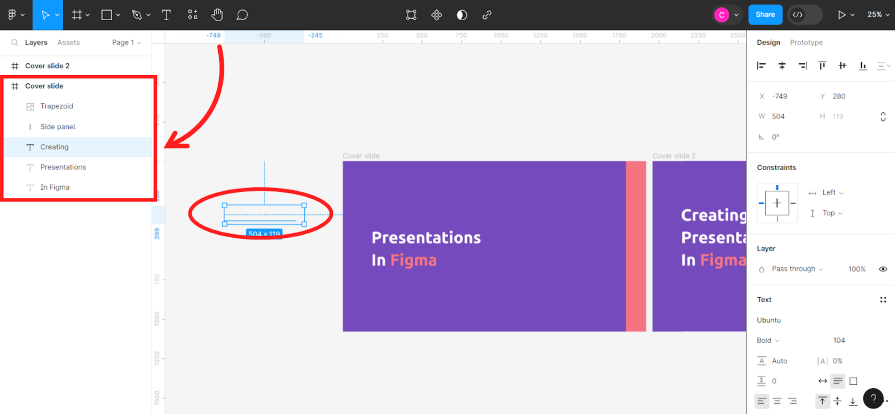
Next, select the first text box, press Shift , hold down the Space bar , and drag it left until it is outside the visible rectangular frame. Ensure that you hold down Shift and Space to avoid the text box from actually going outside the frame. We need the text to remain within the frame for the transition to work.
In the image below, notice how the text appears outside the visible frame but is still within the Cover slide frame in the layers panel:
Repeat the process for the other text boxes, dragging them a little further each time to create variety in the transition. Then, select all text boxes from the layers panel and reduce their layer opacity to 0 percent.
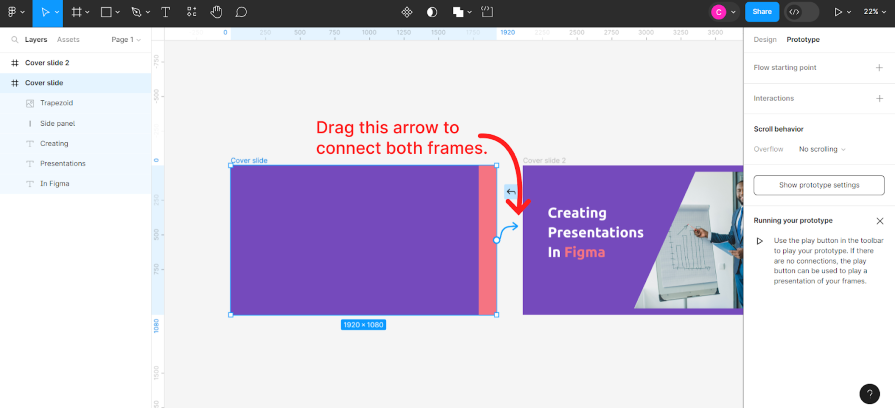
To finish the transition, go to Prototype from the right sidebar. Select the left frame and go to the blue circle that appears on the right side of the frame.
A plus sign will appear. Click on it and drag the arrow to connect it to the right frame:
In the dropdown menu that appears, click on Instant and choose Smart Animate . Select Ease in from the animation options. Adjust the timing to 1000ms. You can leave everything else in default.
Test your transition by clicking the Play button. If you’re happy with it, return to Design mode to continue working on your slides.
Step 6: Add more slides
We’ll use a different transition style from the second frame to the third. The image will shrink, and the text will go outside the frame. To achieve this, rename the second frame to Slide 1 . Duplicate it ( Ctrl/Cmd + D ) and you’ll have Slide 2 .
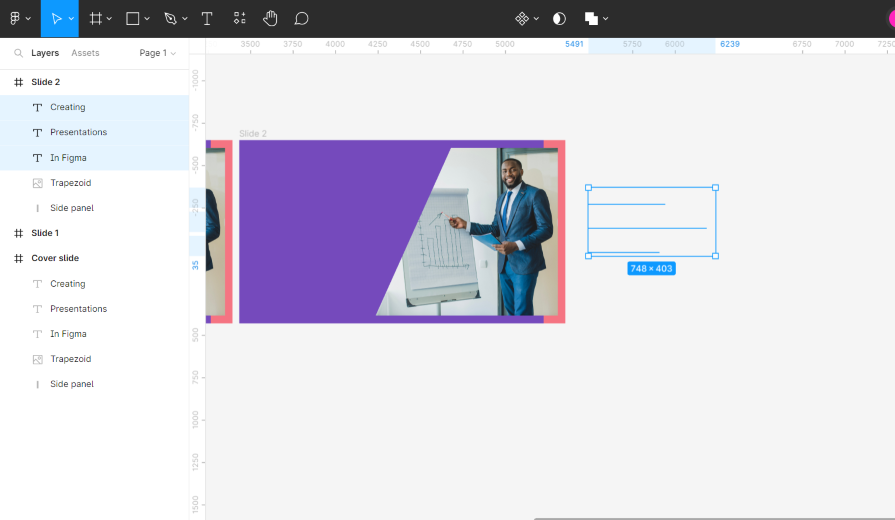
Go to the new frame and move the text boxes outside the visible frame (just like we did previously). But this time, move them to the right. Then, set their opacity to 0 percent:
To achieve the image shrinking effect, click on the image, hold down Shift , and drag the bottom-left resizing handle inwards until it’s about 1/6th of its original size. Next, set the image layer opacity to 0 percent. You’ll have a blank canvas to add all the elements you wish to include in Slide 2.
Add your heading and body text to Slide 2. Also, add an image the same way you did for the cover slide:
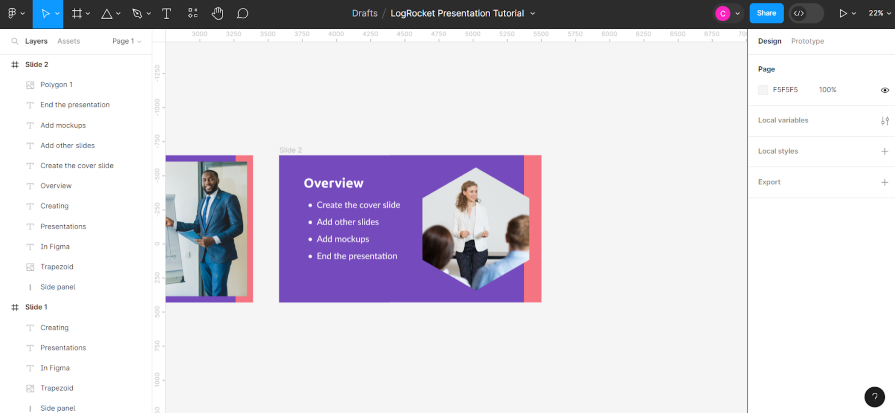
Let’s add some animation to create a smooth transition from Slide 1 to Slide 2.
Select the image in Slide 2, and copy it using Ctrl / Cmd + C . Go to Slide 1 and paste the image ( Ctrl / Cmd + V ). Resize the image to 1/6th its original size and set the opacity to 0 percent. Move the image to the back using a shortcut ( Ctrl / Cmd + [ ):
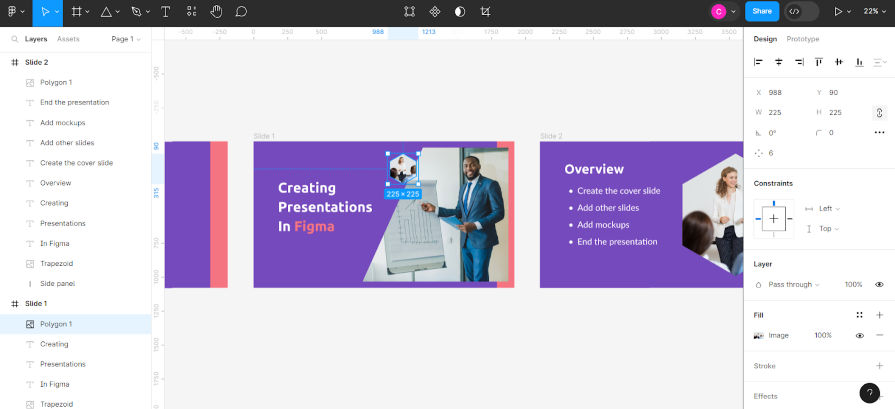
This action will create a zooming transition effect.
To animate the text in Slide 2, select all the text boxes and group them ( Ctrl / Cmd + G ). Copy this group and paste it into Slide 1. Move it to the right of the frame using the dragging technique ( Shift + Spacebar ) we used for the cover slide. Set its opacity to 0 percent.
Next, go to Prototype . Connect Slide 1 to Slide 2. By default, Figma maintains the attributes of the previous transition. Leave it as is:
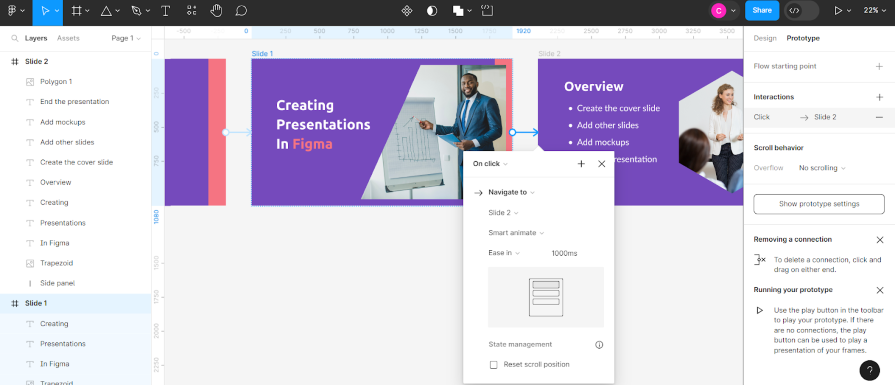
You can play the prototype to ensure that everything works as it should. Once everything is in place, we can move on to the next step.
Step 7: Add mockups
As a designer, your presentations will often involve mockups of your design. So, let’s go over how to add mockups to your presentation slides.
Go back to Design mode and add a new frame. This frame will be Slide 3 . Next, create a mockup. You can use Figma plugins like Clay Mockups 3D , Mockuuups Studio , or Vectary 3D Elements to generate quick mockups.
Paste your mockup inside the new frame and resize it to fit:
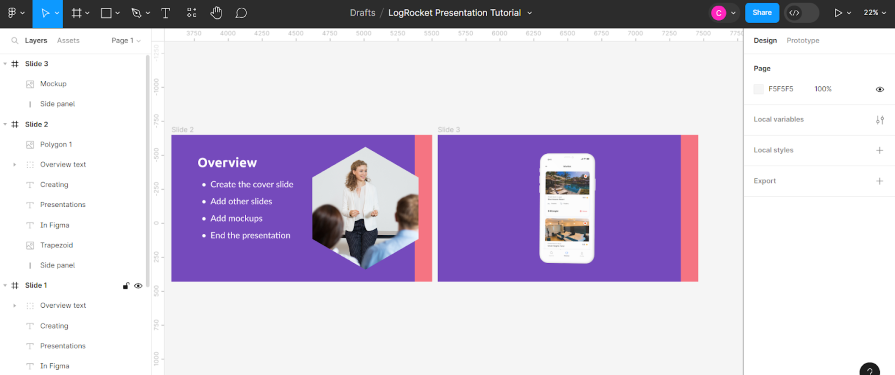
To ensure a smooth transition, copy the mockup and paste it into Slide 2. Scale it to about 1/6th its original size. Position it in the middle of the frame, reduce its opacity to 0 percent, and send it to the back. This action will cause the mockup to zoom in when presenting.
Go to Prototype mode and connect Slide 2 to Slide 3. Leave the animation settings as is.
Step 8: Label mockups
Duplicate the mockup frame. This new frame will be Slide 4. Use the Text tool to add a title and description to explain the different features in your mockup. Group the title and description together and name it:
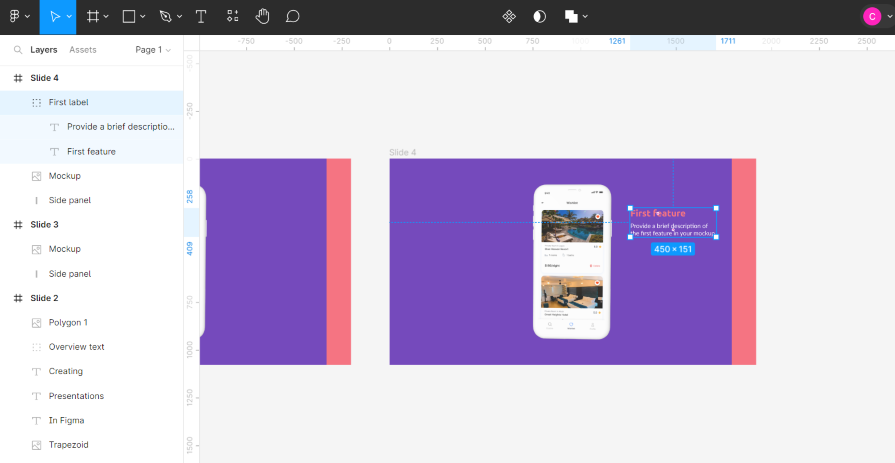
To connect the text to the feature it’s describing, draw a line with the Line tool (L) . While drawing, hold down Shift to keep the line straight.
Next, we’ll add an indicator. Draw a circle with the Ellipse tool (O) . Reduce the fill opacity to 50 percent and add a Background Blur of 20:
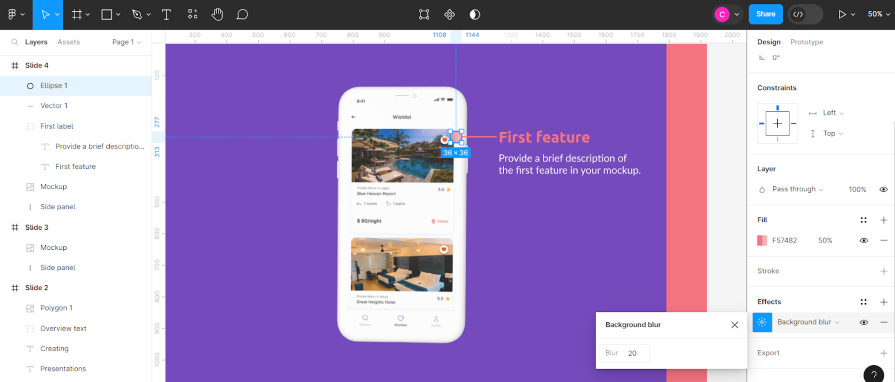
Group the line and indicator together and label it.
To add labels to the next feature in your mockup, duplicate the frame (Slide 4) and add another bullet point indicator and text. Repeat this process for all the features in your mockup, duplicating the frame each time.
Next, go to Prototype , connect the slides, and press Play to see if everything works correctly. If you’re happy with the slides, it’s time to wrap things up.
Step 9: Create the final slide
Once you’ve added all the information you need in your presentation, end the presentation with a final slide.
To do this, duplicate the previous frame to create another slide. Use the Text tool (T) to add a final word for your audience. Center the text vertically and horizontally.
Next, copy this text and paste it into the previous frame. Scale it down to about 1/6th its original size. Press K before scaling it to keep it formatted. Center the text vertically and horizontally. Reduce its opacity to 0 percent and send it to the back:
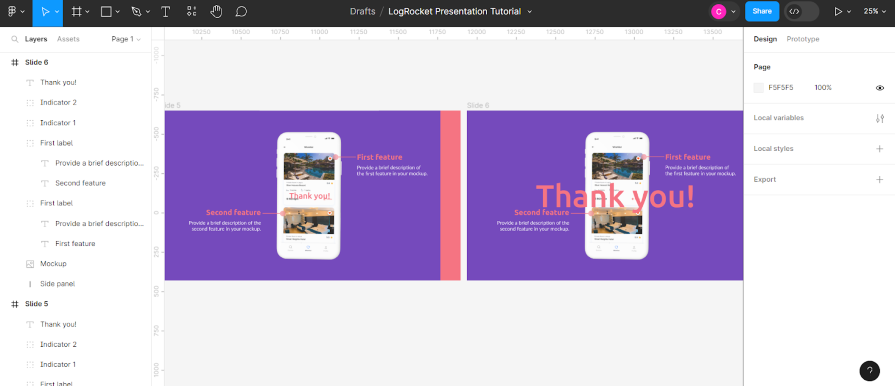
Go back to the final slide. Use the dragging method to move all other elements except the “Thank you” text outside the visible frame. Drag them in different directions for a more dramatic effect:
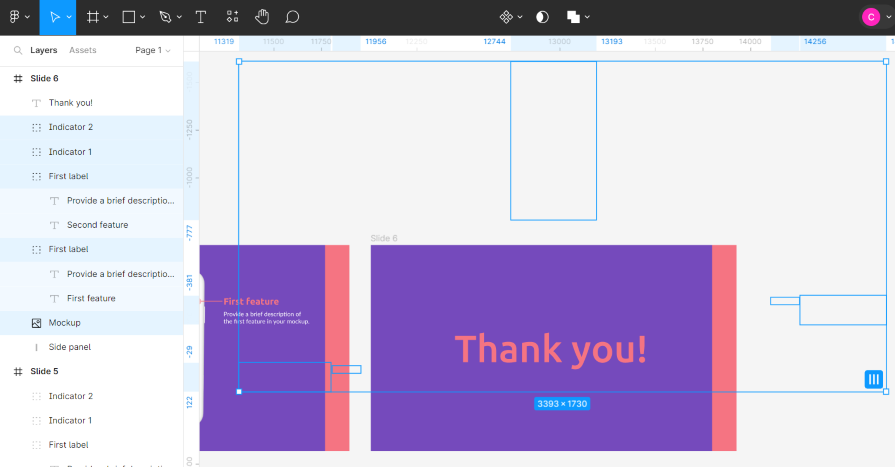
Finally, go to Prototype and connect the final frame to the one before it. Click Play to see the finished presentation.
Step 10: Share your work
After all the hard work, it’s time to share the finished project with your audience. So, here, we’ll be going over how to Export your work, Share it with your team, and Present it to an audience.
To export your slides as a single PDF file, go to File > Export frames to PDF . Figma will export every frame as a PDF page in your slide deck. Your slides will be organized from left to right and top to bottom, meaning the leftmost frame will be the first PDF page, and so on. Note that if you export your slides as PDF, there’ll be no animation effects.
To share your work with others, click the Share button in the top right corner of the Figma interface. Enter an email address and click Invite , or simply copy the shareable link and send it to anyone you wish to invite to the file.
To present your work in Figma, click the Present button in the top right corner or press Ctrl/Cmd + Alt + Enter . Once in presentation mode, switch to fullscreen by pressing the Spacebar .
Voilà, that’s how you create and share a presentation in Figma.
But is Figma really the ideal tool to use for your next presentation? Let’s help you decide by analyzing the pros and cons of using Figma for presentations.
Pros of creating presentations using Figma
Real-time collaboration.
Figma is great for team projects as it allows multiple users to collaborate in real time, promoting teamwork and efficiency.
With Figma, you can invite up to 500 collaborators to your file (200 can have editing access). Now, that’s a large community of collaborators.
Easy export and sharing
Figma allows you to share your presentations in different formats, such as PDFs, JPGs, or interactive prototypes.

Compatible with multiple platforms
A major pro of Figma software is its ability to work smoothly across various operating systems (Windows, macOS, Linux) and browsers, ensuring compatibility and promoting accessibility.
Access to a plugin library
Another great benefit of using Figma for presentations is the easy access to a library of plugins that can speed up your workflow.
Time efficiency
Figma allows you to duplicate and reuse design components, which comes in handy when you want to create multiple slides with similar layouts.
These are just some benefits that make Figma a powerful tool for creating collaborative and highly accessible presentations. But as we know, every tool has its downsides, and Figma is no exception. So, let’s examine some disadvantages of using Figma to create presentations.
Cons of creating presentations using Figma
Learning curve.
To use Figma efficiently, you must know your way around the interface. For anyone using the software for the first time, there might be a learning curve that can slow down the creative process. This can be an issue if you need to build a presentation with people who have no experience with Figma.
Limited offline access
Although Figma offers an offline mode, there is a limit to the features users can access. This limitation can be an issue when you need to edit or access your presentation from areas with limited internet connectivity.
Design-focused, less presentation-focused
Figma is primarily a design software best suited for designing user interfaces, so it might lack the advanced features you’ll find in dedicated presentation software.
Needs enough RAM and a decent graphics card
For Figma to run smoothly, it requires the right amount of RAM and a decent graphics card. So, if you’re using an older computer, you might not have the necessary specs to run this software.
Now that we’ve analyzed the pros and cons of using Figma, we believe you have enough information to decide if it’s the right tool for your next presentation. So, let’s wrap things up, shall we?
Figma is a powerful and versatile collaborative design tool that you can use to create stunning presentations. Its prototype feature allows you to create unique transitions that make your presentations stand out.
Although there are some drawbacks to using Figma, such as the learning curve involved, the tool has many benefits that make it worthwhile, especially since it’s what many of us designers use in our day-to-day. So, if you’re looking for a tool that you can use to share your ideas in a visually appealing and accessible way, Figma is a great option.
LogRocket : Analytics that give you UX insights without the need for interviews
LogRocket lets you replay users' product experiences to visualize struggle, see issues affecting adoption, and combine qualitative and quantitative data so you can create amazing digital experiences.
See how design choices, interactions, and issues affect your users — get a demo of LogRocket today .
Share this:
- Click to share on Twitter (Opens in new window)
- Click to share on Reddit (Opens in new window)
- Click to share on LinkedIn (Opens in new window)
- Click to share on Facebook (Opens in new window)

Stop guessing about your digital experience with LogRocket
Recent posts:.

Tips for better ecommerce UX design
There’s little to no room for innovation and creativity in ecommerce. But by nailing every step of the sales funnel, you can greatly impact the company’s sales.

Creating a low-fidelity prototype in UX design
Use a low-fidelity prototype for your design whenever you need to experiment with ideas in the UX research analysis stage.

Applying the elaboration likelihood model (ELM)
The elaboration likelihood model (ELM) is a theory that describes how people process information and its impact on their attitudes.

Why not every UX problem needs to be solved
If you think UX design is all about solving user problems, you’re wrong. In this blog, I share the the lesser-known truths about UX problem solving.
Leave a Reply Cancel reply

COMMENTS
In Presentation Mode you can see how your design looks on a certain device (static width), interact with design elements for which you have configured any actions on the “Prototype” tab (click, hover, horizontal and/or vertical scrolling, etc.) and test animations.
Figma is great for building with responsive constraints — you can stretch your layouts and see how they will respond to changes in screen size. (If you’re new to constraints in Figma, check out this beginner primer here .)
Create custom presentations for any event with Figma Slides. Effortlessly design, customize, and share visually appealing slides to captivate your audience.
Create STUNNING Interactive Presentations!! | Figma Tutorial. Mizko. 175K subscribers. Subscribed. 1.9K. 71K views 2 years ago Figma Tutorials: The Ultimate Crash Course. ⏱ Watch next: How...
A step-by-step breakdown to achieve a rudimentary responsive design in Figma, from setting up frames to implementing variables.
In this article, we will delve into the pivotal concept of responsive design and provide you with a step-by-step tutorial on creating responsive designs using Figma. Crafting designs that cater to different devices requires a comprehensive understanding of the architectural elements within the canvas.
Whether you're a seasoned Figma user or just getting started, this video will provide you with valuable insights and practical tips. Here's what you'll learn: 🔹 How to set up and use variables in Figma for responsive design. 🔹 Practical examples of creating flexible layouts and components.
Introduction to Responsive Design. Responsive design is often overlooked but is crucial for creating user-friendly interfaces. It ensures that your designs look great on any device, from desktops to smartphones. In Figma, achieving this is made easier with constraints and layout techniques. responsive by Anima.
Creating a presentation in Figma is fairly easy. In order to create a presentation in Figma, you simply need to set up the artboards in order visually and, most importantly, in the left column since that will determine the order by which you’ll view the final presentation. How to share a presentation in Figma. figma mobile app.
Surprisingly, creating stunning presentations in Figma is pretty straightforward. This guide is going to show you how you can do it. We’ll also review the pros and cons of creating presentations in Figma.