- Is the Big Tech Boys Club Failing Women?
- Watch! Wolverine Movies in Order

How to Add a Background Picture to PowerPoint Slides
Personalize your next PowerPoint presentation with one of your photos
- Brock University
What to Know
- Design > Format Background > Picture or texture fill and select the desired image.
- Move the transparency slider to set how transparent you want the image to be.
This article explains how to use any image as the background for one or more slides in your PowerPoint presentation. Instructions apply to PowerPoint 2019, 2016, 2013, 2010, and PowerPoint for Microsoft 365.
Add and Format a Background Image
To add a picture as the background image for a PowerPoint slide:
Open the PowerPoint presentation and go to the slide where you want to add a background image. If you want to add it to all of your slides, add it to any slide.
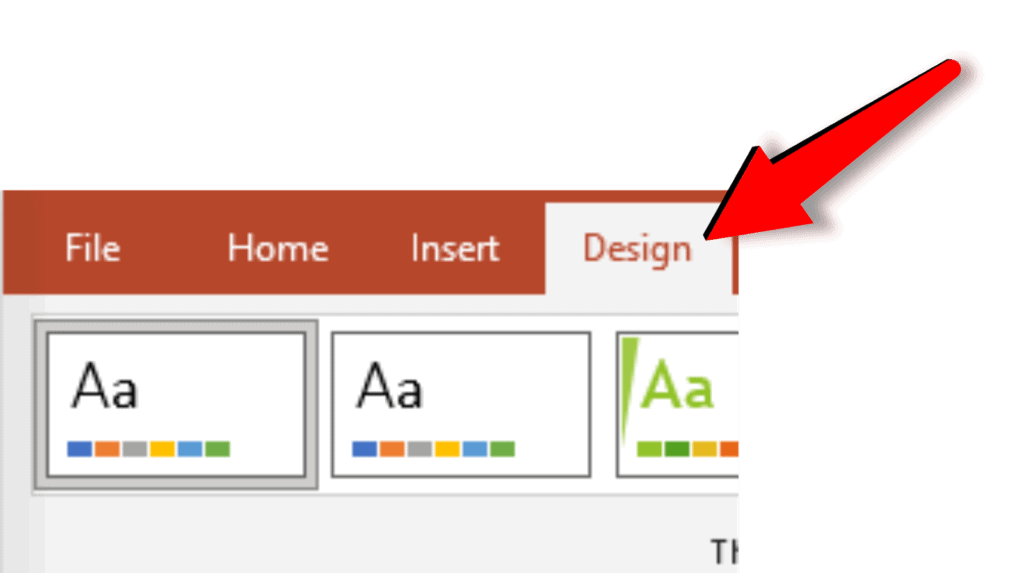
Select Design > Format Background . Or, right-click on the slide and select Format Background . The Format Background pane opens.
Select Picture or texture fill .
Select File to insert a picture from your computer or network drive, select Clipboard to insert a picture you copied, or select Online (or Clip Art in PowerPoint 2010) to search for a picture online.
Locate the picture you want to use and select Insert .
Set the transparency level for the picture using the Transparency slider.
Choose Reset Background to remove the photo so you can start over, Close to apply the picture as the background to one slide, or Apply to All to apply the picture as the background to all the slides in the presentation.
To remove the background image, open the Format Background pane and choose Solid Fill or another option.
Choose the Background Picture Carefully
By default, the picture you choose for the background of your slide is stretched to fit the slide. To avoid distortion, choose a horizontal format picture and one with high resolution .
A picture with high resolution appears crisp and clear, while a picture with low resolution appears blurry when it is enlarged and stretched to fit the slide. Stretching the picture can result in a distorted image.
Get the Latest Tech News Delivered Every Day
- How to Make a Slideshow on PowerPoint
- Slide Layouts in PowerPoint
- The 10 Most Common PowerPoint Terms
- How to Use PowerPoint Slide Master Layouts
- How to Add PowerPoint Slides Into a Word Document
- Insert a Picture Inside Text on a PowerPoint Slide
- 9 PowerPoint Presentation Tips for Students
- Tips for Memorial PowerPoint Presentations
- Copy Slides to Another PowerPoint Presentation
- How to Make a Poster in PowerPoint
- Use This PowerPoint Template for a Multiple Choice Quiz
- Grayscale and Color Picture Effect in PowerPoint
- Edit Music, Sound, or Other Audio Settings in PowerPoint
- How to Make an Image Background Transparent in PowerPoint
- How to Fix a Red 'X' Picture on a PowerPoint Slide
- How to Use Portrait and Landscape Slides in the Same Presentation
PowerPoint Backgrounds: How to Make Your Presentations Pop
A slide background is a key design element in any PowerPoint presentation – its visual impact and value should never be underestimated .
But choosing the right background can be a challenge. In this article, you will learn how to change, edit and customize the PowerPoint background to match your corporate style. Make your presentation pop with the right background!
PowerPoint backgrounds: your options
PowerPoint offers a variety of ways to customize slide backgrounds . You can choose single-color backgrounds or use your own pictures – whatever suits your needs. Here are the different PowerPoint backgrounds:
- Monochromatic backgrounds
- Color gradients
- Your own pictures
- Images from the Internet
Keep reading to learn how to apply and edit each of these backgrounds in your PowerPoint presentation.
Bring color into play
PowerPoint has a wide range of color options for presentation backgrounds. You can opt for a simple, monochrome background, or add color gradients and patterns. Make sure the slide background actually stays in the background – a presentation background that’s too colorful can quickly overwhelm your content and look unprofessional . Use colors wisely.
Set a monochromatic background
Do you want to change the default white and adjust the color to your corporate design? No problem, here’s how it’s done:
1. Select the slide where you want to add or change the background.
2. Now click on the Design tab in the tab and select Format Background from the Customize group.

3. In the Format Background panel, select Solid Color Fill . The default background will disappear.

4. Click on the arrow next to the Color button. A new window with the color palette will appear.
5. Select your color. Click More Colors… if you can’t find the color you’re looking for and to apply more nuanced shades.
6. Use the Transparency slider to change the opacity of your color. The further you move the slider to the right, the more transparent the background color becomes.
7. Your background will now be changed to the selected color.
Tip: If you want to set the same background for all the slides in your presentation, use the slide master.
- Go to View > Slide Master , which is found in the Master Views group.

2. Now select the slides with the backgrounds you want to change from the thumbnail pane on the left.
3. While still in Slide Master, click Background Styles and select Format Background… .
4. Set your desired background color.
5. To change the background for all slides, select Apply to All at the bottom of Format Background pane.
Set a color gradient
A gradient is a bit more elaborate than a monochromatic background. But don’t go overboard! The background should align with the rest of your presentation and never overwhelm your content . Set a color gradient as follows:
1. Follow steps 1 and 2 as described above for a monochrome background.
2. Now select Gradient fill .

3. Open the drop-down menu to the right of Preset gradients and select your background.
4. Now you can customize your gradient. To do this, go to Gradient Stops and select one of the sliders to make your changes.
5. The two icons to the right of the color bar allow you to add additional sliders for further customization.
6. Type allows you to specify the type of gradient from the drop-down menu, e.g., Linear , Radial , Rectangular , etc.
7. The Direction setting allows you to specify where the gradient starts and stops (e.g., Bottom Left to Top Right , Linear Down , etc.).
8. You can also adjust the Transparency and Brightness of gradient.
Insert a Pattern-Fill Background
Another option is the pattern-fill background. Here is how you add one:
1. Follow steps 1 and 2 as described for a monochromatic background.
2. Now select Pattern fill from the Format Background pane.

3. This will open a selection of pattern templates. Click the pattern you would like to insert .
4. Next, adjust the color as needed using Foreground and Background .
Using pictures for your PowerPoint background
Pictures are a fantastic way to create unique backgrounds that support your content . These pictures can be edited to fit your slides and even made transparent. This section will show you how to best use pictures as PowerPoint backgrounds.
Inserting a picture as a background
1. Right-click the slide.
2. Select Format Background from the drop-down menu.
3. Select Picture or texture fill from the Format Background pane on the right.

4. Click Insert… under Picture source ( Insert picture from in older versions) to search for the picture you want to use.
5. This will open the Insert Pictures window. You now have four sources to choose your picture from:

From a File: Click on this option to use a picture from your computer or a local network.
Stock Images: Choose this option when you’d like to select a picture from a curated collection of pictures organized into categories.
Online Pictures: Click on this to browse pictures from online sources, such as Bing, Flickr and One Drive.
From Icons: Here you will find a wide selection of Microsoft Office icons that you can use as backgrounds. Use the categories or the search bar to find the icon you want.
Tip: Edit background icons in PowerPoint
We’ll show you how to scale the size of your icon background and change its color .
Scale your icon background
1. Right-click the icon and select Format Background from the drop-down menu.
2. Now enter the percentage you want to scale the icon in Offset left/Offset right/Offset top/Offset bottom . Warning : The icon may become distorted through scaling!
Change the color of your icon background
- From the Format Background pane, click the picture icon in the top row and then select Picture Color > Recolor .
2. You’ll now see a preview of your background icon in assorted colors . Select the color you want.
Use the slide master to set a picture as the background for the entire presentation
You can also set a picture as a PowerPoint background for your entire presentation :
1. Click on the View Select Slide Master from the Master Views group.
2. Click Background Styles and select Format Background… .
3. In the Format Background pane, click Picture or text fill .
4. Select the picture you want to use for your background by clicking Insert… under Picture source .
Edit and scale picture backgrounds in PowerPoint
A customized background looks professional, sophisticated and leaves a lasting impression on your audience. Here’s how to edit your picture backgrounds:
1. Right-click on the picture background. This will open the Format Background pane.
2. Use the Offset settings (as explained in Scale your icon background ) to scale your picture.
3. Change the transparency of your picture by using the Transparency slider.
4. Click the Tile picture as texture box to insert multiple, consecutive copies of your background picture.
5. To add effects to your background , click the Effects icon next to the paint bucket icon in the top row of the Format Background pane. Double-click your background picture to open the Artistic Effects option. Click the box next to Artistic Effects to see the various effect templates you can apply to your background picture. Select the effect you want to apply to your background.
6. You can make further edits by selecting the Picture icon in the Format Background pane. Click Picture Corrections to manually change the sharpness, contrast and brightness of the image by using the sliders or specifying a percentage. Click Picture Color to adjust Color Saturation or Recolor the picture.

Add a watermark to a slide background
PowerPoint makes it easy to add a company logo or another watermark on your PowerPoint background . This is especially useful for business presentations and intellectual property rights. This is how you do it:
1. Click on View and select Slide Master in the Master Views group.
2. Select all the slide layouts that you want to add a watermark to (e.g., a logo) from the thumbnail pane on the left.
3. Right-click on the desired slide and select Format Background… to open the Format Background pane
4. From the Fill list (paint bucket icon), select Picture or texture fill .
5. Click on Insert under Image Source to select your watermark.
6. Use the Transparency slider to adjust the contrast of your watermark.
7. To add the watermark to all your slides, select Apply to All at the bottom of the pane.
8. Click Close Master View to save your changes.
Remove and hide pictures from backgrounds
Are you not happy with the PowerPoint background picture you chose and want to remove it? No problem; just follow the instructions below:
1. Go to the slide with the background picture you want to remove.
2. Click the Design tab and select Format Background .
3. Select Solid fill from the Format Background pane. Click on the arrow to the right of Color and select white .
4. Click Apply to All to remove the background picture on every slide.
5. To hide the PowerPoint background for individual slides only , go to the corresponding slide, click on Format Background in the Design tab and select Hide background graphics from the right-hand pane.
Tip: How to make effective use of backgrounds for your business
A slide background isn’t just decoration. I t can be used to support your messages and presentation goals . Here are two ways you can use a PowerPoint background more effectively.
Transparent background images: Optimize readability of texts and evoke emotions with the reveal technique
Slide design is moving further and further away from pure text. Vivid images and graphics are becoming essential for their ability to convey emotions to an audience. Combining transparent images with text is really effective . Read on to learn how to create and leverage them in your presentations. You can also find more info about transparent images here .
1. Once you’ve chosen your background picture, open the Format Background pane (see tutorials above).
2. Adjust the transparency of your background picture using the slider.
3. Now it’s time to use the Reveal effect. This is the perfect effect to highlight your information. It’s great for presenting innovations or changes, substantiating ideas and presenting outlooks. You can create the effect in three simple steps.
Step 1: Select a picture and text for your reveal
- Insert the picture as your PowerPoint background using the above tutorial.
- Now go to the Insert tab and click Text Box .

- Use the corner points to size and drag your text box.
- Enter your text.
Step 2: Cover the image with a transparent rectangle
- Go to Insert > Shapes to draw a rectangle.

- Right-click the rectangle and select Format Shape… form the drop-down menu.
- Select Fill (paint bucket icon) > Solid fill from the Format Shape pane. Choose a fill color of your choice.
- Now use the slider to set the transparency.
Step 3: Enable animation
In this step, you’ll set the reveal of both the picture and text message.
- Select the rectangle and open the Animations tab. Here you’ll find a catalogue of animations.
- Scroll down the bar and select the command More Motion Paths > Lines Curves > Arc Left . Confirm with OK .

- You’ll now see a green arrow as the start point and a red arrow as the end point of the animation on the slide.
- Drag the red end point to the desired position.
Align the background picture with the text color: Combine emotions and facts
Images that fill slides are absolutely on trend in today’s PowerPoint presentations. But images should never interfere with the readability of the text. Here are five ways to ensure your audience can read your text without compromising the picture’s emotional impact .
Option 1: Using grayscale to make colored text more legible
Grayscale pictures are particularly effective in enhancing the contrast between text and image.
- Insert your PowerPoint background picture by going to Insert > Pictures .
- Right-click the picture and select Format Picture… . From the Adjust group in the top ribbon, select Color .
- Go to Recolor and select Grayscale .

Option 2: Use light gray coloring to enhance the contrast between text and background
A background color in a light shade (light gray) helps create a great contrast between text and image.
- Insert your PowerPoint background picture.
- Right-click on the picture to open the Format Picture tab . Select Color .
- Go to Recolor and click White, Background color 2 Light .
Option 3: Use a light font on a dark picture to accentuate text
Instead of brightening your PowerPoint background image, you can darken it and use a light font. A semi-transparent rectangle works better for this than the PowerPoint picture correction options.
- Right-click the rectangle and open the Format Shape pane.
- Select Fill (paint bucket icon) and Solid color fill . Select a dark color of your choice.
- Use the slider to adjust the transparency.

Option 4: Use blurring to create a striking contrast with text
- Right-click the image and open the Picture Format tab . Go to Artistic Effects in the Adjust group. Click Blur .

Option 5: Display text messages clearly with picture transparency
- Click on the picture and switch to the Picture Format tab . Go to the Adjust group and click Transparency .
- Now select Picture Transparency Options… to open the Format Picture pane on the right.
- Adjust the transparency of the picture by moving slider under Picture Transparency .
Design Trend 2023: Dark Backgrounds on Slides
If you decide to use a coloured background, black or a darker blue are suitable colours for your slides. There are several reasons for using a dark background in your presentation. We show three of them:
#1: Dark backgrounds stand out from standard white designs and look modern, elegant and classy. Example:

#2: Black contrasts with brighter colours and can therefore make certain elements on your slides stand out. Further, the content in the foreground of your slides stands out better. Example:

#3: Especially dark blue is effective and gives a sense of security . You can use this effect and take advantage of it in keynote and executive presentations and in infographics. Examples:

When is it best not to use dark backgrounds?
Even though a dark background can look very elegant, it is important that you adjust the background colour of your slides according to the situati on, if necessary.
If you plan on conveying a lot of data and facts on your slides, it is better to use a lighter background , for example. This will make it easier for your audience to see all the data at a glance.

You will find many more inspirations for dark foil backgrounds in our references .
Add more individuality to your presentation: Design your own slide background
Are PowerPoint’s background suggestions not what you’re looking for? Do you want to customize your background? Then why not design your own slide background? You can find a variety of design tips to help you in our blog .
Use professionally designed PowerPoint background templates from PresentationLoad!
Are you looking for backgrounds that catch the eye while maintaining a professional design ? Or do you want to save time by not designing your own background but still add a professional PowerPoint background to your presentation? No problem, feel free to browse our shop .
We have, for example, these backgrounds for you:
- Plain, simple backgrounds (with or without geometric shapes)
- Business backgrounds
- World maps/globe backgrounds
- Break time backgrounds
- Theme backgrounds
- … and many more.

Conclusion: PowerPoint backgrounds: The right background makes for a successful presentation
Choose the right PowerPoint background for your PowerPoint presentation. The background is like the cherry on top of your presentation. When used strategically and chosen wisely, the PowerPoint background can support your statements and reinforce your objectives.
Always make sure to select the presentation background that complements your content. A background that doesn’t harmonize with the text can quickly appear unprofessional and poorly thought out. Fortunately, PowerPoint offers numerous design options to help you. Use these tools strategically, and nothing will stand in the way of your individual slide background!
Looking for inspiration for possible PowerPoint backgrounds or searching for professional PowerPoint background templates for your business? Feel free to explore PresentationLoad or contact us at [email protected] if you need assistance. We’re here to help!
You might also be interested in these articles:
- PowerPoint Slide Masters
- PowerPoint Animations
Share this post
- share
- save

Design Thinking: Problem Solving with a Difference

Why Corporate Mission Statements Are So Important

7 Tips & Learnings from the Apple Keynote
Need PowerPoint Backgrounds? The Best Places to Check Out [+ Freebies]
- Share on Facebook
- Share on Twitter
By Lyudmil Enchev
in Freebies , Insights
4 years ago
Viewed 9,780 times
Spread the word about this article:

Having more than 500 million users and being used for an estimated 30 million presentations per day (an amazing 350 presentations per second are started worldwide), PowerPoint , it is no exaggeration to say is a phenomenon. It’s easy to use, a staple in meetings, conferences, classrooms, and now of course for online learning, and completely accessible.
However, familiarity often breeds complacency. Now very long ago, a PowerPoint presentation on its own made a change from long-winded speeches and was enough to motivate an audience. Now, it’s so commonplace you have to think of ways to make your PowerPoint slideshow memorable, to stand out from the crowd, hold the attention, and capture the imagination and interest of an audience. It’s not easy and there are no guarantees but one quick and easy way to complement your content is using backgrounds .
You’ll be surpassed at the difference they make, and how much a little extra effort and attention to detail can succeed in making your PowerPoint presentation deliver on the day. We’ve put together this complete and comprehensive guide to PowerPoint background, taking you on a tour of sources, creation, and tips alongside practical advice.
In this article: 1. How to import backgrounds into PowerPoint? 2. Places to Find Free PowerPoint Backgrounds 2.1. Free sources 2.2. Premium sources 3. How to make a background on your own 4. Useful Tips When Using PowerPoint Backgrounds
1. How to Import Backgrounds into PowerPoint?
Once you got a background saved, you’re going to need to get it onto the PowerPoint presentation show itself. You can either apply a template to a pre-created slideshow or if this is recommended, start with the template and add to it (from scratch or copy items from your previous creation) It’s quite easy to do, so let’s look at a break down of the steps.
Let’s imagine you’ve already downloaded and saved a background image onto your computer.
Step 1: Start PowerPoint, click on File and select New. This will open a series of preinstalled PowerPoint templates and themes options. Step 2: Click on open. Step 3: Locate your saved background file, double click to open it, and there you have it.
To add an existing presentation to your new background simply copy and paste.
2. Where to Find Free PowerPoint Backgrounds?
There are many sources for free PowerPoint background and a search on the net will bring up a huge selection. You could spend time trawling through the masses, and sometimes only to find a hidden catch, but we’ve provided you with some of the best free source sites around.
2.1. Free Sources
2.1.1. freepik.

A great and plentiful resource (nearly 1 million images) for any art from vectors and photos but also including PowerPoint backgrounds and other templates. For the free downloads, and there are many to choose from, you will need to attribute the original author. There is information on what exactly is required when you click on your desired background. There are also Premium (no attribution choices). Freepik’s filters (photos, colors, style, etc.) can save you browsing time by taking you straight to the area of interest. Usefully, when you click on a choice you also get recommendations of similar backgrounds so you can expand your search.
2.1.2. Vecteezy

Another huge resource is Vecteezy, with over 1 million images, and 161,787 royalty-free vector graphics and clipart matching PowerPoint backgrounds. You can need to sign up (it’s free but not obligatory) and there are paid versions of varying price structures that offer greater choice and no attribution. If you want free source backgrounds then you’ll need to attribute the author, following the instructions given on each clip. Vecteezy will ease you through the process of choosing by using their comprehensive search filters.
2.1.3. Unsplash

Unsplash is a resource site dedicated to high-quality photographic images. It’s already enormous, with well over a million images and it is growing with photographers from all over the world contributing, so if you are looking for realistic images for your presentation background Unsplash is a great place to start. It’s completely free with no attribution necessary. It really is just a case of finding what you are looking for (filtering through a free search than a series of options) and then clicking the free download button. Save it, then copy it to your PowerPoint slideshow.
2.1.4. Pixabay

Free source website Pixabay shares nearly 2 million photos, illustrations, vector graphics, film footage, and music. Whilst there are only 13 images directly for PowerPoint background that shouldn’t limit you. There is absolutely no reason why you can’t download something without the tag and simply use it on your show. There’s no attribution required and you are free to use it for all purposes. Great filters make finding something suitable a breeze, then it a just a matter of downloading, saving, and using. You also get download pixel size options, which is useful.
2.1.5. PPTbackgrounds

For specific PowerPoint backgrounds, there is a great free site called ppt backgrounds. A fine collection of 2200 free backgrounds for all your presentation needs, suitable for any situation. You can browse categories and search through or use the search bar, so life is easy. Open the image you want, click to open, right-click, download, and save the image. A really cool feature is each image has color variations, so you can keep a theme but differentiate key slides, areas, or show progress. Click on the colors scale for the Presentation tab.
2.1.6. Free-power-point-templates

Free PowerPoint templates, tell you what it is. Over 12,000 free PowerPoint templates and a whole category on backgrounds. Each modern, trendy template gives specific information and ideas for use, which is handy. You’ve got plenty of scope for browsing and it’s all completely free with no attribution required.
Take a look at GraphicMama’s article 56 Impressive Free Presentation Backgrounds for Outstanding Presentations
2.2. Premium Resources
While it is true that there is a great free source of PowerPoint backgrounds, other templates, and other images that you can use, it must be noted that there are Premium sources that often offer you higher quality, unique options that you can use to really impress your audience.
2.2.1. GraphicMama

As a source for premium design images, Graphic Mama offers a great range of cool and stylish resources for all digital design needs. One category of design is background design bundles and background graphic makers that will help you create outstanding designs. These vector-based backgrounds are prepared on different themes: room interiors, offices, landscapes, abstract, nature, parties, Halloween, Christmas, and more. a bundled theme containing a huge number and variation of choices and styles is available from $32 and includes free updates as the bundles develop over time, so you are never behind the trend. And as they are vector illustrations you won’t lose any quality when you resize, which adds to the versatility, you can use these for printed materials, posters, etc.
Here are some bundles from GraphicMama to whet your appetite.
120 Room Backgrounds Vector Collection

120 rooms of all shapes, sizes, and colors. Using a simple and attractive cartoon style that will add context and entertainment to your presentation whilst not distracting from the content. No limit on usage, so free to do as you please, you also get further updates as and when they come on board.
- Includes 10 high-quality Free Room Interior backgrounds for you to try out.
Vector Backgrounds – Mega Bundle

An enormous bundle of over 240 widely colorful designs on different themes such as Interiors, landscapes, seasons, or even abstract patterns. Truly something for every occasion and all with bright, bold, confident designs that will make your PowerPoint presentation memorable and outstanding.
- Includes 12 high-quality Free landscape backgrounds for you to try out.
1000+ Seamless Pattern Designs Mega Bundle (15 Free Sample Patterns)

- Includes 15 high-quality Free pattern designs for you to try out.
Abstract Backgrounds – Mega Bundle Collection

The backgrounds are ideal for PowerPoint and Google Slides presentations.
2.2.2. ShutterStock.com

Another supplier of premium resources is Shutterstock, with either subscription-based options from $49 per month (10 images) or on-demand packs again from $49 – you can take the opportunity of a 30-day free trial. Shutterstock has an enormous number of stock images (326 million) and nearly 12,000 specific PowerPoint backgrounds. They have an amazingly precise filter system (color, age, ethnicity, size, categories, etc) so you are guaranteed to find something that fits your theme.
2.2.3. iStockPhoto.com

iStockPhoto sell images and illustration through a subscription or credit-based system. 3 credits are $24 or subscribe from 470 per month, (prices increase depending on the number of images per month). they have a nice range and selection of high quality despite the cost. There are the usual filters to help refine your search and there is an online editor so you can customize your images before purchase.
3. How to Make a Background on Your Own?
despite the number of ready-made options, either free or premium some people still prefer to create their background themselves. we can’t fault you for wanting to be creative, especially if you’ve got the time. So, here are some software options that allow you to get your ideas down.
3.1. Adobe Spark

Adobe design app Spark doesn’t limit itself to presentation backgrounds, allowing you to create social media posts and videos and a whole range of other design options from 12 Euros a month for individuals (first 2 months free). Ideal for creatives who need something quick and without a great deal of customization, with a series of very impressive professional templates. It’s probably better for social media posts than PowerPoint backgrounds but it could be worth checking out.
3.2. Pixteller

An image and animation maker that can be used for lots of design purposes. It is easy to use and doesn’t require a lot of technical know-how or ability, just some creative thinking. There are templates, ready-made animations, stock photos, and shapes all ready for you to bring together for your concept design. There are 2 paid options pro from $9 per month (graphics)and Diamond from $19 per month (graphics plus animation tool).

A free photo editing platform (you can upgrade to paid pro version) that also works as a design creator. Selecting on wallpaper brings uploads of wallpaper templates, it doesn’t sound so DIY yet. Here’s where you get creative, you can edit the templates with images, and texts. It gives you a base to work with and then lets you go out on your own.

Visme is a data presentation and visualization tool which aims to help transform your ideas into visually appealing presentations and infographics. The basic plan is free for individuals (up to 5 projects) and paid plans start at $14 per month. A number of high-quality presentation templates, mix and match possibilities, infographic options, and wallpaper options are perfect for creating backgrounds. Get creative using the design tools available and put together something unique and stunning.
4. Useful Tips When Using PowerPoint Backgrounds
Tip 1: modify to make your text pop.
Generally in PowerPoint Presentations, the rule of thumb is to keep text to a minimum, no full sentences, keywords only, and good organization. (don’t read out the slides, please -it’s a guaranteed turn-off). the slides support the speaker, they don’t replace the speaker. With this in mind, when you do use text, let’s make sure it is noticeable. Think of the size, font, typography, color, and style. Don’t go funky just for the sake of it. the style needs to fit with your context, fonts leave subliminal messages (strong and sturdy, trustworthy, professional, creative, imaginative, classy) think carefully about what you are trying to achieve and what message you are trying to get across.
Tip 2: Don’t use too vivid backgrounds
Everybody knows a little about color theory and colors are important. A vivid background color that overly distracts from the main content has done exactly the wrong job. A background adds to the content and works with it -it’s not a battle. A general rule is that cooler colors (blues/greens) often work well for the background, providing a setting for the main information to come alive. Vary colors by all means, but don’t go too bright or too wild, it makes people feel uncomfortable. And remember your content needs to shine through from the background and stand tall – don’t clash.
Tip 3: Think about the audience
Always think of your audience. One of the great things about PowerPoint presentations is that they can easily be customized and edited so use the chance. A great successful presentation that worked in the past is no guarantee of success the next time around. Things change, trends change, styles change and your audience changes too. Examples should be up-to-date and relevant, as should images. People are more and more familiar with presentations these days, they recognize a bog-standard PowerPoint and equally, they recognize something, that has a bit more care and attention.
Tip 4: Think about Branding
Backgrounds are ideal to transmit the idea of your brand. At the simplest level, colors and logos are a must. Consistency in slides and regularly placed branding will leave the audience with a memory imprint. Personalized photographic images where appropriate can also work well in creating a sense of realism and trust -it all goes to build that vital image connection for the listener.
Tip 5: Never forget the author’s rights
I mean – if you are using some free backgrounds, don’t forget to check out the conditions and license types. Some backgrounds need attribution and there is a specific process. Adding a final slide mentioning the authors of the images, or writing them down on the corner of the slides, not only covers you legally but it shows the audience that you are aware of the professional standards and norms to be adhered to. You are a trustworthy, honorable speaker, who is prepared to give credit where it is earned. Nice touch.
Final Words
Let’s make this point again. PowerPoint presentations are so, so common that in order to raise the stakes, we need to make a little more effort. Stand on the shoulders of the familiar presentation and push it forwards. Backgrounds aren’t so difficult but they can make an enormous difference to the overall view of your presentation. They don’t need to take you forever to create, they are a simple, easy, and often free way of creating a lasting impression.

Add some character to your visuals
Cartoon Characters, Design Bundles, Illustrations, Backgrounds and more...
Like us on Facebook
Subscribe to our newsletter
Be the first to know what’s new in the world of graphic design and illustrations.
- [email protected]
Browse High Quality Vector Graphics
E.g.: businessman, lion, girl…
Related Articles
The best free icon packs everyone must download in 2020, 12 of the best adobe illustrator alternatives [free & paid], 31 free modern powerpoint templates for your presentation, 30 free vector images on pixabay by graphicmama, character clipart: a collection for every taste & every project, 500+ free and paid powerpoint infographic templates:, enjoyed this article.
Don’t forget to share!
- Comments (0)

Lyudmil Enchev
Lyudmil is an avid movie fan which influences his passion for video editing. You will often see him making animations and video tutorials for GraphicMama. Lyudmil is also passionate for photography, video making, and writing scripts.

Thousands of vector graphics for your projects.
Hey! You made it all the way to the bottom!
Here are some other articles we think you may like:

Free Vectors
50 free business cartoon illustrations you can use in your projects.
by Al Boicheva

Free Watercolors: Backgrounds, Patterns, Objects, Logos & Мore
by Bilyana Nikolaeva

How-To Tutorials
How to use adobe character animator for free in 2022, looking for design bundles or cartoon characters.
A source of high-quality vector graphics offering a huge variety of premade character designs, graphic design bundles, Adobe Character Animator puppets, and more.
Home » Microsoft Powerpoint » How to Use an Image as a Background In PowerPoint
How to Use an Image as a Background In PowerPoint
PowerPoint offers a large collection of background images and patterns. You can select from them and insert one in your presentation.
However, if for some reason, you would like to use a different image as a background, you can easily do so. You may use any image you have downloaded in your PC or an image from the Internet.
You must be careful when selecting the image to insert. PowerPoint stretches the image to fill the slide.
Therefore, use an image with a proper aspect ratio to avoid distortions. Also, use an image with a high enough definition, as the details will stand out better.
Let us start.
Step #1: Open a presentation without a background
Click the Design tab on the top menu bar to change the ribbon.
In the section Customize, click on Format Background.

A dialog box for Format Background opens on the right side of the slide.

Step #2: Insert an image
In the Format Background dialog box, click on Picture or texture refill.
The dialog box changes to include more choices for the picture.
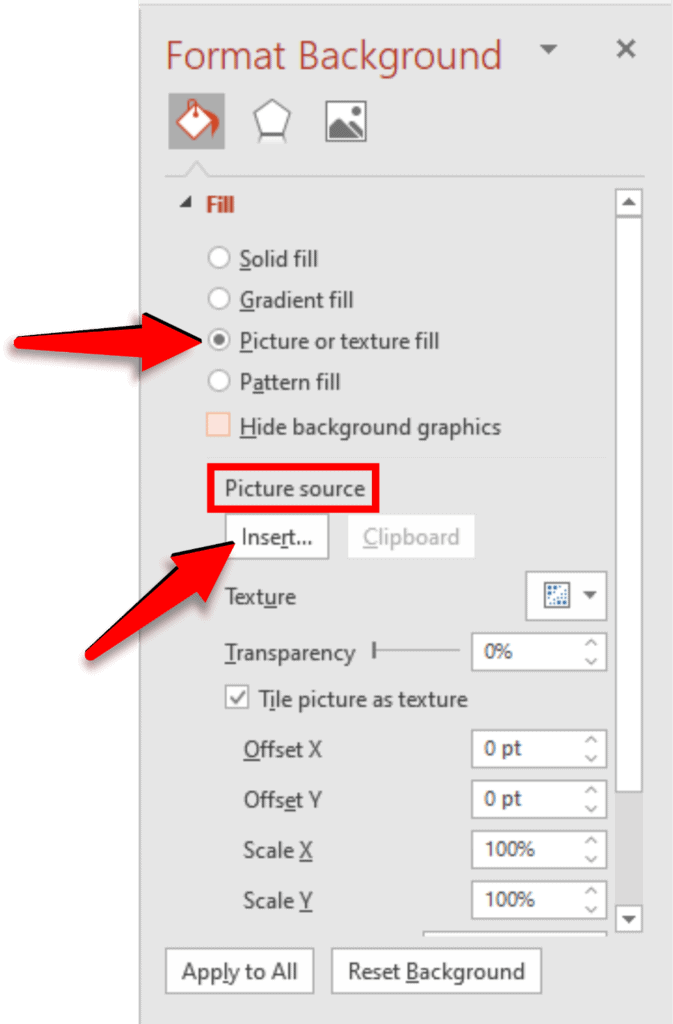
Under Picture Source, click on Insert.
PowerPoint offers three choices to select the image.

You may select your image from:
- From a File — A file on the PC
- Bing Image Search — Image search on the Internet
- OneDrive – Personal — A networked drive
Select according to your requirements. If you choose a file on the PC, the file manager will open to allow you to select an image from your collection.
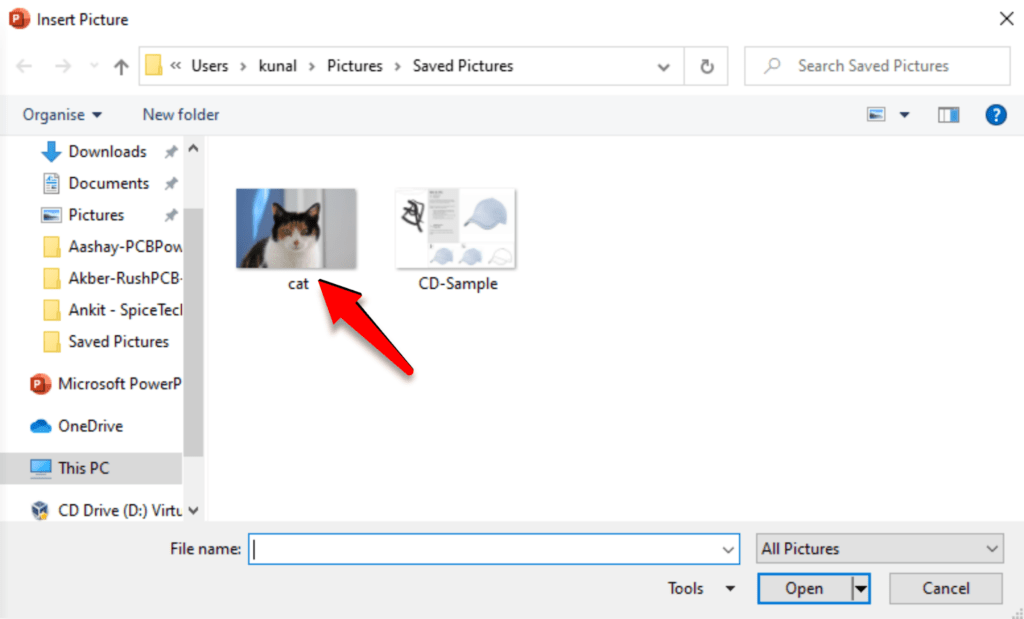
Click on the image you want to insert. PowerPoint inserts the image in your slide as a background.

Step #3: Adjust the quality of the picture
The Format Background dialog box offers many adjustments for your inserted image.
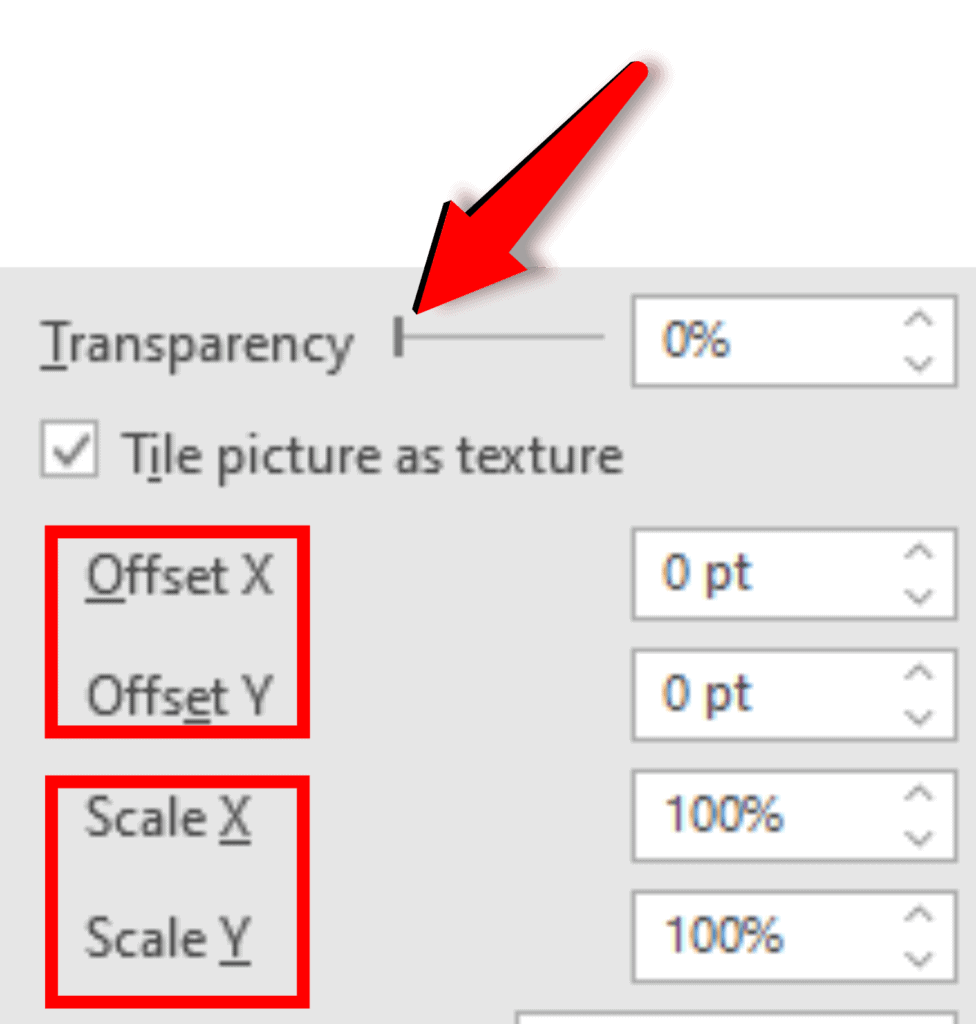
Adjust the transparency by sliding the bar to the left or right
Offset the picture in the X or Y axis in points.
Scale the picture in the X or Y axis in percentage.
Step #4: Apply to single slide or all slides
At present, the picture appears as a background for only one slide. You may want the image to appear as a background in all the slides in your presentation. Click on Apply to All at the bottom of the Format Background dialog box.

Once the result is satisfactory, close the Format Background dialog box. Click on the X at the top right-hand corner.

Follow our step-by-step instructions to use an image as a background in Powerpoint slides.
Leave a Comment Cancel reply
Save my name, email, and website in this browser for the next time I comment.
PowerPoint 101: The Ultimate Guide for Beginners

Are you struggling with PowerPoint? You need a quick design in PowerPoint but don't know where to start? Don't worry, you have nothing to be ashamed of.
In this article, we're going to refresh the most important PowerPoint basics so you can take advantage of this Microsoft software and create high-impact presentations at any time!
Millions of users worldwide use Microsoft 365 services , making PowerPoint the presentation design software with the highest market share. And with good reason! PowerPoint's features stand out for its usability and originality . We can tell you that PowerPoint is pretty intuitive software, and it's a great option to choose when working with presentations on a daily basis. So, are you ready for a quick PowerPoint 101 class?
Let ' s see what you ' re going to learn today with this PowerPoint Guide :
What is PowerPoint?
What are the best uses of powerpoint, powerpoint basics: what are the components of powerpoint workspace, mastering powerpoint: what are the main features of powerpoint, what are powerpoint templates and where to find them, time to practice how to make a presentation in powerpoint.

Microsoft PowerPoint is a presentation design software that is part of Microsoft 365 . This software allows you to design presentations by combining text, images, graphics, video, and animation on slides in a simple and intuitive way.
Over time, PowerPoint has evolved and improved its accessibility to users. For this reason, it has been adapted to the main operating systems and modalities:
- PowerPoint Online
Additionally, you can use Word and Excel in this online version. That way, you'll be able to make real-time changes in the cloud without fearing losing your files. Sounds great, right?
PowerPoint has a versatile range of uses. Here's a list of the different tasks you can complete with this presentation design software:
- Business presentations or Pitch decks.
- Marketing, Sales and HR plans.
- Project briefs and timelines.
- Inductions to new employees.
- Seminars and educational classes.
- Professional portfolio of photos or designs.
- Presentations of a research summary.
- Presentations for special occasions.
These are just a few examples of the multiple possibilities this Microsoft software offers. Your imagination is the only limit!
Stay tuned as we continue with this PowerPoint 101 Guide...

In order to deeply understand this presentation design software, you need to recognize its main components. Now it's time to learn about the PowerPoint basics!
A quick note before going any further: when opening PowerPoint, some of the commands in the ribbons will look grayish and won't be highlighted when you hover the mouse over them.
This happens since some commands need to be selected in order to function. For example, if you want to change the color of a text, you first need to select it.
That being said, let's start with this Guide for PowerPoint beginners:
PowerPoint Main Window
The first aspect to learn is PowerPoint Main Window. To facilitate the explanation, we've organized its main elements with numbers from 1 to 10:

Based on that, the main components of PowerPoint window are the following:
1. Quick Access Toolbar: allows you to customize commands to have them at hand. You only have to select it and go to "More commands."
2. Title Bar: shows you the name of your file and other "Suggested options" like Slide Master View . These options will vary depending on the use you give to the commands.
3. File Tab: you will see the Home Menu (PowerPoint backstage) by selecting it. There, you can create a new presentation, save it, print it, export it, and many other options.
4. The Ribbon: it's where PowerPoint tabs and tools are. These tools can also be called "commands" or “features.”
5. More Button or Down Arrow: these arrows allow you to view more tools or layout options in PowerPoint.
6. Slides Pane: shows your slides in thumbnail size. By right-clicking, you can access additional options for customizing each slide. Perfect for PowerPoint beginners!
7. Slide: PowerPoint's blank canvas and the frame to be seen when presenting the file.
8. Placeholders: they are dotted boxes that will store your content.
9. Status Bar: allows you to view the slide number, grammatical errors, speaker notes, and the comments on your file.
10. Zoom: allows you to enlarge or minimize your PowerPoint workspace. The range goes from 10 to 400%.
PowerPoint Tabs
The PowerPoint tabs are the control desk of your presentation . Since PowerPoint's features are too many, they're organized in tabs.
You can come and go between tabs as you need. Once you click on a tab, it will open its ribbon, and there, you'll be able to see all the tools related to that particular category.
This PowerPoint tutorial for beginners will give you an overview of all PowerPoint tabs . Pay attention to the following list:
- Transitions Tab
- Animations Tab
- Slide Show Tab
- Recording Tab
1. Home Tab
The Home tab is the most common tab of PowerPoint. This is the tab you'll probably use the most if you're designing a presentation deck from scratch.

It allows you to add new slides and change the text characteristics : font, size, boldness, underlining, alignment, etc. If you've ever used Microsoft Word, these features will be familiar to you.
Also, you will find commands to edit the characteristics of the geometric shapes you insert. This includes: fill color, line color, sharpe effects, among others.
2. Insert Tab
The Insert tab is exactly what its name says it is. In this ribbon, you'll find all the options concerning adding a new element to your PowerPoint presentation .

You can insert a picture, some geometric shapes, icons, WordArt graphics, among others. We can tell you that this tab is really helpful for PowerPoint beginners!
For example, if you have a lot of data in PowerPoint , you could add a chart or diagram to show your information in a more visual way. Also, you can embed videos or music into PowerPoint really easily.
- PowerPoint tip for beginners: To be able to write text on your slides, you need a text box. So, if you're designing your presentation from scratch, remember to go first to the Insert tab and add a text box to start writing.
3. Design Tab
If you are one of those people who enjoy choosing the design of a PowerPoint presentation, this tab will be your favorite.

The Design tab offers a wide range of premade designs , allowing you to get more polished slides. Even better, if you explore its ribbon, you can adjust the color palette and change the overall style of your PowerPoint deck.
The PowerPoint interface, as this basic PowerPoint Tutorial, is really intuitive. We believe that you won't have any problem with this tab!
4. Transitions Tab
Using transitions in PowerPoint is a dynamic way to move from one slide to the next during a presentation. This feature is PowerPoint's stamp, so don ' t miss it!

Some PowerPoint transitions are really classic, like wiping the old slide to present the new one. Others are somewhat over the top, like the “Vortex” or the “Airplane” effect.
If you click on each kind of transition, you'll see a preview on how it would look when presenting. Really cool, right?
5. Animations Tab
In case you want to add special effects for certain elements in your slides , the Animations tab in PowerPoint will interest you.

Like the Transitions tab, you will find various animation effects in this ribbon. It's a matter of trying and choosing the best one according to your needs!
6. Slide Show Tab
As its name says, the Slide Show tab is about presenting your slides . We really like that it gives you several options to show up your presentation!

Considering that you're a PowerPoint beginner, you're not likely to use the Slide Show tab very much.
But if you're curious about this command, you must read our article: How to Make a PowerPoint Slideshow that Runs Automatically?
7. Review Tab
The Review tab is not often used by PowerPoint beginners either.
However, if your job is related to writing or if you work at an international company, this tool can be extremely useful!

With this tab, you can check the slide's spelling, translate the text in real-time, and add comments to your slides . This last function can be helpful to give feedback to a colleague.
8. View Tab
This View tab allows you to change the view of your PowerPoint slides and make handouts from them, among other things.

As you can see, the majority of its commands are really specific. So you won't have any issues while designing, test and see!
In this section, our favorite command for PowerPoint beginners is Slide Master . Explore more about this tool in our guide!
9. Recording Tab
In the last versions of this design presentation software, PowerPoint added the Recording tab. As its name says, it allows you to record all your presentation slides .

This ribbon has advanced commands, so the most common action for a PowerPoint beginner is to take a screenshot or record the screen sequentially .
10. Help Tab
Finally, there is the Help tab. If you have any problem or question concerning how to use PowerPoint, you may go here to look for a solution.
In the latest versions, Windows has added a “Show Training” option. You can click this command to practice the PowerPoint basics since it will download training templates.

As a beginner in PowerPoint, you must recognize the objective of each PowerPoint tab to be able to master the software . But, in order to conduct an outstanding presentation deck, you also need to dominate its most important features. Let's see some of them in the next section!
If you feel ready to delve deeper into PowerPoint's tools, this section is for you.
As you may know , 24Slides specializes in creating outstanding presentations for any Design Project . So, we asked one of our experts about her favorite PowerPoint features, and we want to share them all with you!
Carmen Navarrete , Graphic Designer at 24Slides, highlighted the following features that will make your presentations stand out from the crowd:
PowerPoint Feature #1: Crop to Shape
This first PowerPoint feature is simple but effective!
Let's see how to use it:
- First, choose an image you want to cut and insert it into your workspace.
- Once inserted, select it with the mouse.
- Go to the "Picture Format" tab.
- Press the arrow of the "Crop" button (right side of the screen).
- Select "Crop to Shape."
- Choose your favorite shape and customize your PowerPoint presentation!

PowerPoint Feature #2: Merge Shapes
If you don't like any figure enough, you can create one from scratch!
This is possible thanks to the "Merge Shapes" option. Follow these steps to unleash your creativity:
- First choose an image you want to cut.
- Check the list of PowerPoint shapes (Insert tab > Shapes).
- Choose two or three figures you want to merge (they can be the same figure).
- Select the figures you are going to merge (see the image).
- Once selected, go to the "Shape Format" tab.
- Press the "Merge Shapes" option and the type of merge you want (test and choose!).

- A new figure will appear, and you must fill it with the image from the first step.
- Stay on the Shape Format tab and go to "Shape Fill" (button in the middle of the ribbon).
- Select "Picture Fill" and browse for your image.
- Select the image to fill your new figure, and that's it!

- PowerPoint tip for beginners: When your merged figure is ready, paste the image to the background of your slide to achieve a better result. This way, you can use your image as a canvas and see if both elements fit well.
PowerPoint Feature #3: Insert Icons
This PowerPoint feature is quite easy to follow for PowerPoint beginners!
Just follow these steps:
- Go to the Insert tab.
- Select the "Icons" option.
- A Microsoft 365 library will open, where you can search for the required icon.
- Now, you must insert it into your presentation and adapt it to your design.
- If you have an active Microsoft 365 subscription, you'll have access to a larger number of icons in PowerPoint.
- PowerPoint tip for beginners: If you want to learn more about icons in PowerPoint, read our article on How to Use Icons to Make Amazing PowerPoint Presentations .
PowerPoint Feature #4: Insert SmartArt
PowerPoint's SmartArt is one of the most popular and accessible tools to dominate while learning about PowerPoint basics.
To use it in your slide deck, you must:
- Select SmartArt.
- See all SmartArt categories and choose your favorite based on your needs.
- Add the text you have prepared and adapt it to your presentation.

We want to give you some ideas to master this SmartArt tool in PowerPoint: you can make timelines , flowcharts , and even a Venn diagram in just a few seconds. Try and see!
PowerPoint Feature #5: Remove Background
If you don't know how to use Photoshop and want to remove the background from an image, in this PowerPoint 101 Guide, we show you how:
- First choose the image you want to remove the background from.
- Insert the image in the PowerPoint workspace.
- Select the image and go to the "Picture Format" tab.
- Select "Remove Background" (first option on the left).
- You can keep and remove parts of the image with the first two tools of the ribbon (see image).
- Keep in mind that all the sections highlighted in purple will be deleted.

- We recommend zooming in to keep or remove parts of the image with more detail.
- Once you're done, press the "Keep Changes" button.
- Finally, adapt the new image to your PowerPoint presentation.

- PowerPoint tip for beginners: Choose a high-contrast photo or image for best results. In other words, the outline of the person or object you want to cut out must have clear edges and cannot blend with the image's background color.
PowerPoint Feature #6: Add Speaker Notes
The latest PowerPoint feature is a command you can use to prepare your speech before presenting to an audience.
Learning how to add speaker notes in PowerPoint is simple:
- Select the slide that needs some notes.
- Usually, there is a footer below the slide, but if not, you will have to activate it.
- Go to the View tab and select "Notes."
- The Speaker Notes section will appear, and you can add whatever you want!

- PowerPoint tip for beginners: In case you want to practice your entire presentation and have a lot of notes, go to the View tab and select "Notes Page" (fourth command). You'll be able to see all your Speaker Notes faster!
PowerPoint Feature #7: PowerPoint Translator
If you've ever wondered how to translate your PowerPoint Slides, we'll explain the step by step here:
- Go to the Review tab.
- Select the text you want to translate.
- Press the “Translate” button.
- A panel will open on the right side of the screen.
- Choose the language you need and you'll see the translation in real-time.
- If you press Insert, the text will change to the new translation!
PowerPoint Feature #8: Screen Recording
The process of recording your screen in PowerPoint is straightforward and intuitive. Let's see:
- Go to the “Record” or “Recording” tab.
- Press the "Record Slide Show" button or the “From Beginning” button (depending on your PPT version).
- A new window will open.
- Select the red record button and start recording!
- When you're done, select “Export.”
- By default, the video will be 1080p. If you want to lower the video quality, go to "Customize export."
- Name the video, save it to a folder and that's it!
As you may have noticed, this software has endless PowerPoint design options for beginners. We encourage you to try and test each functionality!
However, we're clear that PowerPoint has different features, so it can be hard to know where to start. That's why understanding PowerPoint basics is crucial if you truly want to master this software!
Our PowerPoint 101 Guide continues; stay tuned to discover more great stuff about this Microsoft software. Keep reading!
A PowerPoint template is a pre-made design that you can use for your own means, and that will save you a lot of time!
Templates in PowerPoint are a great resource for designing since all the structure is already done, and you only have to update the content . We can tell you they're the perfect resource for PowerPoint beginners!
They can be incredibly specific. For example, there are templates for a SWOT analysis or a complete Marketing report. Otherwise, templates can also be very general, with several slides with a similar design.
If you struggle with the artistic part of designing presentations, downloading PowerPoint templates will be a life changer!

How to download PowerPoint templates for free?
If you didn't know, 24Slides has an extensive repository of PowerPoint templates. But how to obtain them? It's really simple:
- First, create an account on our Free Templates Website with the button “Register” (that way, you can download everything without problems!).
- Think about the graphics you need and the ideal structure for your presentation deck (you can also change the color palette later!).
- Download it in PowerPoint format (if you prefer it in Google Slides format, you'll also find this type in our repository).
- Edit and change everything you need for your PowerPoint presentation!
24Slides Designers specialize in business and corporate PowerPoints, but you'll also find other types of templates on our website: Data templates, Timelines, Roadmaps, Matrixes, Diagrams, and more.
Keep in mind that a well-designed PowerPoint deck helps you communicate stronger messages to your audience . Don't waste this opportunity to make your presentation shine!

If you want to learn more about how to master PowerPoint, do not miss the last section. We'll show you some PowerPoint basics from the software itself!
A PowerPoint 101 Guide wouldn't be that useful with no examples. So, if you enjoy the step-by-step guides, this section is for you.
Below, we'll show you how to make a simple PowerPoint presentation. But first, here are some tips to be more efficient in the process:
- Be clear about what type of presentation you're going to create (is it corporate, playful, or more creative?).
- Make a draft with the most important information you need to add and, thus, generate a good structure in your presentation .
- Get inspired by examples on the internet , but adapt them to your needs and audience.
- If you will create a business presentation, keep in mind your brand identity .
- Make sure your PowerPoint works , you may need to update to the latest version or pay for the subscription.
Step 1: Make a draft to structure your presentation
As we said before, writing a draft or script of your content will be vital to start on the right foot as a PowerPoint beginner.
This advice is so important that we choose it as the first step to learning how to make a PowerPoint presentation. Remember: Planning is key!

Regarding the process of planning, we share some good practices:
- If your presentation will be very long , write down all subtitles and content in a Word document. This will help you organize your ideas and give a correct sequence to your narrative. In addition to avoiding redundancies in the message you want to communicate.
- If your presentation will use many visual resources , we recommend choosing high-quality images. This will help you have a starting graphic base. Some good free image repositories are Freepick , Unsplash , and Adobe Stock .
- If your presentation is based on data , have all your results summarized or your most relevant conclusions at hand. The idea of making a PowerPoint presentation is to show your information in the simplest way possible for your audience.
Step 2: Create a new document in PowerPoint
Once you check that all the functions are working fine with the software, please open it and go to the File tab. If you've ever used Word or Excel, you'll probably find this Home Menu familiar.
In short, this is the main page of PowerPoint, where you can create a new presentation or open an older one. Let's see:

In order to follow this part of our PowerPoint Tutorial correctly, take into consideration the following points:
- On the lower side of the screen, you'll find your recently opened PowerPoint files. This option is great for saving some time.
- If you don't find the presentation you're looking for, click on the “Open” option at the left bar and find older files.
- Don't forget to save your presentation with a relatable name so you won't lose sight of it!
Step 3: Choose the perfect design for your presentation
With your information ready in a draft, it's time to choose the design of your PowerPoint slide deck. You must imagine that the available design options are endless!
For practical reasons, you have three options regarding the design:
- Start a design from scratch (very difficult for a PowerPoint beginner).
- Choose an established PowerPoint design or layout.
- Download a PowerPoint template and modify some details.
Don't worry if you don't know how to continue! In this PowerPoint 101 class, we're going to explain step by step the second option:
How do you set a default design in PowerPoint?
- First, go to the Design tab.
- Open the list of options by clicking on the third arrow.
- Choose the design you like the most for your PowerPoint presentation.

If you want to explore more PowerPoint designs, there is a way to research online. For that, you only need to:
- Go to the File tab (first tab, next to the Home tab).
- Select "More themes" (see image).

- Use the search engine and write the keyword you want (it can be related to your business or it can be a color).
- Check the list of PowerPoint themes and choose your favorite.
- Wait a few minutes while it loads and keep designing in PowerPoint!

How do you change the layout of one slide in PowerPoint?
In this PowerPoint 101 Guide, you will also learn how to configure the layout of each slide.
Keep in mind that to have a high-impact presentation, you must adapt your slides' design to the type of content you'll add. And using layouts is perfect for this purpose.
To change the layout type in PowerPoint, follow these steps:
- Right-click on the slide you want to change.
- Select the "Layout" option.
- You will find more than ten layout models.
- Choose the one that best suits your content.
- Repeat these steps for each slide (if you wish or require).

How do you customize your slides in PowerPoint?
The design process in this PowerPoint 101 Guide doesn't stop there.
You also can customize your presentation's color palette , font style, background format , and graphics effects .
Just go to:
- Design tab > Variants.
- Select Colors, Fonts, Effects or Background Styles (as you need).
- If you're inspired and want to create your own background in PowerPoint, select Background Styles > Format Background.
- Finally, custom your slides as you want!

Step 4: Add all your information to your presentation
Now, it's time to add all your information to your slides. If your script is long, take your time to copy each part of it.
In this PowerPoint Tutorial, we're going to show how our design is going so far. We design at your side!

Step 5: Add transitions or animations to your presentation
The stamp of PowerPoint is its transitions and animations! Naturally, our PowerPoint 101 has considered these essential commands.
If you want to add them to your presentation and make your speech more fluid, follow these steps:
- Go to the tabs section of PowerPoint.
- Select "Transitions" or "Animations" and try your favorite effects.
- Remember that if you select Transitions, these will modify the entire slide, while Animations can be added to each element individually.
When choosing one Animation, you can eliminate it if you aren't 100% convinced. You only need to:
- Select the Animation number that appears on the corner.
- Press the "Delete" or "Backspace" button on your keyboard.
- Choose another Animation in PowerPoint if you want!

This “PowerPoint for dummies” is full of tips and tricks! So here is one more: Don't overuse transitions or animations in PowerPoint ; they can make your presentation slower and unprofessional . Use this tool in a subtle way!
Step 6: Refine the final details
As always, every final product must be reviewed. Especially if you're learning the PowerPoint fundamentals with us.
We recommend reviewing each slide of your PowerPoint presentation one final time. In this process, you will be able to:
- Add icons if your presentation requires it.
- Change any image or illustration if they don't convince you.
- Change transitions or animations.
- Customize your presentation's color palette .
- Proofread your slides' text or add more information.
- Add speaker notes to your presentation.

Step 7: Slideshow your presentation
When your presentation is finished, it's essential to know how to make a PowerPoint slideshow. This way, you can see your slides from the exact same perspective your audience will see them.
To slideshow your presentation in PowerPoint, follow these simple steps for PowerPoint beginners:
- Position yourself on your first slide.
- Go to the bottom right of the software.
- Select the "Slide Show" button (see image).
- Have a look of your presentation by clicking on each slide or pressing the right arrow on your keyboard.
- To go out from the Slide Show mode, you have to press the ESC key.

Now you can present your slides like an expert!
When you master this presentation design software, you'll be able to create amazing things in PowerPoint : infographics, diagrams, charts, pitch decks, business cards, calendars, you name it!
This was our PowerPoint Guide for beginners. We hope that our compilation today will be useful for conducting more professional presentations in the future and, why not, achieve all your goals!
Don't forget to share this PowerPoint 101 Guide with your co-workers or whoever you want!

Want to boost your beginner PowerPoint skills? Check out this content:
- How to Work with Multiple Images in PowerPoint
- How to Add a Timer to Your Powerpoint Presentations
- PowerPoint Charts, Graphs, & Tables Made Easy | Tips & Tricks
- How To Use PowerPoint Design Ideas - All Questions Answered!
- 36 Fun Icebreakers for Your Next Presentation
- The Cost of PowerPoint Presentations: Discover the hidden expenses you might overlook!
Create professional presentations online
Other people also read

Tutorial: Save your PowerPoint as a Video
How To Convert Google Slides To PowerPoint and Vice Versa

How To Add Animations To PowerPoint
- PRO Courses Guides New Tech Help Pro Expert Videos About wikiHow Pro Upgrade Sign In
- EDIT Edit this Article
- EXPLORE Tech Help Pro About Us Random Article Quizzes Request a New Article Community Dashboard This Or That Game Happiness Hub Popular Categories Arts and Entertainment Artwork Books Movies Computers and Electronics Computers Phone Skills Technology Hacks Health Men's Health Mental Health Women's Health Relationships Dating Love Relationship Issues Hobbies and Crafts Crafts Drawing Games Education & Communication Communication Skills Personal Development Studying Personal Care and Style Fashion Hair Care Personal Hygiene Youth Personal Care School Stuff Dating All Categories Arts and Entertainment Finance and Business Home and Garden Relationship Quizzes Cars & Other Vehicles Food and Entertaining Personal Care and Style Sports and Fitness Computers and Electronics Health Pets and Animals Travel Education & Communication Hobbies and Crafts Philosophy and Religion Work World Family Life Holidays and Traditions Relationships Youth
- Browse Articles
- Learn Something New
- Quizzes Hot
- Happiness Hub
- This Or That Game
- Train Your Brain
- Explore More
- Support wikiHow
- About wikiHow
- Log in / Sign up
- Computers and Electronics
- Presentation Software
- PowerPoint Presentations
Simple Steps to Make a PowerPoint Presentation
Last Updated: July 23, 2024 Fact Checked
Creating a New PowerPoint
Creating the title slide, adding a new slide, adding content to slides, adding transitions, testing and saving your presentation.
This article was co-authored by wikiHow staff writer, Darlene Antonelli, MA . Darlene Antonelli is a Technology Writer and Editor for wikiHow. Darlene has experience teaching college courses, writing technology-related articles, and working hands-on in the technology field. She earned an MA in Writing from Rowan University in 2012 and wrote her thesis on online communities and the personalities curated in such communities. This article has been fact-checked, ensuring the accuracy of any cited facts and confirming the authority of its sources. This article has been viewed 4,345,399 times. Learn more...
Do you want to have your data in a slide show? If you have Microsoft 365, you can use PowerPoint! PowerPoint is a program that's part of the Microsoft Office suite (which you have to pay for) and is available for both Windows and Mac computers. This wikiHow teaches you how to create your own Microsoft PowerPoint presentation on a computer.
How to Make a PowerPoint Presentation
- Open the PowerPoint app, select a template and theme, then like “Create.”
- Click the text box to add your title and subtitle to create your title slide.
- Click the “Insert” tab, then “New Slide” to add another slide.
- Choose the type of slide you want to add, then add text and pictures.
- Rearrange slides by dragging them up or down in the preview box.
Things You Should Know
- Templates make it easy to create vibrant presentations no matter your skill level.
- When adding photos, you can adjust their sizes by clicking and dragging in or out from their corners.
- You can add animated transitions between slides or to individual elements like bullet points and blocks of text.

- If you don't have a Microsoft Office 365 subscription, you can use the website instead of the desktop app. Go to https://powerpoint.office.com/ to use the website version.
- You can also use the mobile app to make presentations, though it's easier to do this on a computer, which has a larger screen, a mouse, and a keyboard.

- If you don't want to use a template, just click the Blank option in the upper-left side of the page and skip to the next part.

- Skip this step if your selected template has no themes available.

- If you're creating a PowerPoint presentation for which an elaborate title slide has been requested, ignore this step.

- You can change the font and size of text used from the Home tab that's in the orange ribbon at the top of the window.

- You can also just leave this box blank if you like.

- You can also click and drag in or out one of a text box's corners to shrink or enlarge the text box.

- On a Mac, you'll click the Home tab instead. [1] X Research source

- Clicking the white slide-shaped box above this option will result in a new text slide being inserted.

- Title Slide
- Title and Content
- Section Header
- Two Content
- Content with Caption
- Picture with Caption

- Naturally, the title slide should be the first slide in your presentation, meaning that it should be the top slide in the left-hand column.

- Skip this step and the next two steps if your selected slide uses a template that doesn't have text boxes in it.

- Text boxes in PowerPoint will automatically format the bulk of your text for you (e.g., adding bullet points) based on the context of the content itself.
- You can add notes that the Presentation will not include (but you'll still be able to see them on your screen) by clicking Notes at the bottom of the slide.

- You can change the font of the selected text by clicking the current font's name and then clicking your preferred font.
- If you want to change the size of the text, click the numbered drop-down box and then click a larger or smaller number based on whether you want to enlarge or shrink the text.
- You can also change the color, bolding, italicization, underlining, and so on from here.

- Photos in particular can be enlarged or shrunk by clicking and dragging out or in one of their corners.

- Remember to keep slides uncluttered and relatively free of distractions. It's best to keep the amount of text per slide to around 33 words or less. [2] X Research source

- Slide content will animate in the order in which you assign transitions. For example, if you animate a photo on the slide and then animate the title, the photo will appear before the title.
- Make your slideshow progress automatically by setting the speed of every transition to align with your speech as well as setting each slide to Advance . [3] X Trustworthy Source Microsoft Support Technical support and product information from Microsoft. Go to source

- If you need to exit the presentation, press Esc .

- Windows - Click File , click Save , double-click This PC , select a save location, enter a name for your presentation, and click Save .
- Mac - Click File , click Save As... , enter the presentation's name in the "Save As" field, select a save location by clicking the "Where" box and clicking a folder, and click Save .
Community Q&A
- If you save your PowerPoint presentation in .pps format instead of the default .ppt format, double-clicking your PowerPoint presentation file will prompt the presentation to open directly into the slideshow view. Thanks Helpful 6 Not Helpful 0
- If you don't have Microsoft Office, you can still use Apple's Keynote program or Google Slides to create a PowerPoint presentation. Thanks Helpful 0 Not Helpful 0

- Your PowerPoint presentation (or some features in it) may not open in significantly older versions of PowerPoint. Thanks Helpful 1 Not Helpful 2
- Great PowerPoint presentations avoid placing too much text on one slide. Thanks Helpful 0 Not Helpful 0
You Might Also Like

- ↑ https://onedrive.live.com/view.aspx?resid=DBDCE00C929AA5D8!252&ithint=file%2cpptx&app=PowerPoint&authkey=!AH4O9NxcbehqzIg
- ↑ https://www.virtualsalt.com/powerpoint.htm
- ↑ https://support.microsoft.com/en-us/office/set-the-timing-and-speed-of-a-transition-c3c3c66f-4cca-4821-b8b9-7de0f3f6ead1#:~:text=To%20make%20the%20slide%20advance,effect%20on%20the%20slide%20finishes .
About This Article

- Send fan mail to authors
Reader Success Stories
Artis Holland
Sep 22, 2016
Is this article up to date?
Oct 18, 2016
Jul 23, 2016
Margery Niyi
Sep 25, 2017
Jul 21, 2016

Featured Articles

Trending Articles

Watch Articles

- Terms of Use
- Privacy Policy
- Do Not Sell or Share My Info
- Not Selling Info
wikiHow Tech Help Pro:
Level up your tech skills and stay ahead of the curve
Got any suggestions?
We want to hear from you! Send us a message and help improve Slidesgo
Top searches
Trending searches

10 templates

hispanic heritage month
21 templates

indigenous canada
46 templates

49 templates

mid autumn festival
18 templates

suicide prevention
9 templates
Background Presentation templates
Take advantage of these free ppt and google slides presentation templates whose backgrounds stand out and boost the overall look of your slide decks..
- Calendar & Weather
- Infographics
- Marketing Plan
- Project Proposal
- Social Media
- Thesis Defense
- Black & White
- Craft & Notebook
- Floral & Plants
- Illustration
- Interactive & Animated
- Professional
- Instagram Post
- Instagram Stories

It seems that you like this template!
Create your presentation create personalized presentation content, writing tone, number of slides.

Register for free and start downloading now
Futuristic background.
When you need to impress everybody and stay relevant, you must look ahead and aim to be the first. Take a peek into the future with this new template Slidesgo has just designed. It’s free and perfect for techie topics or just for giving your presentation a futuristic vibe!

Aqua Marketing Plan
For those times when a marketing plan needs to cause an impact, trust this template. You'll see instantly how appealing the watercolor details are when contemplating these slides. This design can be the perfect choice if your message has to do with water or the environment!

Premium template
Unlock this template and gain unlimited access
2025 Calendar Simple Style
Download the 2025 Calendar Simple Style presentation for PowerPoint or Google Slides and start impressing your audience with a creative and original design. Slidesgo templates like this one here offer the possibility to convey a concept, idea or topic in a clear, concise and visual way, by using different graphic...

Notebook Lesson
These are the last days before the Summer break! We know that there are some pending lessons that you need to prepare for your students. As they may be thinking about their friends and their holidays, catch their attention with this cool template!

Minimalist Aesthetic Slideshow
When you combine a minimalist design with abstract shapes and a palette composed of pastel colors, you get a successful result. This template has all of the aforementioned, plus an elegant typography and some icons of plants. It's quite unique and works for any topic, so give it a try!

Team Building Class for Elementary
Your students spend most of their days at school, so building a good atmosphere in the class is vital for their happiness. Why don’t you dedicate a day to team building activities? This will help new students make friends and older students create deeper relationships with their classmates. It that...

Floral Pattern
Download the "Floral Pattern" presentation for PowerPoint or Google Slides and start impressing your audience with a creative and original design. Slidesgo templates like this one here offer the possibility to convey a concept, idea or topic in a clear, concise and visual way, by using different graphic resources. You...

Leafy Green Color Palette Company Profile
Download the "Leafy Green Color Palette Company Profile" presentation for PowerPoint or Google Slides. Presenting a comprehensive company profile can be a game-changer for your business. A well-crafted profile connects with potential clients and vendors on another level, giving them a deep understanding of your organization. This company profile template...

Eco-Friendly Minitheme
Speaking about taking care of the environment is always a good idea, and with this Eco-Friendly Minitheme you can assure that your audience knows about recycling, bio products, the problems of plastic, and the solutions to lessen the impacts of global warming. The slides have cute abstract and floral illustration...

Minimalist Business Slides
Minimalism is an art style that frees the canvas and that lets the content stand out for itself. It’s a way of conveying modernism, simplicity and elegance and can be your best ally in your next presentation. With this new design from Slidesgo, your business presentations will be as professional...

Watercolor Company Profile
Do you like watercolor painting and need to present your company profile? Combine your passion with your work with this Google Slides and PowerPoint template. The Slidesgo team has designed this presentation that looks like a canvas with all the watercolor strokes included. And not only that! All the resources...

Spring Woods
Download the "Spring Woods" presentation for PowerPoint or Google Slides and start impressing your audience with a creative and original design. Slidesgo templates like this one here offer the possibility to convey a concept, idea or topic in a clear, concise and visual way, by using different graphic resources. You...

Sunset Beach Agency Infographics
Download the Sunset Beach Agency Infographics presentation for PowerPoint or Google Slides. Your agency is set to reach new heights and milestones. Allow us to accompany you on the journey to success with this all-rounded template. No need for typical sales fluff, this template speaks its cutting-edge design loudly. Display...

Yellow Abstract Marketing Theme
Download the "Yellow Abstract Marketing Theme" presentation for PowerPoint or Google Slides and take your marketing projects to the next level. This template is the perfect ally for your advertising strategies, launch campaigns or report presentations. Customize your content with ease, highlight your ideas and captivate your audience with a...

Butterflies Campaign
Download the "Butterflies Campaign" presentation for PowerPoint or Google Slides. Improve your campaign management with this template that will definitely make a difference. It will empower you to organize, execute, and track the effectiveness of your campaign. Enriched with innovative resources, it facilitates seamless communication, meticulous planning, and provides insightful...

Mountain Backgrounds
Be creative and feel free to adapt this template to the topic you need to talk about. It will feel like a little excursion to the mountains due to the wonderful backgrounds. All the layouts are easily editable—the only limit is your imagination!

Formal Meeting
When it comes to important decisions and discussions, a formal meeting is often necessary. These meetings are typically held in a structured setting and require a certain level of decorum and respect for all participants. Do you think that they also require a well-prepared presentation? We think so, because we've...

Vintage Paper Texture Style Newsletter
Are you planning on sending a newsletter? If you’re looking for a beautiful and elegant aesthetic maybe this template is for you! The vintage paper style over a soft blue and mecanograph font look absolutely stunning! Golden texts or spots and nice leaves all over… It looks so chic and...
- Page 1 of 566
Register for free and start editing online
Unsupported browser
This site was designed for modern browsers and tested with Internet Explorer version 10 and later.
It may not look or work correctly on your browser.
- Presentations
30 PowerPoint Presentation Tips to Make Good PPT Slides in 2024 (+ 6 Expert Tips)
- Bahasa Indonesia
Here are 30 quick PowerPoint presentation tips to help you improve your presentations.

Plus, get PowerPoint tips on changing your slide design to make your content shine. We've even called on six presentation experts for their best tips.
How to Make a Good PowerPoint Presentation (Watch & Learn)
This screencast is a speed round of my very favorite PowerPoint tricks. It's a great resource to learn how to make a presentable PowerPoint. I'll walk you through ten of my favorite PowerPoint tips and tricks to create a better presentation.

Keep reading for an illustrated version of these good PPT tips (and more) that you can use to improve your PowerPoint presentations. You'll see 30 of our favorite PowerPoint presentation tips and tricks, including techniques to update slide master PowerPoint 2024 designs.
Jump to content in this section:
- How Do You Give a Memorable PPT Presentation?
- Practice Makes Perfect
- Adapt Your Presentation to the Audience
- Use a Custom Font
- Use Contrast
- Avoid Too Many Animations
- Use the Rule of Three
- Use a Custom PPT Theme Design
- Make Use of Charts and Graphs
- Use the Built-in Slide Layouts
- Align Text Consistently
- Make Your Exports User-Friendly
- Try a Different Color Scheme
- Edit Slide Masters for Consistency
- Use the Alignment Feature
- Use Stock Assets
- Reduce Your Content
- Rethink Your Slide Order
- Use PowerPoint Animations
- Invite Collaborators
- Add Supporting Video Clips
- Use Infographic Templates
- Use Impactful Closing Techniques
- Include Data in the Appendix
- Alternate Between Solid Color and White Slides
- Present Information With Maps
- Keep the Design Best Practices in Mind
- Set a Time Limit
- Test Your Content Everywhere
30 Tips: How to Make Good PowerPoint Presentation Designs Fast in 2024
A few tried and true tips can help you speed up your PowerPoint presentation design. Check out 30 of my favorite PowerPoint tips to do just that. Each of these give you PowerPoint slideshow help to create good PowerPoint slides:
1. How Do You Give a Memorable PPT Presentation?
If you're learning the top PowerPoint presentation tips and tricks, you're probably asking yourself: how do I give a presentation that won't be forgotten?
We all want to be remembered. The best PowerPoint slideshow help to make a mark on the audience. There are tried-and-true ways to do just that, and expert Neil Tomlinson shares expertise on being remembered:
Get your main point into the presentation as early as possible (this avoids any risk of audience fatigue or attention span waning), then substantiate your point with facts, figures etc and then reiterate your point at the end in a ‘Summary’.
2. Practice Makes Perfect
Also, don’t forget to practice your presentation. Go through your slide deck a few times to make sure you know it like the back of your hand when the big day arrives. Doing so helps you feel more confident. It'll reduce any anxiety and nervousness you might feel as the presentation day approaches.
What's the best way to rehears for a good PowerPoint? Here's one of the top PowerPoint presentation tips from expert presenter Sandra Zimmer :
Once slides are ready, practice one slide at a time aloud until you feel like you know it and like the flow of speech. Be willing to change anything that does not feel in flow. At the end of learning all your slides, practice the whole talk.
If you want even more great PowerPoint presentation tips and tricks, check out the following post:

3. Adapt Your Presentation to the Audience
Let's say that you're a seasoned presenter with a pretty standard set of presentation topics. Maybe you're an expert in your field, and you're asked to give a PPT presentation frequently on similar topics.
That's the value of being an expert. You might have a standard spiel that you give your audiences, and your content won't totally change from one presentation to another. That's why it helps to make only slight tweaks to adapt your presentation to each audience.
Leading presentation expert Suzannah Baum offered up this advice:
Different audiences will have different needs and different challenges, which requires me to re-sequence the slides, or create new ones. I tend to do a lot of research on my audiences – via surveys, interviews, and conversations with the hiring manager – to help me better understand what information would be most relevant to them.
How do you adapt to your audience? Here are a few more tips:
- Learn about them. If you're asked to speak, talk to the curator of the presentation to learn more about the audience and their background.
- Ask about them! With contact details, send out a survey or a response link to ask for feedback and preparation info. Ask leading questions like "what do you want to learn?"
- Consider the environment. If you're presenting via Zoom, your style will differ from presenting in person. The key is to acknowledge the difference and adapt to your environment.

Learn everything you can about your audience. Learning how to make a presentable PowerPoint is all about thinking of the recipient, not the presenter!
4. Use a Custom Font
A PowerPoint presentation tip that'll make your slideshow more interesting and more engaging is to use a custom font.
Fonts set the tone for your presentation. So, when you use a premium font, you’re opting for a high-quality font while also adding a personal or creative touch.
When choosing a font, remember that you want everyone to read your text easily.
5. Use Contrast

One PowerPoint trick is to use contrast to make some of your text stand out or make it easier to read.
If you’re putting text over an image on our PowerPoint slide, you may need to use a white box with black text in it to make your text easier to read. You can also use contrasting colors to highlight important text.
6. Avoid Too Many Animations
Another PowerPoint tip is to avoid having too many animations or transitions.
When you've got too many animations, it can be distracting to the audience. It’s not only distracting, but it's unprofessional.
It’s best to stick to one or two animations throughout your presentation. Also, if you've got any animations in your presentation, make sure to test them to see if they work before presenting.

7. Add Audio
Include audio on a slide on PowerPoint to increase audience engagement. Audio can be anything from fun sound effects to interview clips. You can even add an audio clip of your voice.
Audio gives you a break from speaking while also engaging the audience. Envato Elements has hundreds of premium audio clips if you want to add some.

8. Use the Rule of Three
One PowerPoint tip and trick is to follow the rules of PowerPoint.
One of those rules is the rule of three. It's where you start by dividing your presentation into thirds. Everything should come in thirds, so if you use bullet points, you should only have three. If you use icons, you should only have three.
When things come in threes, it's easier to remember them. For more information, read this informative article:

9. Use a Custom PPT Theme Design
Above all, consistently use custom PowerPoint themes. Microsoft has built-in themes that you can use for free, sure. But the premium themes that are on Envato Elements are a major step-up from PowerPoint's built-in themes.

When you subscribe to Envato Elements, you'll have access to unlimited downloads of all the PowerPoint themes. Right now, Envato Elements has almost 4,000 PowerPoint themes and that number is always growing. You'll learn tips for a good PowerPoint presentation by using the best templates.

10. Make Use of Charts and Graphs
Illustrate your data with the use of charts and graphs. Not only will you be able to make your presentation more visually appealing, but you'll also help your audience remember the information better.

Many PowerPoint templates already include chart and graph elements. Easily customize them to make your data and stats more interesting and easier to understand.
Want to learn more about how to use data? Turn to expert Adrienne J ohnston , a presentation professional:
When it comes to visualizing data in presentations, we have to remember that our audience does not need all the fine details of the data - they need the main takeaway and we need to make sure that's evident to them when looking at the slide.
11. Use the Built-in Slide Layouts
Inside of PowerPoint themes, you'll find layouts , which are custom slide designs.
Most themes include a selection of content layouts that you can use as a starting point for your own slide designs. You can leverage slide master PowerPoint 2024 designs with the help of layouts.

Layouts are like a starting point for your PowerPoint presentation slides. They contain combinations of placeholders for text boxes, images, and more.
Instead of clicking and drawing individual objects onto the slide, use one of these layouts to start your slide off. It's one of the top PowerPoint presentation tips and tricks to save time.
12. Align Text Consistently
When you're working with text on your slide, it helps to ensure that it aligns consistently. Keeping your text aligned in the same orientation really makes a slide look clean.
In the example below, I've basically got three text boxes:
- list of bulleted points
Notice that all this text is aligned left.

Aligning text was the " aha " moment that I learned when I started studying slide design. It's one of those steps that makes a slide look much neater and professional, so keep it in mind when designing.
13. Make Your Exports User-Friendly
No matter how great your PowerPoint presentation slides look, you need to think about how your user will use the presentation file.
Any of these are likely scenarios if you're regularly sending presentations to other users:
- The viewer may not have PowerPoint installed on their computer.
- The recipient may be using a version of PowerPoint that renders the presentation differently.
- Maybe you don't want the user to be able to make any edits or see your notes in the presentation file.

In this case, my favorite tip is to export the presentation as a PDF. To do that, go to File > Export > Create PDF , and then save your presentation as a PDF.
This is sure to help most of your users see the presentation just the way you intended.
14. Try a Different Color Scheme
Many PowerPoint themes have more than one color scheme that you can apply to your presentation. On the Design tab, click on the drop-down next to Themes to try out a different color scheme.

Typically, these will restyle your entire presentation. Premium themes that you might get from Envato Elements, for example, may have many versions inside the original presentation zip file.
15. Edit Slide Masters for Consistency
The slide master controls the design for your PowerPoint slide. Instead of making the same change to each slide, apply a change to a slide master. It'll affect all the PowerPoint presentation slides that use the same master.

It's ideal to apply a logo to the slide master itself, for example. This keeps the logo the same size and in the same position on each slide.
To do that, go to View > Slide Master. On the right side, you're likely to see a variety of slide masters that control designs for many slides. Drop the elements that you want to remain consistent onto one of the slide masters.
16. Use the Alignment Feature
PowerPoint presentation slides look better when the objects on them are in line with one another. There's a certain visual rhythm that occurs when objects line up in the center or along certain boundary lines.

When you start dragging objects on your slide, you'll see guiding lines that pop up. These are very intuitive, and you'll likely notice that they help you line up your objects. You might seem them pop up when you've got a box that's equidistant between two other objects on the slide, for example.
This is one of the best tricks for improving the look of your PowerPoint slide. Spend some time making sure that your key elements line up cohesively.
17. Use Stock Assets
Earlier, I mentioned using Envato Elements to grab PowerPoint themes. But there's more that comes with an Envato Elements subscription for presentations.
That includes a wide variety of stock photos, graphics, and custom designed fonts that you can use in your presentation. Instead of reusing the same stock photo or clip art, Envato Elements has everything you need to supplement a presentation.
Again, Envato Elements is the perfect subscription if you build presentations. It's a one-stop-shop that you can use to fill content.
18. Reduce Your Content
There's nothing that makes an audience tune out faster than being overloaded with slide content. Sometimes we try to make so many points that the audience misses all of them due to information overload.
Less is truly more. When you cut the weaker points of your presentation, the audience's attention will follow your key points accordingly.
It seems like cheating, but one of the best steps that you can take for your slide is to simply reduce the number of items that are on it. Convert some of your typed points to things you'll speak verbally.
19. Rethink Your Slide Order
Sometimes, I find that my presentations are out of order. I might spend too much time explaining my decision before I get to the conclusion.
In these cases, I like to use Slide Sorter View to re-sequence the slides in my presentation. To access this view, go to View > Slide Sorter on PowerPoint's ribbon.

From Slide Sorter view, you've got a top-down view of all the slides in your presentation deck. It sometimes becomes obvious that the slides can be reordered into a better sequence from this view.
20. Use PowerPoint Animations
One of my favorite PowerPoint presentation tips is to complement your major points with a bit of animation. Using animation can bring a key point onto your slide with style!
Check out ten of the best PowerPoint tips for how to use animation from expert Sven Lenaerts below:
21. Invite Collaborators
Building a presentation often benefits from a second set of eyes. That's why it helps so much to invite a collaborator to work with you side-by-side in Microsoft PowerPoint.
Pushing your presentation up to OneDrive and inviting collaborators is easy. Thanks to the cloud-based approach, more than one user can edit a slide deck in real time. Learn how to do that in the tutorial below:

22. Add Supporting Video Clips
Building impactful presentations is all about adding other perspectives and angles to the content. One of my favorite ways to do that is to add a video clip. Maybe that's a production that you built on your own or found on sites like YouTube.
Either way, learn how to add and auto play a video clip in the quick tip below:
23. Use Infographic Templates
More presentations than ever will feature visuals that tell stories with data. But it's easy for an audience become overwhelmed with data.
That's where infographics come into play. Learn to use them in PowerPoint in the tutorial below:
24. Use Impactful Closing Techniques
I've sat through many presentations in my life. I can only remember a few that really stick out, thanks to techniques that highlighted key points. You need PowerPoint tips and tricks that help leave your audience with an impact.
To do just that, make sure you use some of the techniques highlighted in the article below:

To do that, just drag and drop the thumbnails into the order you want. When you return to Normal view, the PowerPoint presentation slides will be in the resequenced order you set here.
25. Include Data in the Appendix
Many PowerPoint presentations include data in the form of charts and graphs. That means that you'll condense specifics into a few easy-to-follow charts.
But what if your audience wants more of the backing details? Maybe they want to validate and review the detail for themselves. In that case, a set of appendix slides with extra data is sure to help.

Appendix slides are included at the end of a presentation deck for backup purposes. You might not present them, but your audience is certain to appreciate that you included them. That helps your presentation continue to be useful even after you leave the room.
Here's a great tip from: pro presenter Graeme Thomas of Johnny F Designs:
If (my clients) are sending the deck straight to clients however, I would then put all the information on the slides but will often use more slides so that they aren't too cluttered. In cases where there is a lot of content, like financial statements, I would use appendix slides.
Including an appendix helps your audience understand data without overwhelming them with that data. Follow these tips so that you get the best of both worlds.
26. Alternate Between Solid Color and White Slides
Alternating between solid color and slides with a white background can produce an interesting visual effect and engage your audience. You can use the solid-colored slides to signify a new section in your presentation.

Not to mention, solid-colored slides are the perfect way to re-enforce your brand colors and build your brand recognition.
27. Present Information With Maps
If you’re trying to make a case for a global expansion or need to report on how other branches are performing, consider using a map to help your audience visualize the data.
There's no shortage of quality PowerPoint templates with maps built in so be sure to take advantage of them.
28. Keep the Design Best Practices in Mind
The design of your presentation matters just as much as the content of your presentation. That’s why you need to devote an equal amount of time to making sure the design of your presentation is on point as you do to the actual content.
Familiarize yourself with best design practices and keep them in mind as you go about customizing your template.
29. Set a Time Limit
How many slides is the right number for you? Well, it all depends on the time limit you set for your presentation.
Believe it or not, setting a time limit is helpful to create good PowerPoint slides. If you want to learn how to make a presentable PowerPoint, it's a must to lock in the time limit and ensure that your slides support that timeframe.
Expert presenter Stephanie Ottavan offers one of our top tips for a good PowerPoint presentation based on time limits:
A presenter is usually limited to a specific time frame and you want to adhere to that as closely as you can. If you have animations and transitions in your deck, these take added time so make sure to rehearse in “show mode” of PowerPoint or Keynote and time yourself.
Believe it or not, setting a time frame is one of the most important part of creating a PPT presentation. It helps you influence how many good PowerPoint slides you should design.
30. Test Your Content Everywhere
PowerPoint in 2024 could take place anywhere. Maybe you present, online, in-person, or beam it to mobile devices. It's important to remember that the content will appear differently on each device.
PowerPoint Online is a different medium than many other apps. Make sure that your presentation design appears the same by testing it with the help of this tutorial. It shows you how your PPT presentation appears even in a browser:

Discover Great Premium PowerPoint Templates With Google Slides (For 2024)
Creating a great presentation starts with a great template. And a great PowerPoint slide design use the best presentation practices, for example:
- Use high-quality photos and graphics to help tell the story.
- Keep text to a minimum.
- Stick to one idea per slide.
Designing a great template doesn’t mean you've got to start from scratch, though. Take a look at some of the best PowerPoint templates we've got on Envato Elements.
1. Neo PowerPoint Template

The Neo PowerPoint template features a modern and bold design and includes five color variations to get you started. Along with this, you'll also get 10 master slides and 30 individual slides for all your presentation needs.
2. Vexana PowerPoint Template

The Vexana template is a great choice for brands that need a touch of elegance. This template works with PowerPoint and Google Slides and comes with a grand total of 150 slides. It also has five color variations and includes infographic elements and photo placeholders.
3. Sprint PowerPoint Template

The Sprint PowerPoint template features a professional and modern design. The template is easy to customize. You'll find 20 masters in the standard 4:3 size, allowing you to choose the best layout for your information.
4. Travelicious PowerPoint Template

For any presentation that deals with the topic of travel, check out the Travelicious template. This template is compatible with both PowerPoint and Google Slides. It includes three premade color variations as well as 30 unique slides.
As you can see from the examples above, there's no shortage of beautiful and professional PowerPoint slide designs on Envato Elements . What’s more, Envato Elements allows you to download as many PowerPoint templates as you want. Plus, get thousands of other design assets such as fonts, photos, and icons—all for one low monthly price.
Want to see even more great PowerPoint template examples? Be sure to check out our related roundup:
Need Help? Grab Our Making Great Presentations eBook (Free)
We've got the perfect complement to this tutorial. You can find more information in our eBook on making great presentations . Download this PDF eBook now for FREE with your subscription to the Tuts+ Business Newsletter.
It'll help you master the presentation process from initial creative ideas through to writing, design, and delivering with impact.

PowerPoint Frequently Asked Questions (FAQ)
Now that you’ve read about PowerPoint tips and tricks, if you want to learn more about PowerPoint, here are some FAQs:
1. What Is a Placeholder?
Placeholders in your slide on PowerPoint help you easily add text or images to your slide without changing your design.
In a template, sometimes the placeholders have prompts such as “Click to insert a picture” or “Click to add text.” These prompts let you know what kind of placeholder it is. To learn more about placeholders, read this article:

2. How Can I Automatically Play a Video?
A PowerPoint tip is to insert an automatically played video in your presentation. When you've got a video that'll play automatically, it saves you the trouble of starting your video manually.
Videos can illustrate topics or specific points. They're also a great way to keep your audience engaged. If you want to learn how to play a video automatically, read this tutorial:
3. How Can I Add a Map to my Slide?
Another PowerPoint trick is to add a map to your slide. If you're discussing a specific location, then a map can help your audience visualize the location you're presenting. To learn how to add a map to your PowerPoint slide, read this tutorial:
4. How Do I Add a GIF to My Presentation?
Adding a GIF to your slide on PowerPoint is one way you can grab your audience's attention. To add a GIF to your slide, you’ll need to download a GIF.
Once you download it, upload it into PowerPoint and use it on your slide. For more information about how to add a GIF to your slide on PowerPoint, read this article:

5. Can I Recover My Unsaved Presentation?
Another PowerPoint trick is to learn how to recover unsaved PowerPoint files so that you can be prepared in case of an emergency. If you want to learn more, read this tutorial:
Learn More About How to Make Presentable PowerPoints
These quick PowerPoint Presentation tips are some of my favorite ways to rapidly improve a presentation. Keeping them in mind while you build a presentation can help you build a deck that you'll be confident about presenting.
Check out these tutorials to keep learning more about PowerPoint. These tutorials will give you more ideas for fixing up your PowerPoint presentation slides efficiently:

Find More Templates
Didn't see a template you like? Here are some more:

Use These PPT Presentation Tips on Your Next Presentation
Now that you've studied some of our best PowerPoint tips, it's time to put them to use. Download one of our top-notch PowerPoint themes from Envato Elements to get started. These PowerPoint presentation tips and tricks give you confidence to make you a skilled presenter.
Editorial Note : This post was first published in February of 2019. Our staff updates this post regularly — adding new, exciting PowerPoint tips and templates (with special help from Brenda Barron , Andrew Childress and Sarah Joy ).

A step-by-step guide to captivating PowerPoint presentation design
november 20, 2023
by Corporate PowerPoint Girl
Do you often find yourself stuck with a lackluster PowerPoint presentation, desperately seeking ways to make it more engaging and visually appealing? If your boss has ever told you to "please fix" a presentation and you didn't know where to start, you're not alone. In this article, we'll walk you through a straightforward method to transform your PowerPoint slides into a visually captivating masterpiece.
Let's dive right in!
Clean up your slides
The first step in this journey to presentation excellence is all about decluttering your slides and elevating their impact. Say goodbye to those uninspiring bullet points that often dominate presentations. Instead, focus on what truly matters – the key call-out numbers. By increasing the font size of these numbers, you ensure they take center stage, immediately drawing your audience's attention.
To make those numbers pop, consider breaking the text after the numbers into the next line and adding a touch of color. The contrast created by pairing a dark color with a lighter shade, like dark teal and light teal or burnt orange with peach, can work wonders. This simple adjustment makes your data more engaging , enhancing the overall impact of your presentation.
Add dimension with boxes
Now, let's introduce an element of depth and organization to your slides. By adding boxes, you'll create a visually pleasing structure that guides your audience through the content. In the "Insert" menu, select "Table" and opt for a one-by-one table. Change the table color to a light gray shade, elongate it, and position it neatly to the left of your text.
To improve readability and aesthetics, increase the spacing between text phrases. A small adjustment in the before spacing setting (setting it to 48) significantly enhances the visual appeal of your slides.
Insert circles
To further enhance the visual appeal and engagement of your slides, let's introduce circles. In the Insert menu, navigate to Shapes and choose the circle. Adjust the circle's height and width to 1.2, ensuring it complements your content seamlessly. Match the circle's shape fill color with the corresponding text color for a harmonious look.
Avoid using colored outlines for the circles, as they may distract from the overall aesthetic. This simple addition of circles adds an element of visual interest to your presentation, making it more captivating.
Choose icons
Now, it's time for a touch of creativity. Selecting icons to complement your text can elevate the clarity and appeal of your slides. In the "Insert" menu, you can search for relevant keywords to find the perfect icon from PowerPoint's extensive library .
For instance, if your text discusses investment portfolio yield, search for "growth" and choose an upward arrow growth icon. These icons add an extra layer of visual appeal and clarity to your content, making it more engaging and informative.
Final touches
To wrap up the transformation process, we come to the final touches that give your presentation a polished, professional finish. Align your icons with their corresponding circles and change the shape fill color to white. This simple adjustment creates a crisp, cohesive look that ties everything together seamlessly.
In conclusion, by following these steps, you've embarked on a journey to enhance your PowerPoint presentation . These initial steps are just the beginning of your exploration into the world of design elements and styles that can cater to your specific presentation needs. The key to a stunning PowerPoint presentation lies in the details. By following these steps, you can turn a lackluster set of slides into a visually engaging and dynamic presentation that will captivate your audience. So, the next time your boss says, "Please fix," you'll know exactly where to start. Happy presenting!
Related topics
How-To Geek
8 tips to make the best powerpoint presentations.

Your changes have been saved
Email is sent
Email has already been sent
Please verify your email address.
You’ve reached your account maximum for followed topics.
Quick Links
Table of contents, start with a goal, less is more, consider your typeface, make bullet points count, limit the use of transitions, skip text where possible, think in color, take a look from the top down, bonus: start with templates.
Slideshows are an intuitive way to share complex ideas with an audience, although they're dull and frustrating when poorly executed. Here are some tips to make your Microsoft PowerPoint presentations sing while avoiding common pitfalls.

It all starts with identifying what we're trying to achieve with the presentation. Is it informative, a showcase of data in an easy-to-understand medium? Or is it more of a pitch, something meant to persuade and convince an audience and lead them to a particular outcome?
It's here where the majority of these presentations go wrong with the inability to identify the talking points that best support our goal. Always start with a goal in mind: to entertain, to inform, or to share data in a way that's easy to understand. Use facts, figures, and images to support your conclusion while keeping structure in mind (Where are we now and where are we going?).
I've found that it's helpful to start with the ending. Once I know how to end a presentation, I know how best to get to that point. I start by identifying the takeaway---that one nugget that I want to implant before thanking everyone for their time---and I work in reverse to figure out how best to get there.
Your mileage, of course, may vary. But it's always going to be a good idea to put in the time in the beginning stages so that you aren't reworking large portions of the presentation later. And that starts with a defined goal.

A slideshow isn't supposed to include everything. It's an introduction to a topic, one that we can elaborate on with speech. Anything unnecessary is a distraction. It makes the presentation less visually appealing and less interesting, and it makes you look bad as a presenter.
This goes for text as well as images. There's nothing worse, in fact, than a series of slides where the presenter just reads them as they appear. Your audience is capable of reading, and chances are they'll be done with the slide, and browsing Reddit, long before you finish. Avoid putting the literal text on the screen, and your audience will thank you.
Related: How to Burn Your PowerPoint to DVD

Right off the bat, we're just going to come out and say that Papyrus and Comic Sans should be banned from all PowerPoint presentations, permanently. Beyond that, it's worth considering the typeface you're using and what it's saying about you, the presenter, and the presentation itself.
Consider choosing readability over aesthetics, and avoid fancy fonts that could prove to be more of a distraction than anything else. A good presentation needs two fonts: a serif and sans-serif. Use one for the headlines and one for body text, lists, and the like. Keep it simple. Veranda, Helvetica, Arial, and even Times New Roman are safe choices. Stick with the classics and it's hard to botch this one too badly.

There reaches a point where bullet points become less of a visual aid and more of a visual examination.
Bullet points should support the speaker, not overwhelm his audience. The best slides have little or no text at all, in fact. As a presenter, it's our job to talk through complex issues, but that doesn't mean that we need to highlight every talking point.
Instead, think about how you can break up large lists into three or four bullet points. Carefully consider whether you need to use more bullet points, or if you can combine multiple topics into a single point instead. And if you can't, remember that there's no one limiting the number of slides you can have in a presentation. It's always possible to break a list of 12 points down into three pages of four points each.

Animation, when used correctly, is a good idea. It breaks up slow-moving parts of a presentation and adds action to elements that require it. But it should be used judiciously.
Adding a transition that wipes left to right between every slide or that animates each bullet point in a list, for example, starts to grow taxing on those forced to endure the presentation. Viewers get bored quickly, and animations that are meant to highlight specific elements quickly become taxing.
That's not to say that you can't use animations and transitions, just that you need to pick your spots. Aim for no more than a handful of these transitions for each presentation. And use them in spots where they'll add to the demonstration, not detract from it.

Sometimes images tell a better story than text can. And as a presenter, your goal is to describe points in detail without making users do a lot of reading. In these cases, a well-designed visual, like a chart, might better convey the information you're trying to share.
The right image adds visual appeal and serves to break up longer, text-heavy sections of the presentation---but only if you're using the right images. A single high-quality image can make all the difference between a success and a dud when you're driving a specific point home.
When considering text, don't think solely in terms of bullet points and paragraphs. Tables, for example, are often unnecessary. Ask yourself whether you could present the same data in a bar or line chart instead.

Color is interesting. It evokes certain feelings and adds visual appeal to your presentation as a whole. Studies show that color also improves interest, comprehension, and retention. It should be a careful consideration, not an afterthought.
You don't have to be a graphic designer to use color well in a presentation. What I do is look for palettes I like, and then find ways to use them in the presentation. There are a number of tools for this, like Adobe Color , Coolors , and ColorHunt , just to name a few. After finding a palette you enjoy, consider how it works with the presentation you're about to give. Pastels, for example, evoke feelings of freedom and light, so they probably aren't the best choice when you're presenting quarterly earnings that missed the mark.
It's also worth mentioning that you don't need to use every color in the palette. Often, you can get by with just two or three, though you should really think through how they all work together and how readable they'll be when layered. A simple rule of thumb here is that contrast is your friend. Dark colors work well on light backgrounds, and light colors work best on dark backgrounds.

Spend some time in the Slide Sorter before you finish your presentation. By clicking the four squares at the bottom left of the presentation, you can take a look at multiple slides at once and consider how each works together. Alternatively, you can click "View" on the ribbon and select "Slide Sorter."
Are you presenting too much text at once? Move an image in. Could a series of slides benefit from a chart or summary before you move on to another point?
It's here that we have the opportunity to view the presentation from beyond the single-slide viewpoint and think in terms of how each slide fits, or if it fits at all. From this view, you can rearrange slides, add additional ones, or delete them entirely if you find that they don't advance the presentation.
The difference between a good presentation and a bad one is really all about preparation and execution. Those that respect the process and plan carefully---not only the presentation as a whole, but each slide within it---are the ones who will succeed.
This brings me to my last (half) point: When in doubt, just buy a template and use it. You can find these all over the web, though Creative Market and GraphicRiver are probably the two most popular marketplaces for this kind of thing. Not all of us are blessed with the skills needed to design and deliver an effective presentation. And while a pre-made PowerPoint template isn't going to make you a better presenter, it will ease the anxiety of creating a visually appealing slide deck.
- Microsoft Office

Basic tasks for creating a PowerPoint presentation
PowerPoint presentations work like slide shows. To convey a message or a story, you break it down into slides. Think of each slide as a blank canvas for the pictures and words that help you tell your story.
Choose a theme
When you open PowerPoint, you’ll see some built-in themes and templates . A theme is a slide design that contains matching colors, fonts, and special effects like shadows, reflections, and more.
On the File tab of the Ribbon, select New , and then choose a theme.
PowerPoint shows you a preview of the theme, with four color variations to choose from on the right side.
Click Create , or pick a color variation and then click Create .

Read more: Use or create themes in PowerPoint
Insert a new slide
On the Home tab, click the bottom half of New Slide , and pick a slide layout.

Read more: Add, rearrange, and delete slides .
Save your presentation
On the File tab, choose Save .
Pick or browse to a folder.
In the File name box, type a name for your presentation, and then choose Save .
Note: If you frequently save files to a certain folder, you can ‘pin’ the path so that it is always available (as shown below).

Tip: Save your work as you go. Press Ctrl+S often or save the file to OneDrive and let AutoSave take care of it for you.
Read more: Save your presentation file
Select a text placeholder, and begin typing.

Format your text
Select the text.
Under Drawing Tools , choose Format .

Do one of the following:
To change the color of your text, choose Text Fill , and then choose a color.
To change the outline color of your text, choose Text Outline , and then choose a color.
To apply a shadow, reflection, glow, bevel, 3-D rotation, a transform, choose Text Effects , and then choose the effect you want.
Change the fonts
Change the color of text on a slide
Add bullets or numbers to text
Format text as superscript or subscript
Add pictures
On the Insert tab, select Pictures , then do one of the following:
To insert a picture that is saved on your local drive or an internal server, choose This Device , browse for the picture, and then choose Insert .
(For Microsoft 365 subscribers) To insert a picture from our library, choose Stock Images , browse for a picture, select it and choose Insert .
To insert a picture from the web, choose Online Pictures , and use the search box to find a picture. Choose a picture, and then click Insert .

You can add shapes to illustrate your slide.
On the Insert tab, select Shapes , and then select a shape from the menu that appears.
In the slide area, click and drag to draw the shape.
Select the Format or Shape Format tab on the ribbon. Open the Shape Styles gallery to quickly add a color and style (including shading) to the selected shape.

Add speaker notes
Slides are best when you don’t cram in too much information. You can put helpful facts and notes in the speaker notes, and refer to them as you present.

Click inside the Notes pane below the slide, and begin typing your notes.

Add speaker notes to your slides
Print slides with or without speaker notes
Give your presentation
On the Slide Show tab, do one of the following:
To start the presentation at the first slide, in the Start Slide Show group, click From Beginning .

If you’re not at the first slide and want to start from where you are, click From Current Slide .
If you need to present to people who are not where you are, click Present Online to set up a presentation on the web, and then choose one of the following options:
Broadcast your PowerPoint presentation online to a remote audience
View your speaker notes as you deliver your slide show.
Get out of Slide Show view
To get out of Slide Show view at any time, on the keyboard, press Esc .
You can quickly apply a theme when you're starting a new presentation:
On the File tab, click New .
Select a theme.

Read more: Apply a design theme to your presentation
In the slide thumbnail pane on the left, select the slide that you want your new slide to follow.
On the Home tab, select the lower half of New Slide .
From the menu, select the layout that you want for your new slide.
Your new slide is inserted, and you can click inside a placeholder to begin adding content.
Learn more about slide layouts
Read more: Add, rearrange, and delete slides
PowerPoint for the web automatically saves your work to your OneDrive, in the cloud.
To change the name of the automatically saved file:
In the title bar, click the file name.
In the File Name box, enter the name you want to apply to the file.
If you want to change the cloud storage location, at the right end of the Location box, click the arrow symbol, then navigate to the folder you want, then select Move here .
On the Home tab, use the Font options:

Select from other formatting options such as Bold , Italic , Underline , Strikethrough , Subscript , and Superscript .
On the Insert tab, select Pictures .
From the menu, select where you want to insert the picture from:

Browse to the image you want, select it, then select Insert .
After the image is inserted on the slide, you can select it and drag to reposition it, and you can select and drag a corner handle to resize the image.
On the slide canvas, click and drag to draw the shape.
Select the Shape tab on the ribbon. Open the Shape Styles gallery to quickly add a color and style (including shading) to the selected shape.

A horizontal Notes pane appears at the bottom of the window, below the slide.
Click in the pane, then enter text.

On the Slide Show tab, select Play From Beginning .

To navigate through the slides, simply click the mouse or press the spacebar.
Tip: You can also use the forward and back arrow keys on your keyboard to navigate through the slide show.
Read more: Present your slide show
Stop a slide show
To get out of Slide Show view at any time, on the keyboard, press Esc.
The full-screen slide show will close, and you will be returned to the editing view of the file.
Tips for creating an effective presentation
Consider the following tips to keep your audience interested.
Minimize the number of slides
To maintain a clear message and to keep your audience attentive and interested, keep the number of slides in your presentation to a minimum.
Choose an audience-friendly font size
The audience must be able to read your slides from a distance. Generally speaking, a font size smaller than 30 might be too difficult for the audience to see.
Keep your slide text simple
You want your audience to listen to you present your information, instead of reading the screen. Use bullets or short sentences, and try to keep each item to one line.
Some projectors crop slides at the edges, so that long sentences might be cropped.
Use visuals to help express your message
Pictures, charts, graphs, and SmartArt graphics provide visual cues for your audience to remember. Add meaningful art to complement the text and messaging on your slides.
As with text, however, avoid including too many visual aids on your slide.
Make labels for charts and graphs understandable
Use only enough text to make label elements in a chart or graph comprehensible.
Apply subtle, consistent slide backgrounds
Choose an appealing, consistent template or theme that is not too eye-catching. You don't want the background or design to detract from your message.
However, you also want to provide a contrast between the background color and text color. The built-in themes in PowerPoint set the contrast between a light background with dark colored text or dark background with light colored text.
For more information about how to use themes, see Apply a theme to add color and style to your presentation .
Check the spelling and grammar
To earn and maintain the respect of your audience, always check the spelling and grammar in your presentation .
Top of Page

Need more help?
Want more options.
Explore subscription benefits, browse training courses, learn how to secure your device, and more.

Microsoft 365 subscription benefits

Microsoft 365 training

Microsoft security

Accessibility center
Communities help you ask and answer questions, give feedback, and hear from experts with rich knowledge.

Ask the Microsoft Community

Microsoft Tech Community

Windows Insiders
Microsoft 365 Insiders
Was this information helpful?
Thank you for your feedback.
- myPNW Login
- Brightspace Login
- PNW Calendar
- Scholarships
- Tuition and Fees
PNW Presentation Templates
Use our official PNW presentation template to show your pride in PowerPoint, Google Slides or other software. Share your message with built-in font styles and sizes that ensure your content is easy to read, both online and in a presentation!
Download the PNW Presentation Template
After you download the template, open it in PowerPoint or upload to Google Slides. A sample presentation will appear, which you can begin to use. Modify or delete existing slides by editing placeholders, and add new slides by using the “New Slide” button, selecting the layout of your choice.
More From Forbes
How to use virtual meetings and presentations to demonstrate that you’re a leader.
- Share to Facebook
- Share to Twitter
- Share to Linkedin
Photo credit
Let’s face it—meetings and presentations aren’t just about sharing the latest numbers or project updates. They’re prime opportunities to show off your leadership potential. Whether you’re chatting with your manager or presenting to a room full of colleagues, virtual settings can be your stage to shine. To prove you are leadership material, follow these seven tips—and have a little fun along the way.
1. Shift Your Mindset (Virtual is the New Real!)
Virtual meetings aren’t just second-rate versions of the in-person kind. They’re legitimate opportunities to show you’re capable, adaptable, and ready for a leadership role. Here’s the key: Most people don’t take virtual meetings seriously. Use that to your advantage. By treating them with the same importance as face-to-face interactions, you’re already one step ahead.
2. Master the Basics
First impressions matter—even on Zoom. Show up looking like you mean business: good lighting, an interesting background, and the appropriate wardrobe. You likely wouldn’t attend an in-person meeting in sweats, so don’t do it virtually either. Oh, and arrive on time (or better yet, early). Those precious minutes of pre-meeting chit-chat can be golden opportunities to bolster relationships with colleagues and decision-makers. Arriving late doesn’t show how busy you are; it shows a lack of respect.
3. Brand Your Presence
Don’t blend into the background. Bring your unique flair to every meeting. Whether it’s your creative solutions, a fresh perspective, or simply a witty remark, let people know who you are. Use your superpowers and highlight what sets you apart so your presence doesn’t blend into the background. Avoid corporate speak and trite jargon. And don’t be afraid to disagree—respectfully. Executive coach Deborah Grayson Riegel , who delivers a course on growing influence by delivering presentations said, “Try saying something like, ‘May I offer a different perspective here?’ or ‘I see this differently, and I’d like to share my perspective.’ Leaders are willing to share their opinions even when they differ from the consensus, if they do it without creating unnecessary drama or throwing someone else under the bus.”
4. Express Praise and Gratitude
One thing that’s been missing in the virtual world? Humanity. People forget to appreciate others, celebrate wins, or simply say thanks. Be the leader who changes that. A little gratitude goes a long way in showing that you’re humble and supportive—a winning combination for any leader-in-the-making. Send a quick “great job” message after the meeting and highlight contributions during the session. These small acts of kindness will make you stand out—and they create a ripple effect of positivity.
‘The Acolyte’ Fan Petition Shows Just How Right Disney Was To Cancel The ‘Star Wars’ Flop, After All
Meet the world’s oldest fish—presumed extinct for 60 million years, then rediscovered in a small fishing town, nyt ‘strands’ today: hints, spangram and answers for thursday, september 12th, 5. embrace feedback.
Leaders love feedback—even when it’s not glowing. All feedback, when delivered with positive intent, is valuable. The way you handle constructive criticism shows how coachable and growth-oriented you are. So, instead of cringing at feedback, think of it as a gift. Thank the person and show how you’ll use it to improve.
6. Be Perpetually Present
Okay, your part of the presentation is over. Time to tune out, right? Wrong. Leaders stay engaged until the very end. By actively listening, chiming in when needed, and showing that you’re invested in the bigger picture, you signal that you care about the collective success—not just your own piece of the puzzle. Grayson Riegel adds, “Remember that we humans have a reciprocity bias, where others are likely to do for (or to) us what we’ve done for (or to) them. So if you don’t want others dropping off while you’re presenting, stay engaged for their part of the meeting as well.”
7. Present Powerfully
Delivering a presentation is your best opportunity to show that you’re a leader. Instead of droning on with a 50-slide PowerPoint, inject some life into your pitch. Deliver on the three Ms of virtual presentations : Be Magnetic (start strong), Be Mesmerizing (make it interactive, use visuals and stories), Be Memorable (use repetition, emotion, and novelty). As Maya Angelou said, "People will forget what you said, they’ll forget what you did, but they’ll never forget how you made them feel."
By embodying these behaviors and strategies during meetings and presentations, you position yourself as a leader who is not only capable but also inspirational. These moments are your chance to demonstrate your expertise, your ability to work as part of a team, and your potential to drive your organization forward. So, don’t just sit back—take charge, have fun, and let your leadership shine!
As a pioneer in personal branding and expert in virtual communication, William Arruda empowers professionals to shine online. Get his free Guide : 9 Fun and Easy Ways to Rev Up Your Online Meetings and Presentations.

- Editorial Standards
- Reprints & Permissions
Join The Conversation
One Community. Many Voices. Create a free account to share your thoughts.
Forbes Community Guidelines
Our community is about connecting people through open and thoughtful conversations. We want our readers to share their views and exchange ideas and facts in a safe space.
In order to do so, please follow the posting rules in our site's Terms of Service. We've summarized some of those key rules below. Simply put, keep it civil.
Your post will be rejected if we notice that it seems to contain:
- False or intentionally out-of-context or misleading information
- Insults, profanity, incoherent, obscene or inflammatory language or threats of any kind
- Attacks on the identity of other commenters or the article's author
- Content that otherwise violates our site's terms.
User accounts will be blocked if we notice or believe that users are engaged in:
- Continuous attempts to re-post comments that have been previously moderated/rejected
- Racist, sexist, homophobic or other discriminatory comments
- Attempts or tactics that put the site security at risk
- Actions that otherwise violate our site's terms.
So, how can you be a power user?
- Stay on topic and share your insights
- Feel free to be clear and thoughtful to get your point across
- ‘Like’ or ‘Dislike’ to show your point of view.
- Protect your community.
- Use the report tool to alert us when someone breaks the rules.
Thanks for reading our community guidelines. Please read the full list of posting rules found in our site's Terms of Service.
IMAGES
VIDEO
COMMENTS
Insert a background picture on a slide. Right-click the margin of the slide and then select Format Background. In the Format Background pane, choose Picture or texture fill. (This option is unavailable if you haven't Copied a picture.) To adjust the picture's relative lightness, slide the Transparency bar to the right.
How to add a background in PowerPoint - the right-click method. Method 2 - the Design tab option. To access this option, go to the Design tab on the ribbon. On the far right side, you will see the Format Background option. Clicking it will open the Format Background pane on the right side of your screen.
Once your slides are selected, in PowerPoint's ribbon at the top, click the "Design" tab. On the "Design" tab, from the "Customize" section, select "Format Background." To the right of PowerPoint's interface, you will see a "Format Background" pane. Here, in the "Fill" section, you will select a custom background for your slides.
Format the slide background with color. On the ribbon, select the Design tab. At the far-right end, select Format Background. The Format Background pane opens on the right side of the window. Under Fill, select Solid fill, Gradient fill, or Pattern fill. Select a color and other accompanying options, as applicable.
Select Design > Format Background. Right-click the margin of slide and select Format Background. In the Format Background pane, select Picture or texture fill. Select File. In the Insert Picture dialog box, choose the picture you want to use and then select Insert. Note: PowerPoint resizes the image to fill the entire slide background.
When you're ready, open the PowerPoint presentation that you would like to add a background image to. Once open, head over to the "Design" tab. In the "Customize" group, select the "Format Background" button. The "Format Background" pane will appear on the right-hand side of the window. Here, select "Picture Or Texture Fill ...
Changing the Background in PowerPoint. Select the slide you want to change and click the Design tab. Click Format Background and click Fill. You can change the background to Solid, Gradient, Picture or Texture or Pattern. To apply the background to all slides, click Apply to All. Method 1.
A background is the color, gradient or picture behind your slide's content. By customizing it, you can add a unique look that reflects your topic or personal...
Add and Format a Background Image. To add a picture as the background image for a PowerPoint slide: Open the PowerPoint presentation and go to the slide where you want to add a background image. If you want to add it to all of your slides, add it to any slide. Select Design > Format Background. Or, right-click on the slide and select Format ...
4. Click on the arrow next to the Color button. A new window with the color palette will appear. 5. Select your color. Click More Colors… if you can't find the color you're looking for and to apply more nuanced shades.. 6. Use the Transparency slider to change the opacity of your color. The further you move the slider to the right, the more transparent the background color becomes.
This Microsoft PowerPoint 2016 tutorials shows you how to use a picture as a background on your presentation slides. You can add an online image or pictures ...
Open the image you want, click to open, right-click, download, and save the image. A really cool feature is each image has color variations, so you can keep a theme but differentiate key slides, areas, or show progress. Click on the colors scale for the Presentation tab. 2.1.6. Free-power-point-templates
Step #1: Open a presentation without a background. Click the Design tab on the top menu bar to change the ribbon. In the section Customize, click on Format Background. A dialog box for Format Background opens on the right side of the slide. Step #2: Insert an image. In the Format Background dialog box, click on Picture or texture refill.
Microsoft PowerPoint is a presentation design software that is part of Microsoft 365. This software allows you to design presentations by combining text, images, graphics, video, and animation on slides in a simple and intuitive way. Over time, PowerPoint has evolved and improved its accessibility to users.
Editing PowerPoint slides to make them look uniform can take a lot of time, especially for a large presentation. If you want all of your slides to have the same background, the following tutorial will help you accomplish this in just a few clicks, saving you a lot of editing time. 1. Launch PowerPoint, and […]
Learn how to create personalized backgrounds with your own photographs. By using transparent boxes you can "fade out" the photograph to form a new slide back...
Open the PowerPoint app, select a template and theme, then like "Create.". Click the text box to add your title and subtitle to create your title slide. Click the "Insert" tab, then "New Slide" to add another slide. Choose the type of slide you want to add, then add text and pictures. Rearrange slides by dragging them up or down in ...
Download the "Floral Pattern" presentation for PowerPoint or Google Slides and start impressing your audience with a creative and original design. Slidesgo templates like this one here offer the possibility to convey a concept, idea or topic in a clear, concise and visual way, by using different graphic resources. You...
Click File > New. To browse a wide range of templates with backgrounds, search for "Backgrounds." For the background images shown above and more, search for the template called "Backgrounds for PowerPoint slides." For backgrounds specific to a theme, search on a keyword, such as "mountains." Click a template thumbnail, preview the slides by ...
Use a Custom Font. A PowerPoint presentation tip that'll make your slideshow more interesting and more engaging is to use a custom font. Fonts set the tone for your presentation. So, when you use a premium font, you're opting for a high-quality font while also adding a personal or creative touch.
In the "Insert" menu, select "Table" and opt for a one-by-one table. Change the table color to a light gray shade, elongate it, and position it neatly to the left of your text. To improve readability and aesthetics, increase the spacing between text phrases. A small adjustment in the before spacing setting (setting it to 48) significantly ...
Make Bullet Points Count. Limit the Use of Transitions. Skip Text Where Possible. Think in Color. Take a Look From the Top Down. Bonus: Start With Templates. Slideshows are an intuitive way to share complex ideas with an audience, although they're dull and frustrating when poorly executed.
Select the text. Under Drawing Tools, choose Format. Do one of the following: To change the color of your text, choose Text Fill, and then choose a color. To change the outline color of your text, choose Text Outline, and then choose a color. To apply a shadow, reflection, glow, bevel, 3-D rotation, a transform, choose Text Effects, and then ...
Download the PNW Presentation Template. After you download the template, open it in PowerPoint or upload to Google Slides. A sample presentation will appear, which you can begin to use. Modify or delete existing slides by editing placeholders, and add new slides by using the "New Slide" button, selecting the layout of your choice.
Engage the Audience: Make It a Conversation, Not a Lecture. No one wants to sit through a dull monologue. I always make sure to turn my talks into a conversation by asking open-ended questions and ...
2. Master the Basics. First impressions matter—even on Zoom. Show up looking like you mean business: good lighting, an interesting background, and the appropriate wardrobe.