- PRO Courses Guides New Tech Help Pro Expert Videos About wikiHow Pro Upgrade Sign In
- EXPLORE Tech Help Pro About Us Random Article Quizzes Request a New Article Community Dashboard This Or That Game Happiness Hub Popular Categories Arts and Entertainment Artwork Books Movies Computers and Electronics Computers Phone Skills Technology Hacks Health Men's Health Mental Health Women's Health Relationships Dating Love Relationship Issues Hobbies and Crafts Crafts Drawing Games Education & Communication Communication Skills Personal Development Studying Personal Care and Style Fashion Hair Care Personal Hygiene Youth Personal Care School Stuff Dating All Categories Arts and Entertainment Finance and Business Home and Garden Relationship Quizzes Cars & Other Vehicles Food and Entertaining Personal Care and Style Sports and Fitness Computers and Electronics Health Pets and Animals Travel Education & Communication Hobbies and Crafts Philosophy and Religion Work World Family Life Holidays and Traditions Relationships Youth
- Browse Articles
- Learn Something New
- Quizzes Hot
- Happiness Hub
- This Or That Game
- Train Your Brain
- Explore More
- Support wikiHow
- About wikiHow
- Log in / Sign up
- Computers and Electronics
- Presentation Software
- PowerPoint Presentations

How to Save a PowerPoint Presentation
Last Updated: May 26, 2022
wikiHow is a “wiki,” similar to Wikipedia, which means that many of our articles are co-written by multiple authors. To create this article, volunteer authors worked to edit and improve it over time. This article has been viewed 53,336 times. Learn more...
A PowerPoint presentation is an excellent way of presenting information or ideas to an audience. The software is easy to use and offers a lot of cool effects for your slideshows, too. But, what's all the use of this if you don't even know how to save your finished PowerPoint? This wikiHow will teach you how to save your file.
Design your PowerPoint presentation.

- You don't have to wait until you're totally finished to save your work. It can help to save along the way, too, to ensure you don't lose any progress.
Open the File menu when you're ready to save.

Choose the Save or Save As option.

Decide where to save the presentation.

Name and save your presentation.

Expert Q&A
You might also like.

About This Article
- Send fan mail to authors
Is this article up to date?

Featured Articles

Trending Articles

Watch Articles

- Terms of Use
- Privacy Policy
- Do Not Sell or Share My Info
- Not Selling Info
wikiHow Tech Help Pro:
Level up your tech skills and stay ahead of the curve

- Get started with computers
- Learn Microsoft Office
- Apply for a job
- Improve my work skills
- Design nice-looking docs
- Getting Started
- Smartphones & Tablets
- Typing Tutorial
- Online Learning
- Basic Internet Skills
- Online Safety
- Social Media
- Zoom Basics
- Google Docs
- Google Sheets
- Career Planning
- Resume Writing
- Cover Letters
- Job Search and Networking
- Business Communication
- Entrepreneurship 101
- Careers without College
- Job Hunt for Today
- 3D Printing
- Freelancing 101
- Personal Finance
- Sharing Economy
- Decision-Making
- Graphic Design
- Photography
- Image Editing
- Learning WordPress
- Language Learning
- Critical Thinking
- For Educators
- Translations
- Staff Picks
- English expand_more expand_less
PowerPoint - Saving Presentations
Powerpoint -, saving presentations, powerpoint saving presentations.

PowerPoint: Saving Presentations
Lesson 4: saving presentations.
/en/powerpoint/creating-and-opening-presentations/content/
Introduction
Whenever you create a new presentation in PowerPoint, you'll need to know how to save in order to access and edit it later. As with previous versions of PowerPoint, you can save files to your computer . If you prefer, you can also save files to the cloud using OneDrive . You can even export and share presentations directly from PowerPoint.
Watch the video below to learn more about saving and sharing PowerPoint presentations.
Save and Save As
PowerPoint offers two ways to save a file: Save and Save As . These options work in similar ways, with a few important differences.
- Save : When you create or edit a presentation, you'll use the Save command to save your changes. You'll use this command most of the time. When you save a file, you'll only need to choose a file name and location the first time. After that, you can just click the Save command to save it with the same name and location.
- Save As : You'll use this command to create a copy of a presentation while keeping the original. When you use Save As, you'll need to choose a different name and/or location for the copied version.
About OneDrive
Most features in Microsoft Office, including PowerPoint, are geared toward saving and sharing documents online . This is done with OneDrive , which is an online storage space for your documents and files. If you want to use OneDrive, make sure you’re signed in to PowerPoint with your Microsoft account. Review our lesson on Understanding OneDrive to learn more.
To save a presentation:
It's important to save your presentation whenever you start a new project or make changes to an existing one. Saving early and often can prevent your work from being lost. You'll also need to pay close attention to where you save the presentation so it will be easy to find later.

- If you're saving the file for the first time, the Save As pane will appear in Backstage view .

- The Save As dialog box will appear. Select the location where you want to save the presentation.

- The presentation will be saved . You can click the Save command again to save your changes as you modify the presentation.
You can also access the Save command by pressing Ctrl+S on your keyboard.
Using Save As to make a copy
If you want to save a different version of a presentation while keeping the original, you can create a copy . For example, if you have a file named Client Presentation you could save it as Client Presentation 2 so you'll be able to edit the new file and still refer back to the original version.
To do this, you'll click the Save As command in Backstage view. Just like when saving a file for the first time, you'll need to choose where to save the file and give it a new file name .

To change the default save location:
If you don't want to use OneDrive , you may be frustrated that OneDrive is selected as the default location when saving. If you find this inconvenient, you can change the default save location so This PC is selected by default.

Using AutoRecover
PowerPoint automatically saves your presentations to a temporary folder while you are working on them. If you forget to save your changes or if PowerPoint crashes, you can restore the file using AutoRecover .
To use AutoRecover:
- Open PowerPoint. If autosaved versions of a file are found, the Document Recovery pane will appear.

By default, PowerPoint autosaves every 10 minutes. If you are editing a presentation for less than 10 minutes, PowerPoint may not create an autosaved version.
If you don't see the file you need, you can browse all autosaved files from Backstage view . Just select the File tab, click Manage Presentation , then choose Recover Unsaved Presentations .

Exporting presentations
By default, PowerPoint presentations are saved in the .pptx file type. However, there may be times when you need to use another file type , such as a PDF or PowerPoint 97-2003 presentation . It's easy to export your presentation from PowerPoint to a variety of file types.
- PDF : This saves the presentation as a PDF document instead of a PowerPoint file.
- Video : This saves the presentation as a video.
- Package for CD : This saves the presentation in a folder along with the Microsoft PowerPoint Viewer, a special slide show player anyone can download.
- Handouts : This prints a handout version of your slides.
- Other file type : This saves in other file types, including PNG and PowerPoint 97-2003 .
To export a presentation:
In our example, we'll save the presentation as a PowerPoint 97-2003 file.
- Click the File tab to access Backstage view .

You can also use the Save as type drop-down menu in the Save As dialog box to save presentations in a variety of file types. Be careful to choose a file type others will be able to open.

Sharing presentations
PowerPoint makes it easy to share and collaborate on presentations using OneDrive . In the past, if you wanted to share a file with someone you could send it as an email attachment. While convenient, this system also creates multiple versions of the same file, which can be difficult to organize.
When you share a presentation from PowerPoint, you're actually giving others access to the exact same file . This lets you and the people you share with edit the same presentation without having to keep track of multiple versions.
In order to share a presentation, it must first be saved to your OneDrive .
To share a presentation:

- Open our practice presentation .
- Use Save As to create a copy of the presentation. Name the new copy Saving Challenge Practice . You can save it to a folder on your computer or to your OneDrive .
- Export the presentation as a PDF file.
/en/powerpoint/slide-basics/content/
How To Save Presentation In PowerPoint
Have you ever spent hours working on a presentation only to lose it due to a technical glitch? Or struggled to collaborate with others because you couldn’t easily share your work?
We will explore the importance of saving presentations, how to save Presentations in PowerPoint, best practices for saving, and troubleshooting common saving issues.
Key Takeaways:
Why is saving presentations important.
Saving presentations in PowerPoint is crucial for safeguarding your work and ensuring that your valuable content is securely stored.
By saving your presentations, you create a protective barrier against unexpected crashes or technical glitches that could lead to data loss, which can be devastating when hours of work are at stake.
Regularly saving your files ensures that your content remains accessible whenever you need it, minimizing disruptions to your workflow.
Prevents Losing Work
By saving work on platforms like OneDrive, users can rest assured knowing that their data is constantly being backed up and protected from unexpected crashes or system failures. This not only saves time but also ensures that hours of effort are not lost due to technical issues. Leveraging the autosave functionality removes the burden of manually saving documents frequently, allowing individuals to focus more on their creative process.
Allows for Easy Sharing and Collaboration
Cloud services such as Google Drive, Dropbox, or Microsoft OneDrive provide a convenient platform for storing and accessing presentations from anywhere, fostering improved teamwork and real-time edits. Exporting presentations to these cloud platforms ensures that team members can access the most updated version, reducing confusion caused by multiple document versions. The Backstage view not only simplifies the process of sharing by offering quick access to sharing options but also enhances collaboration by allowing users to manage permissions and track changes easily.
Enables Revisions and Updates
Saving presentations allows for seamless revisions and updates, providing options to adjust file types and enhance visual quality by choosing resolutions like Full HD , Ultra HD , HD , or Standard .
Leveraging these tools enables users to create professional-looking slides with captivating graphics, interactive charts, and polished text. By adjusting resolution settings and file formats accordingly, one can ensure compatibility across various devices and maintain a high level of clarity and detail.
How to Save a Presentation in PowerPoint
When updating an existing presentation, click on ‘File’ again and then ‘Open’. Locate the file you wish to update, make the necessary changes, and remember to save the modifications before closing.
Saving a New Presentation
By establishing a saving routine , you can safeguard against unexpected software glitches or power outages that may lead to losing unsaved changes. This practice not only protects your hard work but also allows for seamless workflow management, enabling you to pick up where you left off without any setbacks. Remember to use clear and descriptive file names when saving your presentation, making it easier to locate specific versions or updates when needed. Consistently saving your presentation throughout the creation process is a smart habit that all PowerPoint users should adopt.
Saving an Existing Presentation
When working on an existing presentation in PowerPoint, make sure to save your changes periodically and utilize autosave features to maintain the latest version of your document.
Choosing the File Format
Selecting the appropriate file format for your PowerPoint presentation is crucial for optimizing compatibility and ensuring that embedded videos are displayed correctly.
MP4 is a versatile format widely accepted across platforms and devices, ensuring seamless playback. Adjusting video settings like resolution and frames per second can further enhance the quality of embedded videos. Choosing the right video settings can significantly impact the clarity and smoothness of video playback , making your presentation more engaging and professional. Understanding the needs of your audience and the platform where the presentation will be delivered is key to selecting the optimal file format and video settings.
Best Practices for Saving Presentations
Implementing best practices for saving presentations in PowerPoint can streamline your workflow and enhance data management through frequent saves, descriptive file naming, and cloud storage utilization.
Leveraging cloud storage solutions like Google Drive or Dropbox for backing up your presentations provides added security and accessibility. Storing your files in the cloud not only protects them from potential hardware failures but also allows you to access and edit your presentations from any device, anytime, anywhere.
This simple habit also aids collaboration, as having a detailed version history helps streamline feedback and revisions, making the editing process more efficient. Remember, a small effort in saving can save you from potential frustration and setbacks in the long run.
Use Descriptive File Names
Consider using cloud storage.
Leveraging cloud storage services for your PowerPoint presentations offers the advantage of secure backups, seamless access from multiple devices, and collaborative editing capabilities.
Troubleshooting Common Saving Issues
Addressing common saving issues in PowerPoint can help users overcome challenges related to file size limitations, error messages during saving, and compatibility issues with different software versions.
Unable to Save Due to File Size
Encountering difficulties in saving PowerPoint presentations due to file size constraints can be addressed by optimizing content, compressing media elements, or utilizing alternative storage solutions.
For those working with exceptionally large files, utilizing external storage options like cloud services or external hard drives can provide ample space to store data without overloading the local system.
Error Messages When Saving
Another prevalent error that users encounter is ‘PowerPoint cannot save files .’ This may be due to inadequate disk space or file permissions. It’s recommended to check the available disk space on the device and ensure that you have sufficient permissions to save files in the chosen location.
Compatibility Issues with Different Versions of PowerPoint
Verifying file format compatibility is crucial when sharing presentations across different versions. It is recommended to save files in commonly supported formats such as .pptx or .pdf to maximize compatibility. Utilizing cloud storage or online platforms for sharing presentations can also help mitigate compatibility concerns, as these platforms often offer seamless compatibility across various PowerPoint versions.

Frequently Asked Questions
1. how do i save a presentation in powerpoint, 2. can i save my presentation as a different file type, 3. how can i ensure my presentation is saved with the correct formatting.
To ensure your presentation is saved with the correct formatting, it is recommended to save your presentation frequently while working on it. This will prevent any potential formatting errors from occurring. Additionally, you can use the “Save As” option to create a backup of your presentation in case any formatting changes are made unintentionally.
4. Is there an option to automatically save my presentation in PowerPoint?
5. can i save my presentation in powerpoint online, 6. how do i access my saved presentations in powerpoint.
To access your saved presentations in PowerPoint, open the program and click on the “Open” tab in the top left corner. This will show a list of recent presentations, as well as the option to browse for presentations saved in a specific location. You can also click on the “File” tab and select “Open” to access your saved presentations.
Similar Posts
How to add picture in powerpoint from google, how to present in powerpoint without showing notes, how to calculate in powerpoint, how to change the start setting to after previous in powerpoint, how to change hyperlink color in powerpoint, how to add underline animation in powerpoint.
Critical PowerPoint Shortcuts – Claim Your FREE Training Module and Get Your Time Back!
How to Make a PowerPoint Presentation (Step-by-Step)
- PowerPoint Tutorials
- Presentation Design
- January 22, 2024
In this beginner’s guide, you will learn step-by-step how to make a PowerPoint presentation from scratch.
While PowerPoint is designed to be intuitive and accessible, it can be overwhelming if you’ve never gotten any training on it before. As you progress through this guide, you’ll will learn how to move from blank slides to PowerPoint slides that look like these.

Table of Contents
Additionally, as you create your presentation, you’ll also learn tricks for working more efficiently in PowerPoint, including how to:
- Change the slide order
- Reset your layout
- Change the slide dimensions
- Use PowerPoint Designer
- Format text
- Format objects
- Play a presentation (slide show)
With this knowledge under your belt, you’ll be ready to start creating PowerPoint presentations. Moreover, you’ll have taken your skills from beginner to proficient in no time at all. I will also include links to more advanced PowerPoint topics.
Ready to start learning how to make a PowerPoint presentation?
Take your PPT skills to the next level
Start with a blank presentation.
Note: Before you open PowerPoint and start creating your presentation, make sure you’ve collected your thoughts. If you’re going to make your slides compelling, you need to spend some time brainstorming.
For help with this, see our article with tips for nailing your business presentation here .
The first thing you’ll need to do is to open PowerPoint. When you do, you are shown the Start Menu , with the Home tab open.
This is where you can choose either a blank theme (1) or a pre-built theme (2). You can also choose to open an existing presentation (3).
For now, go ahead and click on the Blank Presentation (1) thumbnail.

Doing so launches a brand new and blank presentation for you to work with. Before you start adding content to your presentation, let’s first familiarize ourselves with the PowerPoint interface.
The PowerPoint interface

Here is how the program is laid out:
- The Application Header
- The Ribbon (including the Ribbon tabs)
- The Quick Access Toolbar (either above or below the Ribbon)
- The Slides Pane (slide thumbnails)
The Slide Area
The notes pane.
- The Status Bar (including the View Buttons)
Each one of these areas has options for viewing certain parts of the PowerPoint environment and formatting your presentation.
Below are the important things to know about certain elements of the PowerPoint interface.
The PowerPoint Ribbon

The Ribbon is contextual. That means that it will adapt to what you’re doing in the program.
For example, the Font, Paragraph and Drawing options are greyed out until you select something that has text in it, as in the example below (A).

Furthermore, if you start manipulating certain objects, the Ribbon will display additional tabs, as seen above (B), with more commands and features to help you work with those objects. The following objects have their own additional tabs in the Ribbon which are hidden until you select them:
- Online Pictures
- Screenshots
- Screen Recording
The Slides Pane

This is where you can preview and rearrange all the slides in your presentation.
Right-clicking on a slide in the pane gives you additional options on the slide level that you won’t find on the Ribbon, such as Duplicate Slide , Delete Slide , and Hide Slide .

In addition, you can add sections to your presentation by right-clicking anywhere in this Pane and selecting Add Section . Sections are extremely helpful in large presentations, as they allow you to organize your slides into chunks that you can then rearrange, print or display differently from other slides.

The Slide Area (A) is where you will build out your slides. Anything within the bounds of this area will be visible when you present or print your presentation.
Anything outside of this area (B) will be hidden from view. This means that you can place things here, such as instructions for each slide, without worrying about them being shown to your audience.

The Notes Pane is the space beneath the Slide Area where you can type in the speaker notes for each slide. It’s designed as a fast way to add and edit your slides’ talking points.
To expand your knowledge and learn more about adding, printing, and exporting your PowerPoint speaker notes, read our guide here .
Your speaker notes are visible when you print your slides using the Notes Pages option and when you use the Presenter View . To expand your knowledge and learn the ins and outs of using the Presenter View , read our guide here .

You can resize the Notes Pane by clicking on its edge and dragging it up or down (A). You can also minimize or reopen it by clicking on the Notes button in the Status Bar (B).
Note: Not all text formatting displays in the Notes Pane, even though it will show up when printing your speaker notes. To learn more about printing PowerPoint with notes, read our guide here .
Now that you have a basic grasp of the PowerPoint interface at your disposal, it’s time to make your presentation.
Adding Content to Your PowerPoint Presentation
Notice that in the Slide Area , there are two rectangles with dotted outlines. These are called Placeholders and they’re set on the template in the Slide Master View .
To expand your knowledge and learn how to create a PowerPoint template of your own (which is no small task), read our guide here .

As the prompt text suggests, you can click into each placeholder and start typing text. These types of placeholder prompts are customizable too. That means that if you are using a company template, it might say something different, but the functionality is the same.

Note: For the purposes of this example, I will create a presentation based on the content in the Starbucks 2018 Global Social Impact Report, which is available to the public on their website.
If you type in more text than there is room for, PowerPoint will automatically reduce its font size. You can stop this behavior by clicking on the Autofit Options icon to the left of the placeholder and selecting Stop Fitting Text to this Placeholder .
Next, you can make formatting adjustments to your text by selecting the commands in the Font area and the Paragraph area of the Home tab of the Ribbon.

The Reset Command: If you make any changes to your title and decide you want to go back to how it was originally, you can use the Reset button up in the Home tab .

Insert More Slides into Your Presentation
Now that you have your title slide filled in, it’s time to add more slides. To do that, simply go up to the Home tab and click on New Slide . This inserts a new slide in your presentation right after the one you were on.

You can alternatively hit Ctrl+M on your keyboard to insert a new blank slide in PowerPoint. To learn more about this shortcut, see my guide on using Ctrl+M in PowerPoint .
Instead of clicking the New Slide command, you can also open the New Slide dropdown to see all the slide layouts in your PowerPoint template. Depending on who created your template, your layouts in this dropdown can be radically different.

If you insert a layout and later want to change it to a different layout, you can use the Layout dropdown instead of the New Slide dropdown.
After inserting a few different slide layouts, your presentation might look like the following picture. Don’t worry that it looks blank, next we will start adding content to your presentation.

If you want to follow along exactly with me, your five slides should be as follows:
- Title Slide
- Title and Content
- Section Header
- Two Content
- Picture with Caption
Adding Content to Your Slides
Now let’s go into each slide and start adding our content. You’ll notice some new types of placeholders.

On slide 2 we have a Content Placeholder , which allows you to add any kind of content. That includes:
- A SmartArt graphic,
- A 3D object,
- A picture from the web,
- Or an icon.
To insert text, simply type it in or hit Ctrl+C to Copy and Ctrl+V to Paste from elsewhere. To insert any of the other objects, click on the appropriate icon and follow the steps to insert it.
For my example, I’ll simply type in some text as you can see in the picture below.

Slides 3 and 4 only have text placeholders, so I’ll go ahead and add in my text into each one.

On slide 5 we have a Picture Placeholder . That means that the only elements that can go into it are:
- A picture from the web

To insert a picture into the picture placeholder, simply:
- Click on the Picture icon
- Find a picture on your computer and select it
- Click on Insert
Alternatively, if you already have a picture open somewhere else, you can select the placeholder and paste in (shortcut: Ctrl+V ) the picture. You can also drag the picture in from a file explorer window.

If you do not like the background of the picture you inserted onto your slide, you can remove the background here in PowerPoint. To see how to do this, read my guide here .
Placeholders aren’t the only way to add content to your slides. At any point, you can use the Insert tab to add elements to your slides.
You can use either the Title Only or the Blank slide layout to create slides for content that’s different. For example, a three-layout content slide, or a single picture divider slide, as shown below.

In the first example above, I’ve inserted 6 text boxes, 3 icons, and 3 circles to create this layout. In the second example, I’ve inserted a full-sized picture and then 2 shapes and 2 text boxes.
The Reset Command: Because these slides are built with shapes and text boxes (and not placeholders), hitting the Reset button up in the Home tab won’t do anything.
That is a good thing if you don’t want your layouts to adjust. However, it does mean that it falls on you to make sure everything is aligned and positioned correctly.
For more on how to add and manipulate the different objects in PowerPoint, check out our step-by-step articles here:
- Using graphics in PowerPoint
- Inserting icons onto slides
- Adding pictures to your PowerPoint
- How to embed a video in PowerPoint
- How to add music to your presentation
Using Designer to generate more layouts ideas
If you have Office 365, your version of PowerPoint comes with a new feature called Designer (or Design Ideas). This is a feature that generates slide layout ideas for you. The coolest thing about this feature is that it uses the content you already have.
To use Designer , simply navigate to the Design tab in your Ribbon, and click on Design Ideas .

NOTE: If the PowerPoint Designer is not working for you (it is grey out), see my troubleshooting guide for Designer .
Change the Overall Design (optional)
When you make a PowerPoint presentation, you’ll want to think about the overall design. Now that you have some content in your presentation, you can use the Design tab to change the look and feel of your slides.
For additional help thinking through the design of your presentation, read my guide here .
A. Picking your PowerPoint slide size
If you have PowerPoint 2013 or later, when you create a blank document in PowerPoint, you automatically start with a widescreen layout with a 16:9 ratio. These dimensions are suitable for most presentations as they match the screens of most computers and projectors.
However, you do have the option to change the dimensions.
For example, your presentation might not be presented, but instead converted into a PDF or printed and distributed. In that case, you can easily switch to the standard dimensions with a 4:3 ratio by selecting from the dropdown (A).
You can also choose a custom slide size or change the slide orientation from landscape to portrait in the Custom Slide Size dialog box (B).

To learn all about the different PowerPoint slide sizes, and some of the issues you will face when changing the slide size of a non-blank presentation, read my guide here .
B. Selecting a PowerPoint theme
The next thing you can do is change the theme of your presentation to a pre-built one. For a detailed explanation of what a PowerPoint theme is, and how to best use it, read my article here .
In the beginning of this tutorial, we started with a blank presentation, which uses the default Office theme as you can see in the picture below.

That gives you the most flexibility because it has a blank background and quite simple layouts that work for most presentations. However, it also means that it’s your responsibility to enhance the design.
If you’re comfortable with this, you can stay with the default theme or create your own custom theme ( read my guide here ). But if you would rather not have to think about design, then you can choose a pre-designed theme.
Microsoft provides 46 other pre-built themes, which include slide layouts, color variants and palettes, and fonts. Each one varies quite significantly, so make sure you look through them carefully.
To select a different theme, go to the Design tab in the Ribbon, and click on the dropdown arrow in the Themes section .

For this tutorial, let’s select the Frame theme and then choose the third Variant in the theme. Doing so changes the layout, colors, and fonts of your presentation.

Note: The theme dropdown area is also where you can import or save custom themes. To see my favorite places to find professional PowerPoint templates and themes (and recommendations for why I like them), read my guide here .
C. How to change a slide background in PowerPoint
The next thing to decide is how you want your background to look for the entire presentation. In the Variants area, you can see four background options.

For this example, we want our presentation to have a dark background, so let’s select Style 3. When you do so, you’ll notice that:
- The background color automatically changes across all slides
- The color of the text on most of the slides automatically changes to white so that it’s visible on the dark background
- The colors of the objects on slides #6 and #7 also adjust, in a way we may not want (we’ll likely have to make some manual adjustments to these slides)

Note: If you want to change the slide background for just that one slide, don’t left-click the style. Instead, right-click it and select Apply to Selected Slides .
After you change the background for your entire presentation, you can easily adjust the background for an individual slide.

Inside the Format Background pane, you can see you have the following options:
- Gradient fill
- Picture or texture fill
- Pattern fill
- Hide background
You can explore these options to find the PowerPoint background that best fits your presentation.
D. How to change your color palette in PowerPoint
Another thing you may want to adjust in your presentation, is the color scheme. In the picture below you can see the Theme Colors we are currently using for this presentation.

Each PowerPoint theme comes with its own color palette. By default, the Office theme includes the Office color palette. This affects the colors you are presented with when you format any element within your presentation (text, shapes, SmartArt, etc.).

The good news is that the colors here are easy to change. To switch color palettes, simply:
- Go to the Design tab in the Ribbon
- In the Variants area, click on the dropdown arrow and select Colors
- Select the color palette (or theme colors) you want
You can choose among the pre-built color palettes from Office, or you can customize them to create your own.
As you build your presentation, make sure you use the colors from your theme to format objects. That way, changing the color palette adjusts all the colors in your presentation automatically.
E. How to change your fonts in PowerPoint
Just as we changed the color palette, you can do the same for the fonts.

Each PowerPoint theme comes with its own font combination. By default, the Office theme includes the Office font pairing. This affects the fonts that are automatically assigned to all text in your presentation.

The good news is that the font pairings are easy to change. To switch your Theme Fonts, simply:
- Go to the Design tab in the Ribbon
- Click on the dropdown arrow in the Variants area
- Select Fonts
- Select the font pairing you want
You can choose among the pre-built fonts from Office, or you can customize them to create your own.
If you are working with PowerPoint presentations on both Mac and PC computers, make sure you choose a safe PowerPoint font. To see a list of the safest PowerPoint fonts, read our guide here .
If you receive a PowerPoint presentation and the wrong fonts were used, you can use the Replace Fonts dialog box to change the fonts across your entire presentation. For details, read our guide here .
Adding Animations & Transitions (optional)
The final step to make a PowerPoint presentation compelling, is to consider using animations and transitions. These are by no means necessary to a good presentation, but they may be helpful in your situation.
A. Adding PowerPoint animations
PowerPoint has an incredibly robust animations engine designed to power your creativity. That being said, it’s also easy to get started with basic animations.
Animations are movements that you can apply to individual objects on your slide.

To add a PowerPoint animation to an element of your slide, simply:
- Select the element
- Go to the Animations tab in the Ribbon
- Click on the dropdown arrow to view your options
- Select the animation you want
You can add animations to multiple objects at one time by selecting them all first and then applying the animation.
B. How to preview a PowerPoint animation

There are three ways to preview a PowerPoint animation:
- Click on the Preview button in the Animations tab
- Click on the little star next to the slide
- Play the slide in Slide Show Mode
To learn other ways to run your slide show, see our guide on presenting a PowerPoint slide show with shortcuts .
To adjust the settings of your animations, explore the options in the Effect Options , Advanced Animation and the Timing areas of the Animation tab .

Note: To see how to make objects appear and disappear in your slides by clicking a button, read our guide here .
C. How to manage your animations in PowerPoint

The best way to manage lots of animations on your slide is with the Animation Pane . To open it, simply:
- Navigate to the Animations tab
- Select the Animation Pane
Inside the Animation Pane, you’ll see all of the different animations that have been applied to objects on your slide, with their numbers marked as pictured above.
Note: To see examples of PowerPoint animations that can use in PowerPoint, see our list of PowerPoint animation tutorials here .
D. How to add transitions to your PowerPoint presentation
PowerPoint has an incredibly robust transition engine so that you can dictate how your slides change from one to the other. It is also extremely easy to add transitions to your slides.
In PowerPoint, transitions are the movements (or effects) you see as you move between two slides.

To add a transition to a PowerPoint slide, simply:
- Select the slide
- Go to the Transitions tab in the Ribbon
- In the Transitions to This Slide area, click on the dropdown arrow to view your options
- Select the transition you want
To adjust the settings of the transition, explore the options in the Timing area of the Transitions tab.
You can also add the same transition to multiple slides. To do that, select them in the Slides Pane and apply the transition.
E. How to preview a transition in PowerPoint

There are three ways to preview your PowerPoint transitions (just like your animations):
- Click on the Preview button in the Transitions tab
- Click on the little star beneath the slide number in the thumbnail view
Note: In 2016, PowerPoint added a cool new transition, called Morph. It operates a bit differently from other transitions. For a detailed tutorial on how to use the cool Morph transition, see our step-by-step article here .
Save Your PowerPoint Presentation
After you’ve built your presentation and made all the adjustments to your slides, you’ll want to save your presentation. YOu can do this several different ways.

To save a PowerPoint presentation using your Ribbon, simply:
- Navigate to the File tab
- Select Save As on the left
- Choose where you want to save your presentation
- Name your presentation and/or adjust your file type settings
- Click Save
You can alternatively use the Ctrl+S keyboard shortcut to save your presentation. I recommend using this shortcut frequently as you build your presentation to make sure you don’t lose any of your work.

This is the standard way to save a presentation. However, there may be a situation where you want to save your presentation as a different file type.
To learn how to save your presentation as a PDF, see our guide on converting PowerPoint to a PDF .
How to save your PowerPoint presentation as a template
Once you’ve created a presentation that you like, you may want to turn it into a template. The easiest – but not technically correct – way, is to simply create a copy of your current presentation and then change the content.
But be careful! A PowerPoint template is a special type of document and it has its own parameters and behaviors.
If you’re interested in learning about how to create your own PowerPoint template from scratch, see our guide on how to create a PowerPoint template .
Printing Your PowerPoint Presentation
After finishing your PowerPoint presentation, you may want to print it out on paper. Printing your slides is relatively easy.

To open the Print dialog box, you can either:
- Hit Ctrl+P on your keyboard
- Or go to the Ribbon and click on File and then Print

Inside the Print dialog box, you can choose from the various printing settings:
- Printer: Select a printer to use (or print to PDF or OneNote)
- Slides: Choose which slides you want to print
- Layout: Determine how many slides you want per page (this is where you can print the notes, outline, and handouts)
- Collated or uncollated (learn what collated printing means here )
- Color: Choose to print in color, grayscale or black & white
There are many more options for printing your PowerPoint presentations. Here are links to more in-depth articles:
- How to print multiple slides per page
- How to print your speaker notes in PowerPoint
- How to save PowerPoint as a picture presentation
So that’s how to create a PowerPoint presentation if you are brand new to it. We’ve also included a ton of links to helpful resources to boost your PowerPoint skills further.
When you are creating your presentation, it is critical to first focus on the content (what you are trying to say) before getting lost inserting and playing with elements. The clearer you are on what you want to present, the easier it will be to build it out in PowerPoint.
If you enjoyed this article, you can learn more about our PowerPoint training courses and other presentation resources by visiting us here .
🔒 Unlock the PowerPoint Shortcuts Trusted by Industry Leaders KKR, American Express, HSBC, and More!
Join over 114,880 professionals from diverse fields including consulting, investment banking, advertising, marketing, sales, and business development who have supercharged their PowerPoint game with our proven methods.
✅ Customize compelling presentations effortlessly.
✅ Master time-saving techniques for faster deck creation.
✅ Boost your career prospects with top-notch PowerPoint skills.
Get FREE access to the Critical PowerPoint Shortcuts module of our premium training course by entering your name and email below.
DISCLAIMER: PC Users Only!
We respect your privacy and will keep your info safe and confidential.
About The Author

Popular Tutorials
- How to Strikethrough Text (l̶i̶k̶e̶ ̶t̶h̶i̶s̶) in Word, Excel & PowerPoint
- How to Make Animated Fireworks in PowerPoint (Step-by-Step)
- Strikethrough Shortcut (l̶i̶k̶e̶ ̶t̶h̶i̶s̶) for Word, Excel & PowerPoint
- How to Create a Flash Card Memory Game in PowerPoint (Like Jeopardy)
- Keyboard Shortcuts Not Working: Solved
PowerPoint Tutorial Categories
- Strategies & Opinions
- Shortcuts & Hacks
- Pictures, Icons, Videos, Etc.
- New Features
- Miscellaneous
- Charts & Data Viz
We help busy professionals save hours and gain peace of mind, with corporate workshops, self-paced courses and tutorials for PowerPoint and Word.
Work With Us
- Corporate Training
- Presentation & Template Design
- Courses & Downloads
- PowerPoint Articles
- Word Articles
- Productivity Resources
Find a Tutorial
- Free Training
- For Businesses
We help busy office workers save hours and gain peace of mind, with tips, training and tutorials for Microsoft PowerPoint and Word.
Master Critical PowerPoint Shortcuts – Secure Your FREE Training Module and Save Valuable Time!
⌛ Master time-saving expert techniques.
🔥 Create powerful presentations.
🚀 Propel your career to new heights.
We value your privacy – we keep your info safe.
Discover PowerPoint Hacks Loved by Industry Giants - KKR, AmEx, HSBC!
Over 114,880 professionals in finance, marketing and sales have revolutionized their PPT skills with our proven methods.
Gain FREE access to a full module of our premium PowerPoint training program – Get started today!
We hate spam too and promise to keep your information safe.
You are currently viewing a placeholder content from Facebook . To access the actual content, click the button below. Please note that doing so will share data with third-party providers.
How-To Geek
How to reduce the file size of a powerpoint presentation.

Your changes have been saved
Email is sent
Email has already been sent
Please verify your email address.
You’ve reached your account maximum for followed topics.
Quick Links
Convert your presentation to the pptx format, insert your pictures—don’t copy and paste, do image edits in an image editor—not in powerpoint, compress all of the images in your presentation, don’t use embedded fonts, link to files instead of embedding them, don’t store a thumbnail for the presentation, remove personal and hidden information from your presentation, turn off autorecover, copy everything into a new presentation, a possibility: unzip the presentation and compress it.
Considering that Microsoft PowerPoint presentations are generally accompanied with tons of images, gifs , embedded videos , charts , graphs, and other content, it’s no surprise that you get some pretty big files. Here are a few steps you can take to reduce a presentation's file size.
Large files can be annoying. They take up loads of precious disk space, slow down playback performance, and can cause emails to bounce back due to exceeding the file size limit. You can prevent all of these things by reducing the file size of your presentation.
We’ve mentioned it before, but the first thing you’d think of when considering file size reduction is images—and for a good reason. Image files can be quite large. There are steps you can take to reduce the size, such as compressing the images in the presentation. If you suspect the reason your PowerPoint file is so large is due to images, then be sure to read the article we’ve written on how to reduce the size of Office documents that contain images .
Related: How to Reduce the Size of a Microsoft Word Document
We do have some additional tips to add if you followed these steps but still need to reduce your presentation’s file size.
Microsoft released the PPTX format in Office 2007. Still, it’s not uncommon to see PPT files floating around. So what’s the difference between a PPT and PPTX file? The PPTX version compresses all of the content within the presentation. If you have a PPT file and convert it into a PPTX file, you’ll notice a decrease in the file size.
Converting the file is as simple as pressing a button and choosing the file type. Go ahead and open your PPT file, head over to the “File” tab, and then click “Convert.”

Windows File Explorer will appear. You’ll notice the Save As type is set as "PowerPoint Presentation." This is the PPTX file type. Click “Save.”

Your PPT file will now be converted to a PPTX file. As you can see, the size of the file has been reduced.
HTG Presentation 2 is our PPT file, and HTG Presentation 3 is our PPTX file. Merely converting the file type reduced the size by 335 KB.
While this isn’t a breathtaking drop in file size, we managed to reduce a Word document file size from 6,001 KB to 721 KB. It all depends on what’s inside the file. With any luck, this will be the only step you need to take. If not, keep reading.
It’s tempting to copy and paste an image in PowerPoint instead of using the insert function. This won’t be an issue if you’re not concerned about file size, but if you are, then beware of copy and paste—it may reformat your image to BMP or PNG. Why is this an issue? Both of those file formats are larger than JPG.

You can see in the above screenshot that the PNG file is 153KB compared to the 120KB JPG file of the same image. Each time you copy and paste a JPG file to PowerPoint, and it gets converted to PNG, you’re adding a bit of unnecessary file size to the presentation. Using the insert function will ensure your images are inserted as intended.
When you insert an image in PowerPoint, it’s best to make sure that it doesn’t need any edits. If it does require edits, you’re better off doing it in an image editor. Why? When you use PowerPoint to edit your image, it stores all of those edits as part of the presentation. For example, when you change an image to black and white, PowerPoint retains the full-color image as well. That’s a lot of extra bites being stored.
If you don’t have an image editor ( you do ) or you simply must use PowerPoint, be sure to tell PowerPoint to discard all of that excess data saved from the edits . It won't save you as much space as working in a dedicated editor, but it will help.
You can compress images in PowerPoint one at a time or all at once. If you’re looking to do the latter, here’s how.
Open your presentation, head over to the “File” tab, and then select “Save As” in the left-hand pane.

Next, select “More Options,” which you'll find under the area where you would name your file and choose the file type.

The “Save As” window will appear—this time with a few extra options available to you. Next to the “Save” button, click “Tools.”

In the drop-down menu that appears, select “Compress Pictures.”

The “Compress Pictures” window will appear. Here, you can choose the resolution type of the images (based on PPI) in the presentation. You’ll also notice that you’re not able to select the “Apply only to this picture” option in the “Compression Options” group. That’s because, due to the way we accessed this tool, this option isn’t available.
Note: If you do want to compress a single picture, select it and then head to Picture Tools Format > Compress Pictures.
Once you’re happy with your selection, click “OK.”

Be sure to save your presentation afterward.
We get why you might want to embed fonts—you might be making a Star Wars themed presentation and, as a result, anyone you may be sharing the presentation with is not likely to have those special fonts available to them. Embedding the fonts in your presentation could prevent issues down the line, but it comes at the cost of increased file sizes.
In general, unless you are sure you need to display a particular font, we recommend turning off font embedding.
Head over to the “File” tab and select “Options” at the bottom of the left-hand pane.

On the “Save” tab, untick the “Embed fonts in the file” checkbox and then click “OK.”

We saved a copy of our presentation with all fonts embedded, without fonts embedded, and with only the fonts used in the presentation embedded. Look at the difference if file sizes:

Convinced yet?
Consider the difference in file size if you embed an entire YouTube video in your presentation instead of linking back to it. Embedding an entire video will significantly increase the size of your presentation. There are certainly some valuable benefits when embedding a file vs. linking to it (such as when the recipient might not have internet access to play the video), but if the file size is an issue, just don’t do it.
Way back when Office let you save thumbnail images of your presentation so that you could get a sneak preview of the file when searching for it in File Explorer. Windows has grown to be more sophisticated, so it no longer requires the help of Office applications to do this. But, the option is still available.
We ran a little test to see the difference in file size with and without this option enabled. Here are the results:
With the thumbnail option enabled, our file size was 2,660 KB. Without the option enabled, the file size was reduced to 2,662 KB, saving a total of 7 KB.
This is a pretty small save, but when we tested it with a Word document, the difference was significant, showing 721 KB without the option enabled, and 3,247 KB with the option enabled.
While this is a large gap between applications and it’s not exactly clear why the difference is so large, it’s still an option worth exploring. To disable the feature, open your presentation, head over to the “File” tab, and then select “Properties” found on the right-hand side, then “Advanced Properties.”

You’ll now be in the “Summary” tab of the “Properties” window. At the bottom of the window, uncheck the box next to “Save preview picture,” and then click “OK.”

Microsoft Office will store your personal information (such as author name) and hidden properties within your presentation. Getting rid of this information can save you a bit of space.
Open your presentation, head over to the “File” tab, select the “Check for Issues” option, then select “Inspect Document."

The “Document Inspector” window will appear. Make sure the “Document Properties and Personal Information” box is checked, and then click “Inspect."

In the next window, select “Remove All.” The information will now be removed, saving you a few KB of space.
We don’t necessarily recommend this, and it should only be used as a last resort effort. AutoRecover is an essential tool in Office, and if you’ve ever lost a document before saving, then you understand precisely what we mean.
Each time Office uses AutoRecover, it adds a little to the size of the file. To turn AutoRecover off, head over to the “File” tab and select “Options” found at the bottom of the left-hand pane.
In the “Save” tab of the “Options” window, uncheck the box next to “Save AutoRecover information ever xx minutes.”

If you save and exit out of the presentation immediately, you won’t notice a difference. Over time though, as you continue to progress through the presentation, the AutoRecover feature will add KB to your file.
While you’re creating your presentation, PowerPoint will save various things in the background to help you out. We’ve mentioned how to turn off a lot of these features, delete data PowerPoint saves, and so on, but there’s always a chance something slipped through the cracks, and PowerPoint stored some information you don’t need. Copying your content over to a new presentation may be a good solution to the problem.
This may be a bit of a hassle though as, with PowerPoint, you’ll need to copy and paste each slide (and master slides). Once you do though, the new presentation won’t have any of the previous background saves, AutoRecover information, or previous versions of the file. As a result, you should see a change in file size.
While we can’t tell you exactly how much this will reduce your file size since each presentation will be different, it’s worth a shot.
As we mentioned earlier, a PPTX file is a compressed file (which is why the size is much smaller than an old-school PPT file). This means you can open it with a tool such as 7-Zip or WinRar, extract all the files from your PPTX, add them to a compressed archive, and then rename the archive to a PPTX file extension.
We had some issues here, though.
In Rob’s testing with his Word document, it successfully reduced the size of the file from 721 KB to 72 KB. However, it corrupted the file in the process. In my testing with my 2,614 KB file, it didn’t corrupt it, but it only reduced it to 2,594KB—a total of only 20 KB. We’re unsure what’s at play here, so if you want to give this a go, be sure to have a backup copy of your file before doing so.
That’s all the tips we've got for reducing the size of your PowerPoint presentation. We’re always looking for new and interesting ways to reduce the size of our files, so if you have any tips, let us know in the comment section, and we’ll be happy to test them out!
- Microsoft Office
- Office 2016
Tutorial: Save your PowerPoint as a Video
It pays to know how to save PowerPoint as video. Whether you are preparing a PowerPoint presentation for work, school , non-profit, staff training or investor relations. Content marketing is one of the biggest trends of the past couple of years and knowing how to distribute your content via various media is critical to business success. This article will guide and show you, step by step, how to save your PowerPoint presentation in video format. Next, we discuss the advantages of PowerPoint to video conversion and how you can put a single presentation to greater use. This guide is written by 24Slides’ Powerpoint experts and includes instruction on using PowerPoint for Mac.

6 Reasons to save PowerPoint as video
So you are considering saving your PowerPoint presentation as video? Before we show you how to do it, let’s talk about why it’s a great idea to convert your PowerPoint to video.
- You can show your presentation to a wider audience by sharing the video on YouTube and other video platforms.
- Your audience do not need to have a copy of Microsoft PowerPoint to view your presentation.
- Burn your presentation video on CD or DVD and giveaway as promotional material to clients or potential customers.
- Leverage your presentation and increase the return on investment (ROI) of your presentations by distributing them as video.
- The technical ability of your audience will not become a barrier to delivering your message. Your video becomes easy to access without the knowledge and understanding of powerpoint.
- Your audience will see your presentation exactly as you have intended it to be seen. Unlike sharing it as a presentation, some slides may get deleted or changed.
Now that you know why you’re on the right track by learning how to save PowerPoint presentations as video, let’s get into the process of exactly how to do it.
How to save PowerPoint 2010 as a video
If you are still using PowerPoint 2010 to create your presentations, you’ll be pleased to know you can still convert your PowerPoint to video. The process is som simple that you’ll wonder why you haven’t been doing this all along.
Whether your presentation contains just text or is a multimedia presentation with sound narration, transitions and video, you will be able to convert it into video. Microsoft PowerPoint allows you to save PowerPoint as video in Windows Media Video (.wmv) file format. If you plan for sharing your presentation as a video before creating it, you can decide whether to record the narration before creating the presentation.
Here are the steps you need to follow:
- Create your PowerPoint presentation as normal and save it.
- If you’re using narration for your presentation, record the narration and add timings to the slideshow.
- Select the File menu and click on Save & Send .

- Under the Save & Send menu, find and click on Create a Video .

- Click on the Computer & HD Displays option to customise the video size and quality (small, medium and large size & quality).

- Click the Don’t Use Recorded Timings and Narrations to select if you’re using timings and narrations.

- Click Create Video and another dialogue box opens.

- Enter appropriate filename and saving location to save your newly created video.
Once your presentation to video conversion is complete, the video is ready to share via Facebook, Youtube, Vimeo or email.
How to save a PowerPoint 2007 presentation as video
There are many users still running Microsoft Office 2007, hence PowerPoint 2007 on their computers. If you are one of them, don’t worry, there are ways to convert your PowerPoint to video using a bundled Microsoft product, Windows Movie Maker.
If you want to convert a PowerPoint 2007 presentation to video and you are running a newer version of the program, you can open the file within PowerPoint 2013. You can then use the Create a Video feature to convert your PowerPoint to video.
Alternatively, if you only have access to PowerPoint 2007 and have a copy of Windows Movie Maker installed, you can save your presentation as image files (.jpg). Once you’ve saved each slide, fire up Windows Movie Maker and start a new project.

Next, import all the slides you saved as images into the new project and create your video.

Note: You can include transitions in Windows Movie Maker. However, animations will not convert when you save the slides as image (.jpg) files. Make sure you modify your slides to remove any animations and ensure you do not lose vital parts of your message before saving as images.
If your presentation has narration, you can import the the sound file directly into Windows Movie Maker. If you do not have the source audio file, you can save the presentation as a web page (a separate .wav file is created). You can then import the .wav file into your Windows Movie Maker video.
How to convert your PowerPoint to video in PowerPoint 2013 in 7 Steps
Turning your PowerPoint 2013 presentation slides into a video is easier than you think. In seven simple steps, you can turn your presentation into a video you can share with viewers wherever they are. Here’s how you do it.
- Access Powerpoint’s Backstage View by clicking on File.

- Select Export and click on Create a Video to access the video export menu.

- Click on the Create a Video option and expand the Computer and HD Displays option to select output video size and quality settings.

- Click on the drop down arrow to expand the Use Recorded Timings and Narrations menu. Use this to select whether you’re using recorded timings or not. If not using recorded timings and narrations, set the duration of each slide using the timings option at the bottom.

- Click the Create Video button to show the Save As dialogue box.

- Select the location where you want to save your video and choose a suitable filename for the video file. Also choose the video file type.

- Click Save and PowerPoint will begin converting your presentation to video. This may take a couple of seconds or a few minutes depending on the size of your presentation.

When the video creation is complete, the video is ready to view, upload to your website, Facebook, YouTube or sharing by email.

How to save a presentation as a movie file in PowerPoint For Mac
If you have an Apple computer running a Mac version of PowerPoint, you can convert your presentation into a movie for easier and wider distribution. The process is similar to Windows system with the inevitable differences between the operating systems. In just a few simple steps, you will be able to turn your powerful presentation into a movie file. The following limitations apply:
- The output is a .mov file compatible with only the Quicktime player or 3rd party converting programs.
- You will lose transitions and animations within the presentation and so make sure you modify your presentation prior to converting it.
- You will also lose narration during the conversion process, you may wish to add the narration as an audio soundtrack to the movie.
The steps are as follows:
- Click on File and choose Save as Movie .

- Click Movie Options to add a background soundtrack (music or your narration) or credits.

- Click Movie Settings to adjust the output quality and video size settings. You can also choose the slide durations, to create a looping video and slide transitions under this option.

- Click OK to close the Movie Options dialogue box.

- Click Save to start creating your video. The process will take a couple of seconds or longer depending on the size and quality options you select.
Once the process is complete, your movie is ready for playback or to convert into other file formats and share via Social Media or other outlets. If you’re using PowerPoint for Mac 2008 and 2011, these steps will work for either.
How to create a video from PowerPoint 2016
You can create a full-fidelity video from your presentation in PowerPoint 2016 in MPEG-4 (.mp4) or Windows Media Video (.wmv) format. In just six steps, you can turn your presentation into a video you can share and distribute on Facebook, YouTube, burn to DVD or via email. Here’s how you go about it:
- Click on the File tab to show file options.

- Scroll down and select Export and navigate to Create a Video.

- Select your video settings preference (video quality, timings and narration, video size).

- Click on Create a Video.

- Choose a filename, saving location and video type (.mp4 or .wmv).

- Click on Save to start video creation process.
This article has shown you how to convert and save PowerPoint as video. Once you’ve delivered a powerful presentation to an audience, making it available afterwards is always a great idea, especially for training presentations. To maintain the presentation in its entirety, saving it as a video and distributing it is the best option. By converting a presentation to video, you are able to reach a wider audience through YouTube, Facebook and other video hosting and sharing sites. We hope you’ve gained some useful insights on how you can achieve that following the simple, step by step guides for the version of PowerPoint you are running.

Did you know?
At 24slides, we provide stunning Powerpoint presentation services and are able to help you and your team have an incredible presentation to film. Take a look at some examples of our work and let’s get in touch . Alternatively, feel free to browse and download hundreds of free Powerpoint templates from our library.
You might also find this interesting: How to Create Social Media Videos With PowerPoint
Create professional presentations online
Other people also read

How To Convert Google Slides To PowerPoint and Vice Versa

How To Add Animations To PowerPoint

How To Create The Best PowerPoint Presentation Background
This browser is no longer supported.
Upgrade to Microsoft Edge to take advantage of the latest features, security updates, and technical support.
How to export high-resolution (high-dpi) slides from PowerPoint
- 10 contributors
- Applies to: PowerPoint for Microsoft 365, PowerPoint 2019, PowerPoint 2016, PowerPoint 2013, PowerPoint 2010, Microsoft Office PowerPoint 2007, Microsoft Office PowerPoint 2003
You can change the export resolution in Microsoft PowerPoint by saving a slide in a picture format. There are two steps to this process: Use the system registry to change the default resolution setting for exported slides, and then save the slide as a picture at the new resolution.
Step 1: Change the export resolution setting
Follow the steps in this section carefully. Serious problems might occur if you modify the registry incorrectly. Before you modify it, back up the registry for restoration in case problems occur.
By default, the export resolution of a PowerPoint slide that you want to save as a picture is 96 dots per inch (dpi). To change the export resolution, follow these steps:
Exit all Windows-based programs.
Right-click Start , and then select Run . (In Windows 7, select Start , and then select Run .)
In the Open box, type regedit , and then select OK .
Locate one of the following registry subkeys, depending on the version of PowerPoint that you're using:
PowerPoint 2016, 2019, PowerPoint for Microsoft 365
HKEY_CURRENT_USER\Software\Microsoft\Office\16.0\PowerPoint\Options
PowerPoint 2013
HKEY_CURRENT_USER\Software\Microsoft\Office\15.0\PowerPoint\Options
PowerPoint 2010
HKEY_CURRENT_USER\Software\Microsoft\Office\14.0\PowerPoint\Options
PowerPoint 2007
HKEY_CURRENT_USER\Software\Microsoft\Office\12.0\PowerPoint\Options
PowerPoint 2003
HKEY_CURRENT_USER\Software\Microsoft\Office\11.0\PowerPoint\Options
Select the Options subkey, point to New on the Edit menu, and then select DWORD (32-bit) Value .
Enter ExportBitmapResolution , and then press Enter.
Make sure that ExportBitmapResolution is selected, and then select Modify on the Edit menu.
In the Edit DWORD Value dialog box, select Decimal .
In the Value data box, specify a resolution of 300 . Or, use the parameters from the following table.
| Decimal value | Full-screen pixels (horizontal × vertical) | Widescreen pixels (horizontal × vertical) | Dots per inch (horizontal and vertical) |
|---|---|---|---|
| 50 | 500 × 375 | 667 × 375 | 50 dpi |
| 96 (default) | 960 × 720 | 1280 × 720 | 96 dpi |
| 100 | 1000 × 750 | 1333 × 750 | 100 dpi |
| 150 | 1500 × 1125 | 2000 × 1125 | 150 dpi |
| 200 | 2000 × 1500 | 2667 × 1500 | 200 dpi |
| 250 | 2500 × 1875 | 3333 × 1875 | 250 dpi |
| 300 | 3000 × 2250 | 4000 × 2250 | 300 dpi |
See the Limitations section for more information when you set this value.
Select OK .
On the File menu, select Exit to exit Registry Editor.
Step 2: Export the slide as a picture
In PowerPoint, open your slide presentation, and then open the slide that you want to export.
On the File menu, select Save As .
In the Save as type box, select one of the following picture formats:
- GIF Graphics Interchange Format (.gif)
- JPEG File Interchange Format (*.jpg)
- PNG Portable Network Graphics Format (*.png)
- TIFF Tag Image File Format (*.tif)
- Device Independent Bitmap (*.bmp)
- Windows Metafile (*.wmf)
- Enhanced Windows Metafile (*.emf)
You may want to change the picture's save location in the Save in box. You may also want to change the name of the picture in the File name box.
Select Save . You will be prompted by the following dialog box:

Select Current Slide Only . The slide is saved in the new format and resolution in the location that you specified in the Save in box.
To verify that the slide is saved in the resolution that you specified, right-click the picture, and then select Properties .
Limitations
When you set the ExportBitmapResolution registry value in PowerPoint, there's a maximum DPI limitation to consider for some versions of PowerPoint.
Maximum DPI is dependent upon the slide size. The formula is as follows: maxdpi = (sqrt(100,000,000 / (slide with * slide height)), where slide width and height are in inches.
For example, for a standard 13.3" x 7.5" slide, the equation would be: sqrt(100,000,000 / (13.333 * 7.5) ) = 1000.
PowerPoint 2019, 2016, 2013, and 365
There is no fixed DPI limit. Slide export is limited only by how large the resulting bitmap gets. PowerPoint can support bitmaps up to 100,000,000 pixels (width x height). For standard widescreen slides (13.3" x 7.5"), this means a maximum DPI of 1,000. For the older style 10" x 7.5" slides, this typically means a maximum DPI of 1,155.
PowerPoint 2010 and older
The maximum resolution that PowerPoint can export is 3,072 pixels, based on the longest edge of the slide. For example, the standard 10" × 7.5" slide has a maximum effective DPI value of 307. The 3,070-pixel result (10 × 307 = 3070) falls within the 3,072-pixel limit. However, any DPI setting that's greater than 307 for a standard slide reverts to the limit of 3,072.
| Decimal value | Pixels (horizontal × vertical) | Dots per inch (horizontal and vertical) |
|---|---|---|
| 307 | 3072 × 2304 | 307 dpi |
The 3,072-pixel limit also applies to saving the slide programmatically.
For example, the following code programmatically saves a picture that has the dimensions of 3072 × 2304 pixels:
More information
For information about changing the size of your slides, see Change the size of your slides .
Was this page helpful?
Additional resources
How to Save a Slide in PowerPoint Individually? [Quick Tip!]
By: Author Shrot Katewa
![How to Save a Slide in PowerPoint Individually? [Quick Tip!]](https://artofpresentations.com/wp-content/uploads/2021/09/Featured-Image-Save-Just-One-Slide-in-PowerPoint.jpg "how to save presentation in powerpoint")
There are times when we want to either just print or share just a single slide from our PowerPoint presentation. It might seem a bit difficult to do so initially, but the process is actually quite simple!
To save a slide in PowerPoint, select the slide from the slide preview panel on the left part of your screen. Press “Ctrl+C” to copy it. Now, click on the “File” tab, and open a “Blank PowerPoint Presentation”. Press “Ctrl+V” to paste the slide. Press “Ctrl+S” to save the single slide presentation.
In this article, I will share with you how you can save just one slide from an existing PowerPoint presentation.
Plus, I will also show you how to save a single slide as an image so that you can avoid the changes in the color and the look of the slide when you move it to a new presentation.
So, without further adieu, let’s get started!
1. How to Save a Single Slide in PowerPoint?
There are actually two different ways in which you can save a single slide in PowerPoint. The first method is where you copy the slide into a new presentation and save it separately. Another method is where you can save a single slide as an image!
Let’s take a look at both the methods below –
Method 1 – Save a Single Slide Using a New Presentation
If you want to extract and save a single slide from an existing PowerPoint presentation, the best thing for you to do is to copy the slide and paste it into a blank PowerPoint presentation.
Related Read – Check out my other article on How to Copy and Paste in PowerPoint that provides you with tips to help retain the design and formatting of your original slide.
Then, save the Powerpoint presentation that contains the single slide that you just pasted in it.
This method allows you retain editing capabilities to the single slide that you move into a new presentation.
Here are the steps that you need to follow –
Step 1 – Copy the Slide
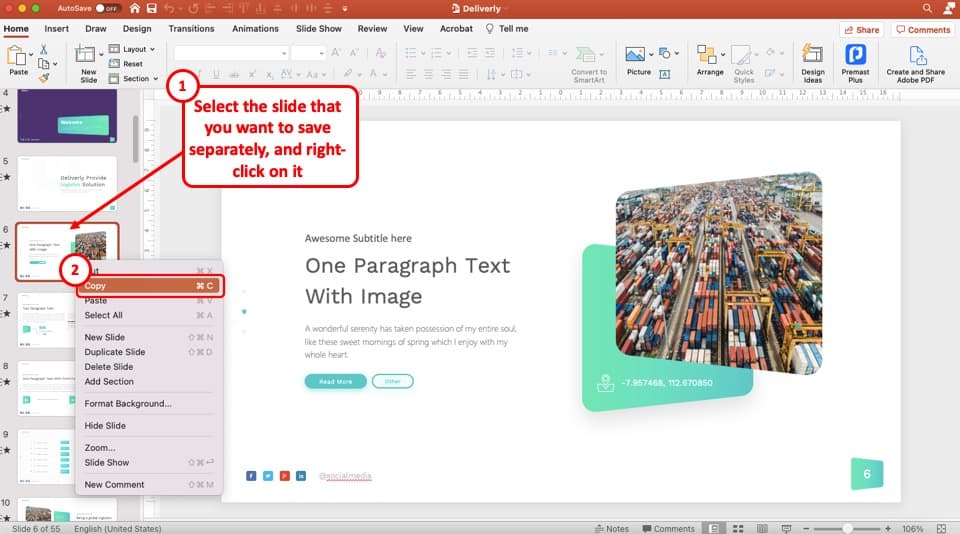
The first step is to copy the slide that you want to save as a presentation. To do that, first, select the slide from the “ Slide Thumbnail View ” on the left part of your PowerPoint window by clicking on it.
Then, “right-click” on the slide. From the options that are displayed in the menu, click on “ Copy “.
You can also use the keyboard shortcut “ Ctrl+C ” to copy the slide once it has been selected.
Step 2 – Open a Blank Presentation
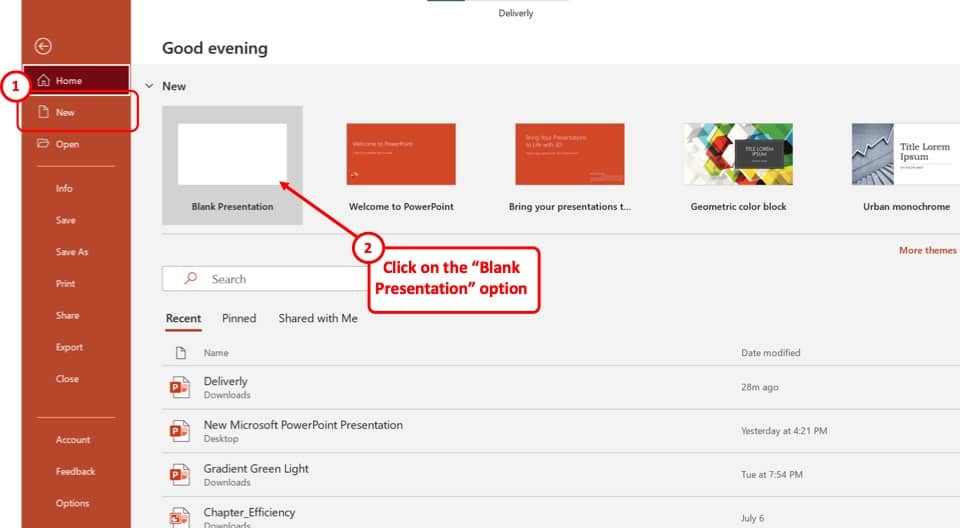
The next step is to move this slide into a new presentation. For that, first, we will need to open a blank presentation.
To open a blank presentation in PowerPoint, click on the “ File ” tab on the top. You will be taken to the backend view.
From the backend view, simply click on the “ New ” option on the left, and then select the “ Blank Presentation ” option.
This will open a new blank PowerPoint presentation.
You can also press “ Ctrl+N ” to open a new PowerPoint presentation and avoid all the above steps.
Step 3 – Paste the Copied Slide
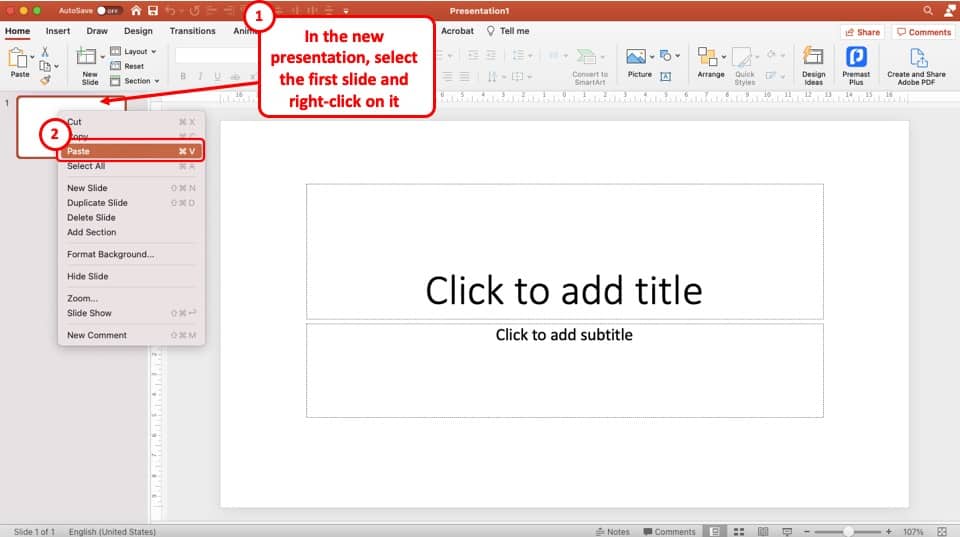
Once the new presentation is open, simply click on the first slide in the new presentation, and paste the slide that you have copied from the original presentation.
You can “ right-click ” on the first slide, and from the options that appear, click on “ Paste “.
Alternatively, you can also simply click on the first blank slide in the new presentation and press “ Ctrl+V ” to paste the copied slide.
Step 4 – Choose the “Keep Source Formatting” option
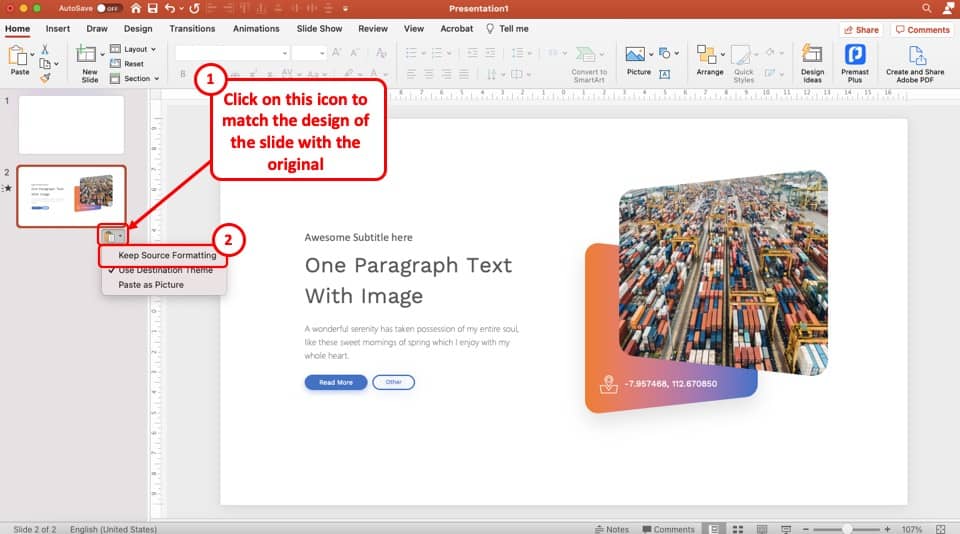
Once you’ve pasted the slide from the original presentation into a new blank presentation, you will notice that sometimes the formatting of the slide (meaning the color and font) doesn’t get carried over.
This can be annoying as you really don’t want to spend time recreating the slide!
To solve this problem, click on the small “clipboard” icon underneath the slide that you just pasted in the new presentation. A dropdown menu will appear.
Simply, choose the “ Keep Source Formatting ” option from the dropdown.
This option will basically retain the way text, image and other elements were formatted in the original presentation.
Step 5 – Delete Additional Slides
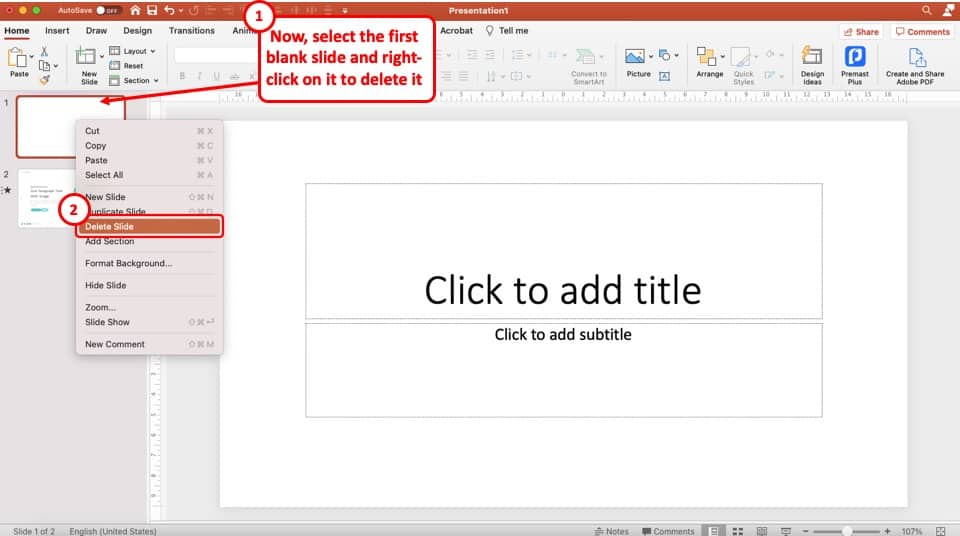
Now, all you are left to do is delete any additional slides that may be present in the new presentation.
To delete the slides from the presentation, select it by clicking on it. Then, right-click and choose the “ Delete Slides ” option.
You should be left with only a single slide that you copied from the original presentation.
Step 6 – Save the Presentation
The last step of the process is the make sure that you save the presentation.
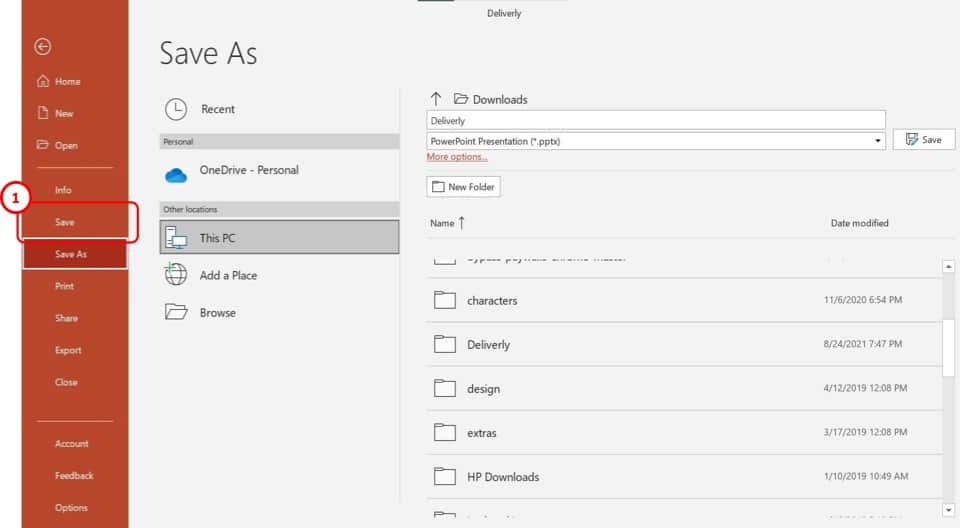
To save a PowerPoint presentation, click on the “ File ” tab. Then, from the backend view, click on “ Save “.
You can also use the keyboard shortcut “ Ctrl+S ” to save a PowerPoint presentation.
You will be prompted with a new window asking you to choose a destination to save the file. Navigate to the specific folder where you want to save the file. Then, click “ Save “.
Method 2 – Save a Single Slide as an Image
If you are in a hurry and don’t really care about being able to edit the slide once it has been moved separately, then perhaps you should use this method.
Saving an individual slide as an image in Microsoft PowerPoint is quite an easy process.
It requires 4 easy steps as follows:
Step-1: “Right-click” on the slide
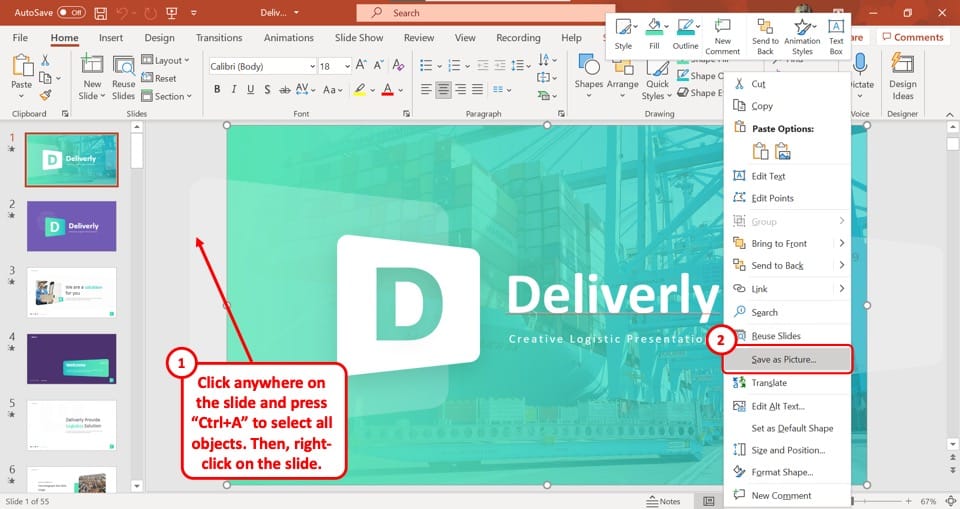
The first step is to go to the slide you want to save as an image and “Right Click” anywhere on the slide. This will open a drop-down menu.
Step-2: Select the “Save as Picture…” option
From the drop-down menu, click on the “Save as Picture…” option. This will open a new window.
In this window, you can select the folder you want to save the slide as a picture in. You can also rename the image by typing in the “File name” box.
Step-3: Select your preferred image format
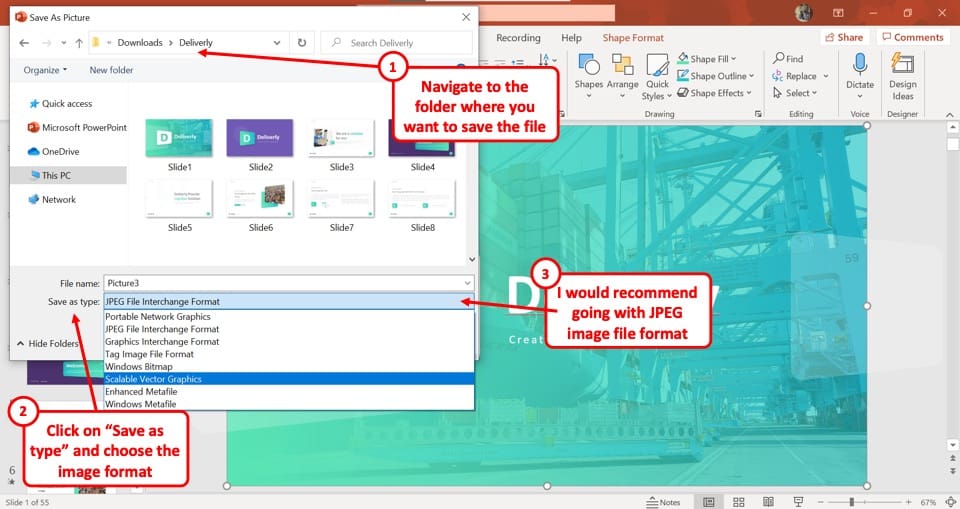
Below the “File name” box, click on the “Save as type” option. This will open a dropdown menu containing all the standard image format options. Click on your preferred format to select it.
I would recommend using the “ JPEG ” file format especially if you only plan to email this to a client or a team member.
If you plan to project it on a screen or print this slide on a huge paper, you would perhaps be better off going with the “PNG” file format.
Step-4: Click on the “Save” button
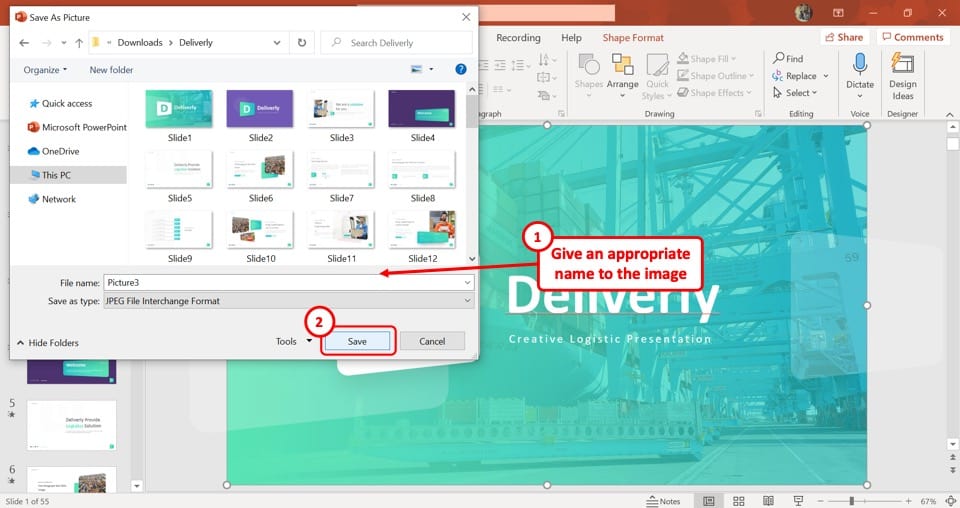
After naming your slide and selecting the image format, click on the “Save” button at the bottom of the new window. This will save the selected single slide as an image.
How to Save One Slide in PowerPoint as a Picture on Mac?
You can follow a similar process to the one mentioned in the previous section even on Mac. However, you can also use the export function and save just one slide as a picture in PowerPoint on Mac.
Here’s how to save just one slide as a Picture in PowerPoint on Mac –
Step-1: Select your preferred slide
First, click on the specific slide you want to save as a picture. Be sure to select the entire slide rather than a single element in the slide.
Step-2: Click on the “Export” option
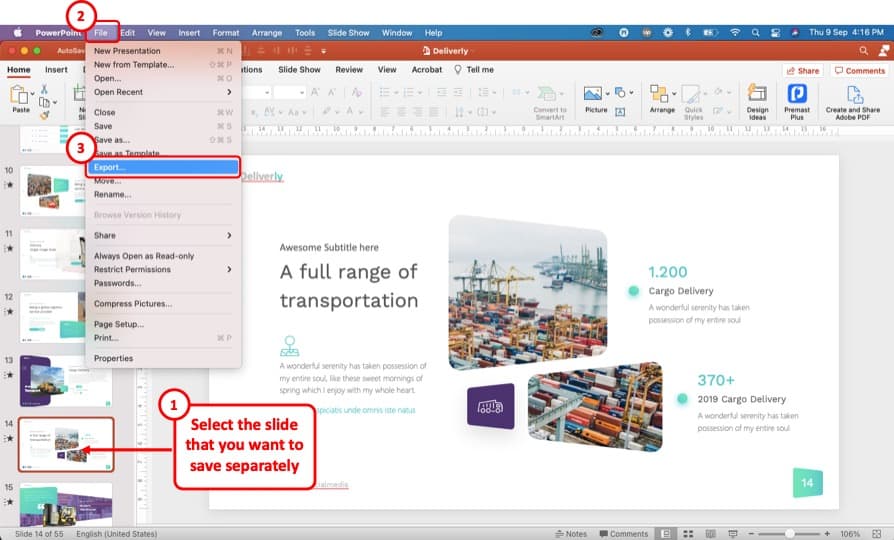
In the “Primary Menu” bar at the top of your screen, click on the “File” option, which will open a dropdown menu. From the dropdown menu, select the “Export” option.
Step-3: Click on the “File Format” box
Clicking on the “Export” option will open a pop-up menu. At the bottom of the pop-up menu, click on the “File Format” box. This will open a dropdown menu containing various file formats.
Step-4: Select the preferred file format
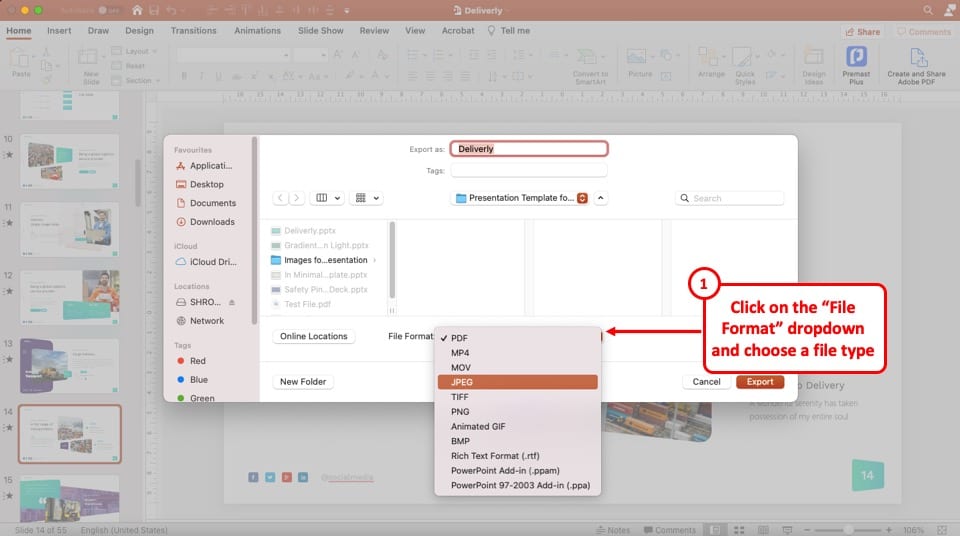
In the dropdown menu under the “File Format” box, there are three image formats which are “JPEG” , “TIFF” and “PNG.” Select your preferred image format.
My recommendation would be to choose the “JPEG” file format as that doesn’t significantly increase the size of the image and also maintains a decent quality for most purposes.
Step-5: Click on the “Save Current Slide Only” option
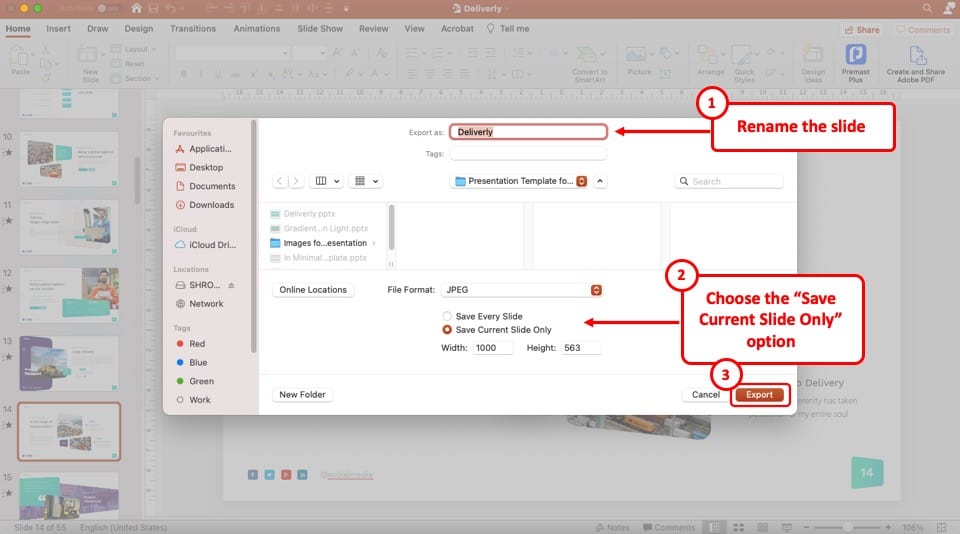
Once you select your desired file format, you will see two new options appear below the “File Format” box. Among the two options, click on “Save Current Slide Only.”
Step-6: Click on the “Export” button
To complete the process, click on the “Export” button which is located at the bottom of the pop-up window. Thus, the selected individual slide will be saved as a picture on your computer.
2. How to Save a Single Slide in PowerPoint as a PDF?
Another option is to save a single slide in PowerPoint as a PDF file. This is great especially when you want to send the slide to a client. Sending a file in a PDF format looks more professional.
Here’s what you need to do to save a single slide in PowerPoint as a PDF –
Step-1: Select the Slide
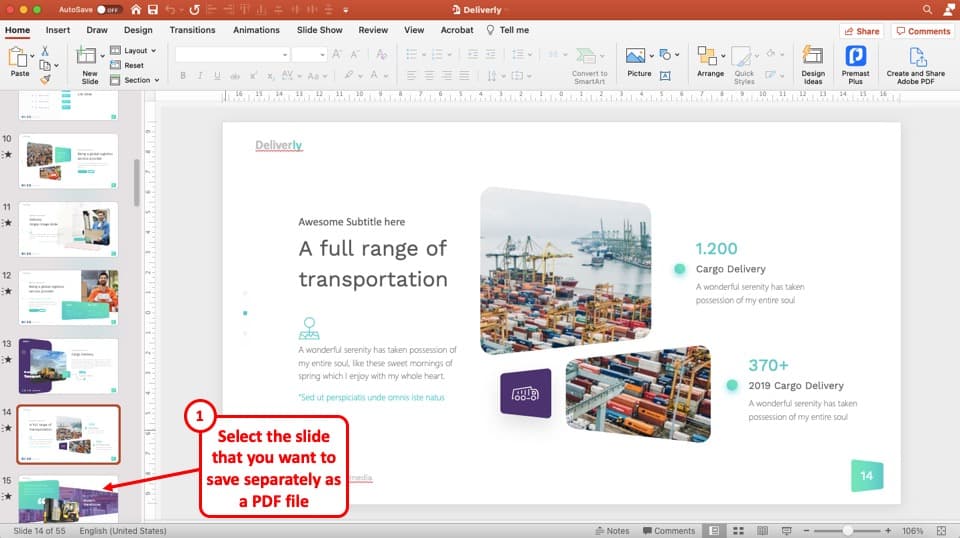
The first step is to select the slide that you want to save as a PDF file.
Step-2: Click on the “File” Tab and choose “Print”
At the top left corner of your screen, click on the “File” menu to open it. In the “File” menu, select the “Print” option from the sidebar at the right side of your screen.
Step-3: Select the “Microsoft Print to PDF” option
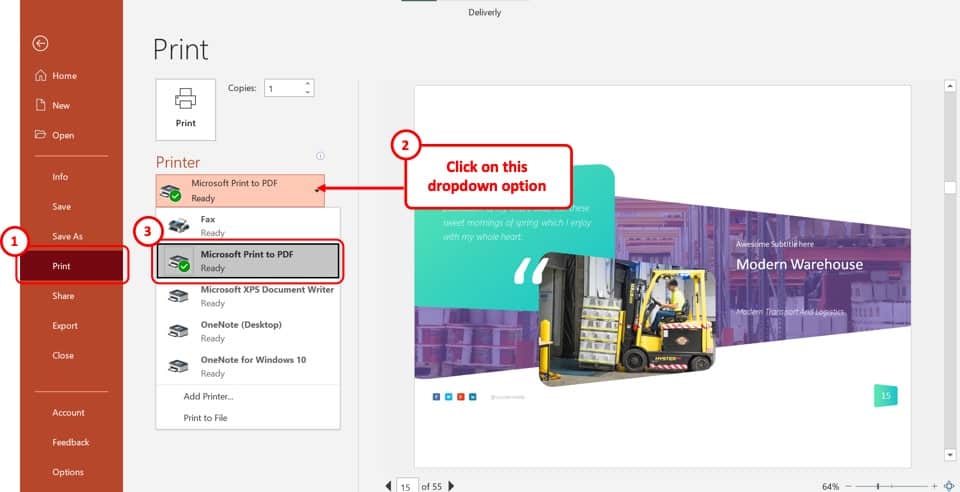
Once the “Print” option is open, click on “Printer” and select the “Microsoft Print to PDF” option from the dropdown menu.
Step-4: Click on the “Custom Range” button
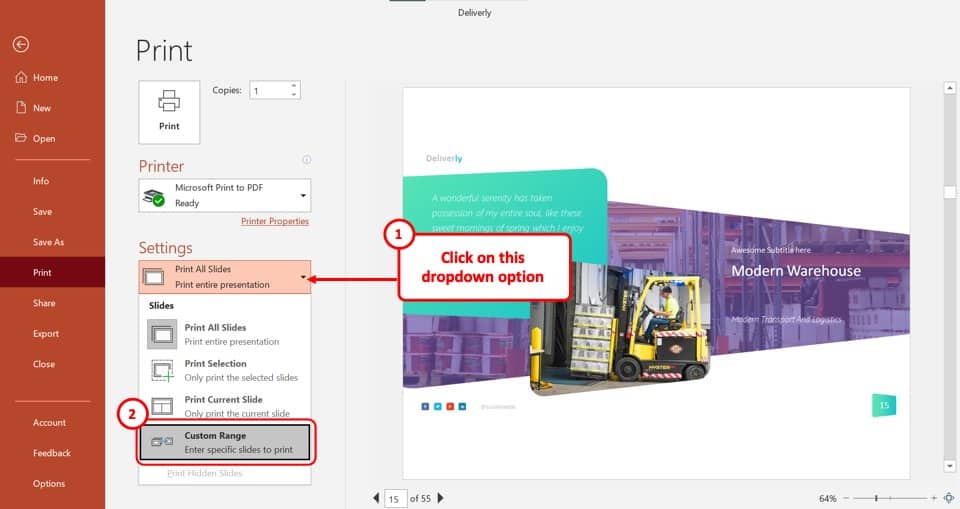
Now, under the “Settings” section, click on the top-most option which says “Print All Slides.” From the dropdown menu, click on the “Custom Range” button.
After that, click on the “Slides” box and type in the slide number of the slides that you want to save as PDF.
Step-5: Click on the “Print” button
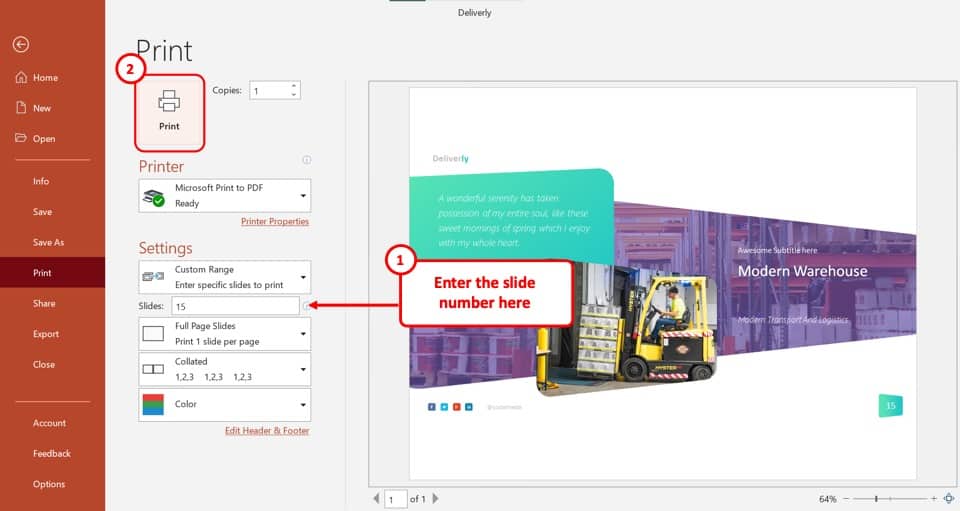
Now, click on the “Print” button to open a pop-up window. Type in the name of the PDF in the “File name” box and click on the “Save” button to save the selected slide as a PDF.
3. How to Save All Slides in PowerPoint as a Picture?
In Microsoft PowerPoint, you can save either an individual slide or an entire presentation as image files. Check out my other article where I’ve gone in-depth on how to save a PowerPoint as a picture . Make sure you check out the article for all the visual references and tips.
I’m also highlighting the process below but if you need to see the process with visual aids, check out the article linked above.
Step-1: Open the “File” menu
At the top-left corner of your PowerPoint window, you will find the “File” tab, which is the first option in the ribbon. Click on the “File” option to open a variety of options.
Step-2: Click on the “Save As” option
With the “File” menu opened, click on the “Save As” option from the sidebar located at the left side of your screen and select the folder where you want to save the pictures in.
To save the slides as pictures in a new folder, click on the “New Folder” button and type in the folder name.
Step-3: Click on “Save As Type”
The “Save As Type” drop-down menu is located in the text box that says “PowerPoint Presentation (*.pptx).”
Click on the text box to open a dropdown menu. Scroll down the menu and select your desired image format from “JPEG File Interchange Format (*.jpg)” , “PNG Portable Network Graphics Format (*.png)” , “TIFF Tag Image File Format (*.tif)” or “Scalable Vector Graphics Format (*.svg).”
After selecting your preferred image file format, click on the “Save” button beside the “Save As Type” box. This will open a new dialogue box.
Step-5: Click on the “All Sides” button
Now, all you have to do is click on the “All Slides” button from the dialogue box to save all the slides of your presentation as image files.
Please Note – Each slide will be saved as a separate image arranged serially by slide number in your selected folder when you save a complete PowerPoint presentation as an image.
4. How to Print a Single Slide in PowerPoint?
In Microsoft PowerPoint, the process of printing an individual slide is similar to the process of saving the slide as a PDF file. Open the “Print” option from the “File” tab and then follow the 3 basic steps:
Step-1: Select the “Add Printer…” option
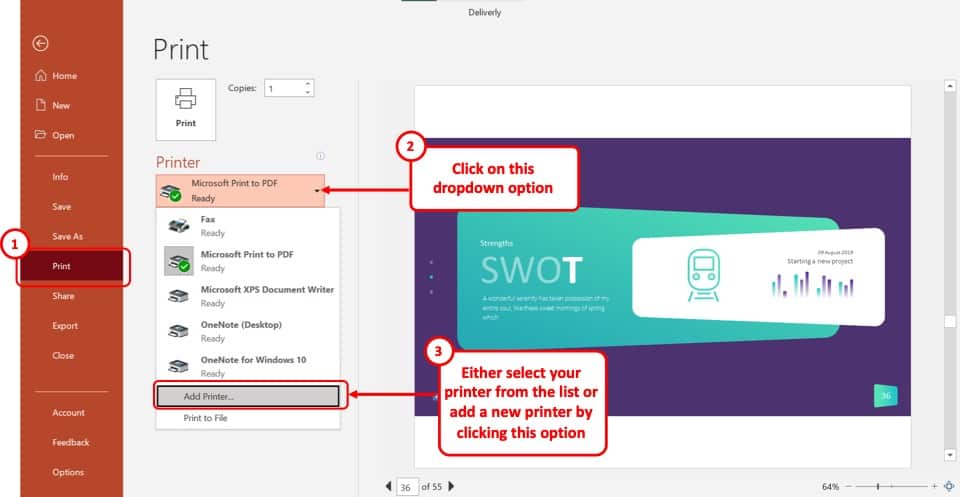
In the “Print” menu, click on the “Printer” box. From the dropdown menu, select the “Add Printer…” option.
This will prompt you to connect your printer to the computer. If your printer is already connected to your computer, click on it to select it.
Step-2: Select your preferred slide
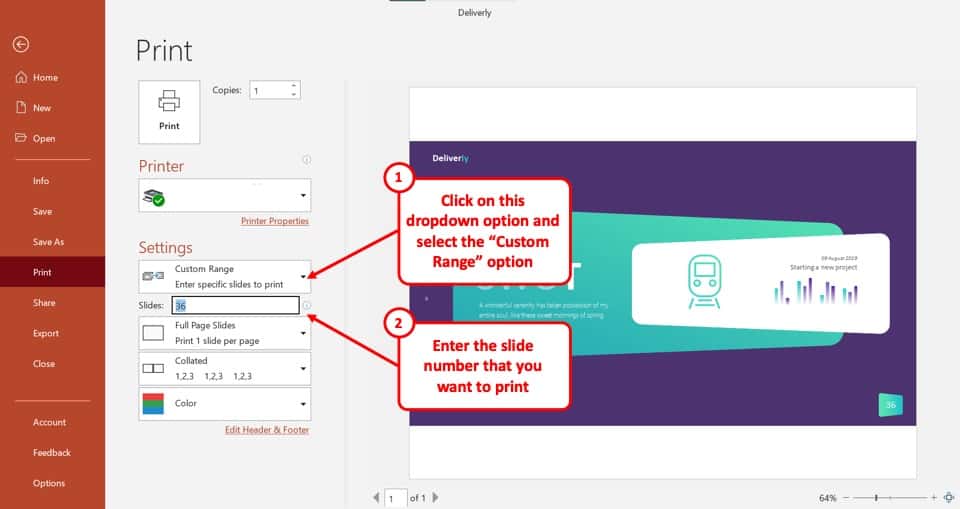
Next, click on the “Settings” button and select the “Custom Range” option from the drop-down menu. In the “Slides” box below, type in the slide number of your preferred slide.
Step-3: Click on the “Print” button

Now, all you have to do is click on the “Print” button for your printer to print the single PowerPoint slide you have selected.
Credit to cookie_studio (on Freepik) for the featured image of this article (further edited)
- GTA 5 Cheats
- Print on a Chromebook
- Nothing Phone 2 Review
- Best YouTube TV Alternatives
- Asus ROG Ally vs. Steam Deck
- Gameshare on Nintendo Switch
How to download Microsoft PowerPoint

If you’re tasked with creating a presentation for work or school, you probably want to look at one of the best slideshow creators, Microsoft PowerPoint.
How to purchase and download Microsoft PowerPoint
How to download microsoft powerpoint on mobile, other ways to get microsoft powerpoint.
Here’s what you need to know about purchasing and downloading Microsoft PowerPoint along with other options for using this full-featured Microsoft Office application.
Just like getting the Microsoft Word standalone app , you can visit the Microsoft Store and search for PowerPoint. However, it’s hard to find the PowerPoint app without it being part of the Microsoft Office bundle. Luckily, we’ll show you exactly how to get it.
Note : Below are the prices at the time of this writing, which are subject to change at any time.
Visit the PowerPoint purchase page on Microsoft.com where you can buy PowerPoint alone for $159.99. If you’re in school, head to the PowerPoint Home and Student page instead where you can buy PowerPoint at a discounted price of $79.99.
Be sure to move down the page slightly and review the Requirements tab before making your purchase because it’s nonrefundable. You’ll need at least Windows 11, Windows 10, or macOS to install PowerPoint along with a certain amount of memory and hard disk space per your operating system.
When you’re ready, select Buy now at the top, and you’ll be directed to your cart to complete the purchase. Note that you’ll receive a digital copy of PowerPoint, not a physical one. Choose Checkout to continue.
Enter your Microsoft username and password when prompted or create an account if necessary.
Select your payment method, optionally enter a promo code, and pick Place order . Notice the statement at the bottom of the page informing you that you’ll be charged immediately, and again, there are no refunds.
Follow the subsequent prompts to complete your purchase, download, and install PowerPoint per your web browser and operating system.
If you’d like to create, edit, or review PowerPoint presentations on the go, you can install the free mobile app. All you need is a Microsoft account to use the PowerPoint app on Android or iOS.
For Android, head to Microsoft PowerPoint on Google Play and select Install . For iPhone, iPad, and Apple Vision, go to Microsoft PowerPoint on the App Store and select Get .
Once the app installs, select Open in Google Play or the App Store. Alternatively, you can simply tap the app icon that displays on your Home screen. Sign in with your Microsoft account and you’re ready to go.
Note that you do have an in-app purchase available for a Microsoft 365 plan if you decide to upgrade.
If you’re looking for additional ways to get Microsoft PowerPoint, we’ve got two options for you.
First, you can use PowerPoint on the web for free with your Microsoft account. All of your files are saved to OneDrive, which also includes 5GB of storage with your free Microsoft account. You can also enjoy many of the same features without much limitation including the use of PowerPoint templates .
Visit PowerPoint online , sign in, and you’re set.
Second, you can purchase PowerPoint as part of Microsoft 365 . Because this is the method you see more than any other, it’s one to consider if you can take advantage of the additional Office apps like Word, Excel, Outlook, OneNote, and others.
Review how to buy Microsoft Office for all of your options.
Do you have to download PowerPoint to use it?
Nope! You can use PowerPoint in your web browser with a free Microsoft account as well as with a Microsoft 365 work or school account. You can also install the PowerPoint mobile app for free on Android or iPhone.
What is similar to Microsoft PowerPoint but free?
You can look at applications similar to PowerPoint that are completely free. These include Google Slides, a web-based slideshow creator, and LibreOffice, a downloadable office suite containing Impress for building slideshows.
For additional options, check out how to use Microsoft Office for free along with our list of the best Microsoft Office alternatives .
How do I save a PowerPoint presentation on desktop?
To save a PowerPoint presentation, go to the File tab and select Save or Save As . Choose a location, name the file, and then Save .
Editors’ Recommendations
- What is Microsoft Edge and how to use it
- Best Microsoft Office deals: Get Word, PowerPoint, and Excel for free
- Microsoft Copilot: how to use this powerful AI assistant
- How Intel and Microsoft are teaming up to take on Apple
- Copilot: how to use Microsoft’s own version of ChatGPT

Apple’s Vision Pro is just a couple of days from landing on people’s heads, with many speculating how much of a success -- or not -- the tech giant can make of its most important product launch in years.
A key factor is expected to be the level of interest developers show in creating custom-made apps for the mixed-reality headset, with some major platforms such as Netflix, Spotify, and YouTube deciding to hold back from offering bespoke apps.
While many people love porting their Microsoft account to their new Windows 11 PC, just as many hate the experience. One of the nicest things about having a new computer is how little tabs it has over you, and letting Microsoft in from the beginning — especially in a way that feels required — is a bit letdown for privacy-minded people.
To make matters worse, getting rid of your account feels tricky. It not only feels like it, Microsoft is your direct antagonist in getting the privacy you want. Luckily, you can make a local account that is disconnected from the rest of your life to gain back the personal feel of your computer. Here's how: Removing a Microsoft account from Windows 11
With various cybersecurity threats on a constant rise, it certainly feels like dangerous malware is around every corner. This time, it found its way into PowerPoint presentations disguised as helpful guides on how to protect yourself against phishing. The irony of it all is strong, but the worst part is that this malware could help attackers empty your bank account.
- International
- Education Jobs
- Schools directory
- Resources Education Jobs Schools directory News Search

KS1 History Lesson: Ernest Shackleton Lesson
Subject: History
Age range: 5-7
Resource type: Lesson (complete)
Last updated
15 August 2024
- Share through email
- Share through twitter
- Share through linkedin
- Share through facebook
- Share through pinterest
A KS1 history lesson which teaches children about the life of Ernest Shackleton and why he was a significant individual. Ernest Shackleton was an explorer of the South Pole in the early 1900s. Ernest tried to reach the South Pole on many occasions but failed. His most famous attempt was in 1915 aboard the Endurance but his ship got stuck in the ice. Heroically, Ernest and his colleagues managed to reach mainland safe.
This resource is a powerpoint presentation which discusses with children Ernest Shackleton’s life as well as making links to the prior lesson which was based on what an explorer is.
How I use this resource: This resource is a powerpoint which is shared at the front of the class with the children. The worksheet can be completed in small groups or completed whole class.
Tes paid licence How can I reuse this?
Get this resource as part of a bundle and save up to 38%
A bundle is a package of resources grouped together to teach a particular topic, or a series of lessons, in one place.
KS1 Explorers: Complete Unit of Planning
A complete unit of planning for Explorers to cover the significant individuals of the past objective of the KS1 History National Curriculum. This unit covers in detail the National Curriculum objective of significant individuals by teaching children about a wide range of explorers in History. This resource features 7 lessons each with a task to complete at the end of the lesson. The seven lessons are: [What is an Explorer?](https://www.tes.com/teaching-resource/resource-13091469) [Ibn Battuta](https://www.tes.com/teaching-resource/resource-13095835) [Christopher Columbus](https://www.tes.com/teaching-resource/resource-13095736) [Ernest Shackleton](https://www.tes.com/teaching-resource/resource-13098000) [Amelia Earhart](https://www.tes.com/teaching-resource/resource-13098221) [Neil Armstrong](https://www.tes.com/teaching-resource/resource-13098258) [Tim Peake](https://www.tes.com/teaching-resource/resource-13098171) The resource also includes a knowledge organiser which shows what is taught in the unit and can be stuck in children’s books as well as a medium term plan with an overview with what is being taught. This resource is suitable for children in Year 1 or in Year 2. How I use this resource: This resource is fully planned and resourced so everything you should need for this unit is provided - saving you valuable time as a teacher. Prior to sessions you will need to check the planning to ensure that you have everything printed. If you are interested in another [KS1 History Unit our Toys Bundle is £10!](https://www.tes.com/teaching-resource/resource-12978657)
Your rating is required to reflect your happiness.
It's good to leave some feedback.
Something went wrong, please try again later.
This resource hasn't been reviewed yet
To ensure quality for our reviews, only customers who have purchased this resource can review it
Report this resource to let us know if it violates our terms and conditions. Our customer service team will review your report and will be in touch.
Not quite what you were looking for? Search by keyword to find the right resource:

Save your presentation in a different file format
You can choose which file format (such as .pptx or .odp) you want to be the default when you're saving your presentations.
Note: Not all features are supported in OpenDocument format. For more info, see Use PowerPoint to open or save a presentation in the OpenDocument Presentation (.odp) format .
Switch your default file format
Select File > Options .
Select Save .
Under Save presentations , in the Save files in this format list, choose the file format you want to use by default.
Use PowerPoint to open or save a presentation in the OpenDocument Presentation (.odp) format

Need more help?
Want more options.
Explore subscription benefits, browse training courses, learn how to secure your device, and more.

Microsoft 365 subscription benefits

Microsoft 365 training

Microsoft security

Accessibility center
Communities help you ask and answer questions, give feedback, and hear from experts with rich knowledge.

Ask the Microsoft Community

Microsoft Tech Community

Windows Insiders
Microsoft 365 Insiders
Was this information helpful?
Thank you for your feedback.
IMAGES
COMMENTS
Learn how to save your PowerPoint presentation to different locations and formats, such as your local drive, a network, a CD, a DVD, or a flash drive. You can also save it as a PDF, XPS, or an earlier version of PowerPoint.
Learn how to save a PowerPoint presentation as a PPT, PPTX, PDF, video or image file on Windows or Mac. Follow the simple steps and screenshots to use the File tab, Quick Access Toolbar or keyboard shortcuts.
Learn how to save a copy of a PowerPoint presentation in different formats, such as read-only, shared, or without notes. Follow the easy steps and screenshots to use the "Save A Copy" or "Save As" option in Microsoft PowerPoint.
Choose the Save or Save As option. Download Article. Click Save to save to the current file, or Save as to create a new file. If you've already saved the file at some point, you'll have the option to click Save, which simply saves your changes to that file. Otherwise, choose Save as to create a brand new file. 4.
When you save your files to the cloud, you can share and collaborate with others, and get to your files from anywhere - on your computer, tablet, or phone. Select File > Save As. Select OneDrive. Save personal files to OneDrive - Personal, and work files to your company OneDrive. You can also save to another location, like your device.
Learn how to save and share presentations in PowerPoint 2019 and Office 365 with this video tutorial. Find out how to use Save, Save As, AutoRecover, Export and other features.
To open the downloaded file, select the arrow to the right of the file name, and then select. If Internet Explorer asks you what you want to do with the file, click. box, pick where you want to save your presentation. box, give your file a name (if you haven't already), and then click.
Learn how to save, copy, export, and share PowerPoint presentations using different options and tools. Find out how to use OneDrive, AutoRecover, and change file types.
To save a presentation in PowerPoint, click on the "File" tab in the top left corner. Then, select "Save" or "Save As" from the dropdown menu. Choose the location where you want to save the presentation and click "Save."
In this video, you'll learn the basics of saving presentations in PowerPoint 2016. Visit https://www.gcflearnfree.org/powerpoint2016/saving-presentations/1/ ...
Learn how to save your PowerPoint presentation as a desktop shortcut in this easy tutorial. Watch the video and follow the steps to create your own icon.
Learn how to create a PowerPoint presentation from scratch with this beginner's guide. Find out how to add content, slides, design, animations, transitions, and more.
Browse to the location where you want to save the file and give it a name then press "Save.". While the video is being created, you will see the small progress bar at the bottom of your PowerPoint window. Wait till this is done and then go to your video. Now you can double-click your video file and it will automatically play with your video ...
Try-it! Transcript. Save your presentation, so you don't lose all your hard work. Then, print it to share it with others. Save your presentation. Click FILE > Save, pick or browse to a folder, type a name for your presentation in the File name box, and click Save. Save your work as you go. Hit Ctrl+S often.
Nevertheless, here's what you need to do to record your presentation as a .ppsx file. Step-1: Click on the "File" tab. In the menu ribbon located at the top of the screen, click on the "File" tab. This will open the "File" screen. Step-2: Click on the "Save As" option. In the menu sidebar on the left side of the "File ...
Open your presentation, head over to the "File" tab, select the "Check for Issues" option, then select "Inspect Document." The "Document Inspector" window will appear. Make sure the "Document Properties and Personal Information" box is checked, and then click "Inspect." In the next window, select "Remove All.".
This http://OneMinuteGeek.com video tutorial shows you how to save your PowerPoint presentations as an automatic slideshow when you open the file. Visit http...
Under the Save & Send menu, find and click on Create a Video. Click on the Computer & HD Displays option to customise the video size and quality (small, medium and large size & quality). Click the Don't Use Recorded Timings and Narrations to select if you're using timings and narrations. Click Create Video and another dialogue box opens.
In PowerPoint, open your slide presentation, and then open the slide that you want to export. On the File menu, select Save As. In the Save as type box, select one of the following picture formats: GIF Graphics Interchange Format (.gif) JPEG File Interchange Format (*.jpg)
Step-1: "Right-click" on the slide. The first step is to go to the slide you want to save as an image and "Right Click" anywhere on the slide. This will open a drop-down menu. Step-2: Select the "Save as Picture…" option. From the drop-down menu, click on the "Save as Picture…" option. This will open a new window.
To save a PowerPoint presentation, go to the File tab and select Save or Save As. Choose a location, name the file, and then Save. Editors' Recommendations
Try-it! Transcript. Save your presentation, so you don't lose all your hard work. Then, print it to share it with others. Save your presentation. Click FILE > Save, pick or browse to a folder, type a name for your presentation in the File name box, and click Save. Save your work as you go. Hit Ctrl+S often.
create and deliver PowerPoint presentations , (SOPs): 5 years (Required) tracking APD project actual expenditures against CMS: 7 years (Required) Work Location: Remote. Show more If you require alternative methods of application or screening, you must approach the employer directly to request this as Indeed is not responsible for the ...
Save in a video format. Select File > Export. (Don't use Save As, because it doesn't offer video options.) Open the File Format list and select the video format that you want ( MP4 or MOV ). If the MP4 and MOV options aren't in your version of PowerPoint, see Requirements below for more information. Select the video Quality you want ...
This resource is a powerpoint presentation which discusses with children Ernest Shackleton's life as well as making links to the prior lesson which was based on what an explorer is. ... Get this resource as part of a bundle and save up to 38%. A bundle is a package of resources grouped together to teach a particular topic, or a series of ...
For more info, see Use PowerPoint to open or save a presentation in the OpenDocument Presentation (.odp) format. Switch your default file format. Select File > Options. Select Save. Under Save presentations, in the Save files in this format list, choose the file format you want to use by default.