Disclosure: MyeLearningWorld is reader-supported. We may receive a commission if you purchase through our links.

How to Share a PowerPoint Presentation Online: 9 Free PPT Sharing Options
Last Updated: 02/12/2024
By Scott Winstead
- Share on Facebook
- Share on LinkedIn
- Share on Reddit
- Share on Pinterest

Did you know that recent data shows a whopping 35 million PowerPoint presentations are given every day across the world? As an instructional designer who often crafts courses and presentations using PowerPoint, it’s one of my favorite tools out there, but I’ve noticed a lot of users run into problems when it comes to sharing their PowerPoint content online.
The good news is PPT sharing is actually super easy, and it doesn’t have to cost a thing thanks to all the different free options available. From using a screen recording platform to taking advantage of file sharing services and everything in between, there’s no shortage of options for getting your PowerPoint presentation in the hands of your audience.
Whether you’re aiming to reach a global student audience, collaborating with fellow educators, or simply looking to make your content more accessible, this guide will walk you through the nuances of sharing a PowerPoint presentation online. Each and every option has its pros and cons, use cases, and distinctive features that I’ll explain in depth so you can choose the right method for your specific needs.
The Best Free Ways to Share PowerPoints Online
1. use screen recording software to add voiceovers and create a shareable link.
VEED is the fastest and easiest way to make high quality, professional videos for eLearning, business training, sales presentations, and other applications.
With a screen recording software like VEED , recording and sharing PowerPoint presentations online is super easy.
Just c reate an account , choose your recording method (you can add a camera pop-in to your presentation, add voiceovers, or just record only the slide presentation), and start recording to add audio to your PowerPoint presentation in the window. I’ve found that it’s a great way to create how to videos ! You can screen record on Windows or Mac with VEED .
Once you’re done, stop recording and do any editing you might wish to do before finalizing your presentation.
Now all you have to do to active PPT sharing is to simply copy the link VEED creates for your video and share it with whoever you wish .
In a nutshell
- Screen recording your PowerPoint presentation with VEED lets you add things like camera bubble pop-ins for presenters or voiceovers
- Get a shareable link you can send to whoever you want
- Track views, watch time, clicks, and other analytics easily
- Free & paid versions available
- Could be a little time-consuming to get your video just the way you want it
Click here to try VEED free.
2. Just email it!
This is a simple, easy to use method for PPT sharing.
Aside from just picking the target address, making an email attachment, and clicking the Send button, you may want to automate and customize emailing to your needs. For instance, think of an ad hoc email account that would distribute your presentation to all incoming contacts.
You can easily configure this using Gmail or other email services. Alternatively, set up a filter : if an incoming message subject contains “Presentation”, the file or URL will be sent over to your recipient.
While email can be convenient for sharing PowerPoint files, it might not even be possible in some cases if your file is too big. This is because most email services have strict file size limits, which means your PowerPoint presentation might be prevented from being sent if it’s too large.
So, if your entire presentation is an especially big one, this option might not be ideal for you.
- A fast and easy method to share PowerPoints online, works right from your email client or web service
- Reduces manual operations with some mild tweaking and tuning
- Proves tricky with big files (since PPT is scarcely the epitome of a lightweight format)
- May not be your first choice if you have security concerns. In case your deck includes confidential information or trade secrets, you may want to think of a safer option.
If you wish to avoid actual files being transmitted, read on for more ways to copy a link to the material.
3. File sharing services
If your deck is really big and feature-packed with all the bells and whistles that PowerPoint offers, why not use DropBox or Google Drive for easy PPT sharing?
- A nice way to send your content to a few people you know
- The problem is: your recipient needs to have PowerPoint installed. Otherwise, the content just won’t open.
- If PowerPoint does exist on the other end, the intended person may have an older version in place. In this case, advanced features and frills may get lost along the way.
- The security risk still stands. What if you make a mistake and the file ends up in the wrong hands? Worst case scenario, your work could be compromised and distributed all over the web in no time.
Ultimately, this option works fine if you intend to share with a limited group of people and your presentation is appropriate for the public domain. To reach a larger number of viewers at a higher security level, check out one of the following options.
4. Slide hosting services
Looking for a tailored PowerPoint sharing solution that keeps deck authors in mind?
Pay heed to web-based solutions like SlideShare , SlideBoom , Speaker Deck , etc. These services help you upload, host, and share slides on the Internet.
- Remote presentation made easy. It’s all in your browser, no need to deploy a dedicated server or any other IT infrastructure
- Most hosting providers offer administrative tools so you can keep track of your presentations and process user feedback
- Your work is safe, since nobody can copy and steal the content
- Most sharing services are mobile-friendly so viewers can access the material on a smartphone or tablet.
The only possible drawback we can think of here is quality. Your hosted slides may not be the spitting image of the original PPT file after all. Make sure you learn about functional limitations in advance.
5. Embed code
Share a file, send over a link… Now there is yet another option. Use a code generated in a third-party service and paste it on your website.
If you are looking for a more scalable intermediary format than PPT, try HTML5 or Flash.
There are a bunch of free and paid converters out there. Pick one with decent output quality, convert the slide deck, upload it onto a hosting service, get your embeddable code and that’s it.
- Easy way to broadcast the content on your website
- If you decide to convert to HTML5, your slides get better visibility across all browsers and gadgets.
Make sure your original effects are not left behind. Flawless conversion is rare, so see to it that your content is rendered in high quality.
6. Make it a video and share on YouTube
Convert your PowerPoint presentation to video and upload it to YouTube. You can’t go wrong. Top exposure guaranteed.
PowerPoint has offered this feature since version 2010. Learn how you can seamlessly export your presentation as video – all effects intact – right from PowerPoint.
Don’t worry, there is a workaround for older versions as well. Use a third-party solution like Movavi or Wondershare PowerPoint add-ins , click Publish, and voila.
As always, pay attention to video quality and resolution settings before you publish.
- These days, the YouTube app comes pre-installed on every web-enabled device. A great way to showcase your expertise to millions of viewers.
- A video presentation just runs its course with no hiccups on the next slide or pop-up effect.
- Instant feedback and progress tracking: count views, comments, shares and likes
- Viral effect: once on YouTube your video proliferates across all social media.
Video is particularly good for tutorials and guidelines. If your presentation comes in a similar vein, have no doubts: most likely it’s your best choice.
7. Show it in your LMS
What can be better than a full-fledged training course with score tracking, feedback, and enhanced statistics?
The good news is you can easily share your PowerPoint presentation online that way.
What you need is a learning management system (LMS) – a service for delivery and management of education courses and online classes. Needless to say, an LMS’s functionality goes far beyond a slide show.
In most cases, you need to register an account in an LMS. Registration ensures your content remains personalized and safe.
Learning management systems are making inroads into the business segment as well, since HR departments are using their potential for employee onboarding and training.
- Secure way to keep your data under a personal account
- Most LMSs offer feedback and collaboration features
- User activity monitoring (test completion and results).
Please bear in mind that a PowerPoint presentation doesn’t work in an LMS as-is. You need to convert your slides into a special format like SCORM or TinCan (free converters are readily available). Some LMS vendors tend to tailor their offering to a specific audience. Make sure the solution fits your needs, upload a converted deck and enjoy the benefits.
8. Save as a PDF
This one is pretty self-explanatory and is great for sharing with non-PowerPoint users. Feel free to use it as a workaround when PowerPoint is unavailable on your recipient’s end.
There is hardly any computer or mobile device out there that doesn’t open PDF format files.
Adobe PDF viewers are free of charge, so there are absolutely no costs incurred.
Save your PowerPoint presentation slides as a PDF and send the file or a link from a hosting service.
- Fast, easy, fairly lightweight if you set the right settings
- A universally accepted file format
As far as conversion is concerned, you should probably expect quality issues. An output PDF file may not include originally conceived animations and other posh effects. The mantra here is be realistic and think what you can sacrifice for the sake of better compatibility.
9. Broadcast your PowerPoint presentation file
Microsoft PowerPoint 2010 includes the Broadcast Slide Show feature that helps presenters to share a slide show with a global audience online. You could also broadcast your PowerPoint presentation on a virtual conference platform like WebinarJam or Zoom .
Just send a link and invite your contacts, so they can watch your PowerPoint presentation in real-time in their browsers.
- Send the URL to attendees by e-mail
- You can pause and resume the slide show during the broadcast
- Some features, such as custom transitions, audio, and video are not supported.
The Broadcast Slide Show requires a network service to host the presentation. A built-in PowerPoint Broadcast Service is available in versions from 2013 onwards. Your viewers need to have a Windows Live ID to join the session.
What is the best way to send a PowerPoint presentation?
There are many different ways to share a PowerPoint presentation, including using a screen recorder tool like VEED to create a shareable link, sending an email attachment, using a service like Dropbox or Google Drive, and more. The best method really depends on your specific needs.
Can you share a PowerPoint for editing?
You can now edit and collaborate on PowerPoint presentations with others by saving your presentation in OneDrive or SharePoint. All authors must be working in PowerPoint 2010 or later (Windows), PowerPoint 2016 (Mac), or PowerPoint on the web.
How do you send a PowerPoint through Gmail or other email services?
The easiest way to share a PowerPoint via Gmail or any other email provider is to send it as an attachment. However, if the file size is too large, your email provider might not allow you to send it this way.
Why can’t I send my PowerPoint through email?
The most common reason why you can’t send a PowerPoint through email is because the file size is too large. For many email services, like Gmail, the max file size you can send is around 25 Mb.
How do I turn a PowerPoint into a link?
There are many different ways you can do this, but the easiest option is to save it to the cloud and send it to others as a view-only copy.
How can I send a large PowerPoint file?
There are a few ways that you can send a PowerPoint file that’s large and requires a lot of storage space. You can use a cloud-based storage service, such as Google Drive or Dropbox. You can turn the PowerPoint into a shareable link and simply email the link, so that you don’t have to send the whole file as an attachment. If you’re using a cloud-based storage service, you’ll need to know the recipient’s email address.
How can I make a PowerPoint file smaller?
If you want to make a PowerPoint file smaller for easier sharing, you can compress the file using a compression tool such as WinZip or 7-Zip. You can also save the PowerPoint as a PDF document.
Final Thoughts on Sharing PowerPoint Presentations Online
No matter what option you pick to share PowerPoints online, it’s key to establish the first contact with your target audience.
Want to have an easy-to-share link to a high-quality slide show video presentation with voice overs and other features? Use a screen recording software like VEED .
Need to share a deck with a large number of viewers and automate distribution? Upload the content on a slide hosting service, get a link and create a special mailbox that will send out this URL to anyone interested.
Feel like limiting access to the presentation to a small group of viewers? Share your PowerPoint slides on Google Drive, DropBox, or a similar service and grant access rights to selected email addresses.
What’s your favorite way to share PowerPoints online? How do you deal with scalability and quality issues? As always, I appreciate your feedback. Any thoughts and comments are welcome.
How to Screen Record on Windows with Audio (Free & Paid Options)
Best practices for instructional designers working with subject matter experts, leave a comment cancel reply.
Save my name, email, and website in this browser for the next time I comment.

Unsupported browser
This site was designed for modern browsers and tested with Internet Explorer version 10 and later.
It may not look or work correctly on your browser.
How to Collaborate as a Team on PowerPoint (PPT) Presentations (+Video)
- Bahasa Indonesia
PowerPoint collaboration helps you to stay in sync and work together. Microsoft has added these features to PowerPoint to help solve problems with shared PowerPoints. Multiple users can work in the same presentation at the same time.

Picture this:
You're working to wrap up a presentation for a class project or work group. You're passing the file back and forth using email or file-sharing and it's hard to stay in sync on the project. Pretty soon, you've got multiple copies of the same file floating around with inconsistent changes.
You may be wondering: can you share a PowerPoint? The answer is yes. Microsoft PowerPoint has added many collaborative, online features in its recent versions.
In this tutorial, I'll teach you how to use the PowerPoint sharing features to work together on a single PPT file online.
How to Quickly Collaborate on PowerPoint Presentations (Watch & Learn)
In this video, I'll show you how to get started with saving a file to the cloud, as well as working with others on editing the same presentation. You'll learn to invite other users to collaborate and what to expect when working together in PowerPoint.

Keep reading to find out more about how to get started with PowerPoint collaboration, including a totally free option to use Microsoft Office Online.
Microsoft Office, Explained
You might be wondering what's possible when it comes to collaboration. To understand that let's talk a bit about the various versions of Microsoft Office.
Back in the day, Microsoft Office was easy to understand. Every few years, Microsoft would release a new version of Office and labeled it according to the year of release, such as "Excel 2016" or "PowerPoint 2013."
Times are different now though. The apps are updated often. Microsoft is essentially responding to competitors like Google Drive and Dropbox Paper. Here are the various current versions of Office that are available to use:
- Microsoft Office Online . These are the web-browser based versions of the Microsoft Office apps, including PowerPoint. They're free to use , and you can think of them as Microsoft's answer to Google Drive.
- Microsoft Office 365 . Much like Adobe's Creative Cloud, Microsoft now offers a subscription-based model to use the Office suite. Pay a monthly fee, and you'll get access to all the Office apps and consistent updates.
- Microsoft Office Home & Student . This is most like the traditional model, where you pay a one-time fee for the app and have it to use.
All these can work with Office collaboration, but it helps to consider that your collaborators may be using a different version.
The best news is that Microsoft Office Online is available to everyone, for free. This means that anyone can create a Microsoft account and use it to collaborate with other Office users.
Also, you might have heard of Microsoft OneDrive. This is Microsoft's cloud storage service (think Dropbox.) You'll need OneDrive to save your PowerPoint file for collaboration. You can get 5 gigabytes of OneDrive storage for free with a Microsoft account.
Prepare to Share
Let's dive into collaboration in PowerPoint. A great way to begin is by saving your presentation in OneDrive.
To save a presentation in OneDrive, go to the File > Save As menu in PowerPoint. When the Save As menu appears, click on Online Locations . From the Place dropdown, choose OneDrive . Name your file, then click Save. This will save your presentation to the cloud so that others can collaborate with you.

Now that you've got your file saved, you need to make it a shared PowerPoint. That means you'll need to invite some other users to collaborate with you on the presentation. Find the Share button near the upper right corner and click on it to invite others to your presentation.

Now, you'll see a new window where you can add others to your PowerPoint presentation. From your list of options, click on Invite People . On this menu, you can add the email addresses of your collaborators.
You can also control how to work on PowerPoint together here. The Can Edit check box controls whether others can make changes. Leave it checked if you want a collaborative editing PowerPoint. But if you want users to see a view-only copy, uncheck it.

Once you press Share , the recipient will get an email with a link to collaborate on the presentation. Keep adding more users to create a truly collaborative presentation. You're ready to start collaborating with others in the same presentation file.
PowerPoint Team Collaboration Options
How you collaborate with your team in PowerPoint is up to you. This could be as simple as asking someone to visit the link and review it. But there are plenty of options to work inside of the file at the same time.
PowerPoint collaboration is useful if you're working all at once on the same project. For example, you might all be on a videoconference completing changes together.
First, someone will receive the link and click on it. This opens up Office Online. Again, this is a version of Office that doesn't require downloading an app.
From here, there are two options. Both are on the Editing dropdown.
- For basic edits, click Editing on the menu. This lets you make changes right inside Office Online.
- But if you need a full suite of features, click Open in Desktop App. This launches the PowerPoint app if it's installed.

If you've got a desktop version of PowerPoint, it's your best choice. The full set of features and tools will be available to work with presentations. Office Online is great for viewing and quick edits, but the desktop version delivers more.

Once the online or desktop app is open, it’s time to get to work. Any changes that you or others make will appear in real time. Office Online defaults to an auto-save option, so the slides save each time they’re changed.
As you work with your global team, there won’t be any delay in the changes becoming visible. This is how to work on PowerPoint together to drive great results.
View PowerPoint Collaborators
Wondering how to collaborate on PowerPoint? It helps to know exactly who’s on your team. When you’re working in the desktop version of PowerPoint, you can click on the Share button again. A list of users and their permissions will appear.
This way, you can track who has access to your shared PowerPoint. You can also tell whether they've got View or Edit access to your slides.

For Office 365 users, there are more options, like chatting with users from the sidebar. You can always click Share to manage who is able to work on the file and change their editing permissions.
No matter which version of PowerPoint you use, collaboration works best with OneDrive. Inviting collaborators within the PowerPoint interface makes it much easier to share. That's always true, no matter which PowerPoint version each of your team members is using.
Learn More About Making PowerPoint Presentations
How do you collaborate when working with others? Do you like to use PowerPoint's built-in features to share and collaborate, or do you prefer using apps like Dropbox to pass files back and forth?
Outside of collaboration, there are plenty of other great PowerPoint tutorials on Envato Tuts+ that can help you build your presentation skills. Check out these PPT tutorials to learn more:

Or, browse through our best PowerPoint template designs on Envato Elements and GraphicRiver . They give you plenty of creative slide designs to build a great presentation with quickly.

Need Help? Grab Our Making Great Presentations eBook (Free)
You can find more information in our eBook on making great presentations . Download this PDF eBook now for FREE with your subscription to the Tuts+ Business Newsletter.

It'll help you master the presentation process, from initial creative ideas, through to writing, design, and delivering with impact.
Collaborating in PowerPoint Made Easy
Many have wondered: can you share a PowerPoint easily? As you can see, the answer is yes. With PowerPoint’s built-in features, you can share slides with the world. This means that your PowerPoint collaboration can span the globe.
Your team doesn’t even have to have the PowerPoint desktop app. Download one of our premium PowerPoint templates, then use them with PowerPoint collaboration features . Thanks to Office Online, your team can view and make edits from anywhere. This article focused on how easy it is to work together inside PowerPoint.
Editorial Note: This post has been updated with contributions and a video from Andrew Childress . Andrew is a freelance instructor for Envato Tuts+.

You’re using an older browser version. Update to the latest version of Google Chrome , Safari , Mozilla Firefox or Microsoft Edge for the best site experience. You are using an outdated browser, so there may be issues with displaying the page. To make the website work correctly, use the latest version of one of these browsers: Google Chrome , Safari , Mozilla Firefox or Microsoft Edge .
- Corporate Training
- Course Selling
- Academic Learning
- Learning Basics
- Instructional Design
- Online Training Tools
- Manufacturing
- Products iSpring Suite iSpring Learn
- Use Cases Training organizations Onboarding Compliance Training Induction Training Product Training Channel Partner Training Sales Training Microlearning Mobile Learning
- Company About Us Case Studies Customers Partnership Course Development Contact Us
- Knowledge Hub Knowledge Hub Academy Webinars Articles Guides Experts on iSpring
- Language EN English Français Deutsch Español Italiano Nederlands Português Polski 中文 日本語 العربية Indonesia
- Shopping Cart
How to Share a PowerPoint Presentation Online

content creator
Paulina Fox See full bio →
Professional presenters, salespeople, developers, designers, teachers, event spokespersons – we all have the problem of sharing PPT slides with a wider audience. Live presentations are cool, but they impose evident limitations. Those 10 – 100 listeners in the room will definitely enjoy the good vibes and a proper joke that come in a package with a nice presentation. Yet there are thousands of people out there who didn’t attend your class or event, but could make good use of your findings.
So the question is: what’s the best way to share your presentation online so more people could see it? Out of a dozen or more ways to solve the issue, let’s get down to the five that seem to make the most sense.
1. Use Presentation Hosting
There’s a bunch of web-based slide hosting services out there that can help you upload and share a presentation without quality losses or security implications, for example, SlideShare, MyPlick, and Slideboom.
The good news is, this scenario makes a remote presentation easy since it’s browser-based and there’s no need to employ your own proprietary server or deal with bandwidth issues. What’s more, most hosting providers include administrative tools so you can keep track of your presentations if you have only a few uploaded.

Check out iSpring Learn LMS to get a better feeling of how it works →
5. Share the Source File
Least sophisticated therefore highly popular, this method has its pros and cons. Indeed, you might be well off uploading your presentation on DropBox or Google Drive and sharing a link with a buddy. However, your buddies might not have PowerPoint installed. Or, chances are, they are using an older version, so turns out the slides just won’t open, and the visual frills you sweated over three nights in a row will get lost. Also make sure you always indicate file size, as a download may result in a very lengthy process for some people.
Besides, there are security risks to consider. The presentation might get copied, modified and distributed across the web before you even know it. If your content is sensitive and better kept from prying eyes, it makes sense to consider the safer options described above. To learn more about how to protect PowerPoint slides, also read this article .
Here are our Top 5 ways of sharing PowerPoint presentations online. Hopefully, we managed to convey the feeling of how cool it is to broadcast your materials to a bigger audience yet stay in control of things. Whatever option you choose, make sure you get the most out of PowerPoint, which is a tremendously powerful tool, indeed.
Good luck with your presentations, and stay tuned for more tech notes!
Table of Contents
iSpring Suite
Create online courses and assessments in record time.

Content creator
Paulina Fox
Passionate about design and tech, Paulina crafts content that helps customers delve deeper into iSpring products.

“Could I have a copy of your slides?” It’s a common question after you have finished your presentation and received the applause. You may just hand the file to the event sponsor to share with the crowd. However, most people will never get back to your slides – not because they were uninterested, but because it is too inconvenient. Is there a more effective way to share a presentation?
Yes there is—in fact, there are several. You can share your hard work, and not only with interested listeners after a presentation, but also with a larger audience you have never met. How many more people all over the world would benefit from the material you have put together? If you share your PowerPoint online, those viewers can find it.
Here are five of the best ways to share a PowerPoint presentation online. Each has its own advantages, so find the method that works best for your current situation.

1. Let others download your original file
Of course, one method is to simply upload your PowerPoint to Google Drive or DropBox and give the link to a friend. For sharing with just a few people and with viewers, you know personally, this can be the best option.
- If the user does not have PowerPoint, your content will be inaccessible.
- If the user has an older version of PowerPoint, important features may be lost.
- This method has the greatest security risk – if the wrong people get access to the file, they can copy, modify, and distribute it overnight.
To safely share your content with a larger number of viewers, consider one of the other options described below.
2. Upload your presentation to a hosting service
Today, services such as iSpring Cloud (soon to be released), SlideShare, SlideBoom, and many others will host your slides on the web.
Advantages:
- Your file can’t be copied or stolen, so you can share it with the world without losing security.
- You can upload PowerPoint, PDF, Keynote and OpenDocument.
- Your slides can also be viewed on mobile devices.
- You can share your slides in many ways: a direct link, an embed code, or an invitation.
- Some services have features that let you monitor your presentations and solicit feedback from viewers.
A word of caution: depending on the service, you may lose animations and effects.
3. Turn your presentation into a video
This is a fantastic option if you want to reach the widest audience possible. Custom converters like SlideAlloy, Movavi, Wondershare and others will enable you to turn your PowerPoint into a video (Most of these tools function as add-ins in PowerPoint, giving you an extra tab when you open the program). Click the “Publish” button, and your video will go straight to YouTube.
- YouTube comes on nearly every web-browsing device, making your video accessible in many ways.
- You can receive views, comments, likes, and shares.
- It’s easy to share the video on any number of sites just by providing a link.
- You can also publicize the video on all forms of social media.
- Videos are better than slides in many contexts, such as explanations or tutorials.
4. Convert your file to HTML5 or Flash
You can also convert your file to a more flexible format such as HTML5 or Flash. While a quick google search will reveal many free online conversion services, the quality they will produce is questionable at best.
- Using a universal format can be more convenient for your audience.
- HTML5+Flash can also be downloaded on all devices and in all browsers.
- More ways to distribute content online.
You then can do whatever you want with the converted file: embed it on any website, or upload it to your favorite hosting provider to experience all the advantages described in point # 1.
5. Upload your presentation to an LMS
An LMS, or Learning Management System, such as DigitalChalk, is a great option for anyone whose work is related to education. These systems deliver training programs and online classes.
- LMSs often have features for feedback and collaboration.
- Statistics on user activity, such as completion of tests and tasks, are always provided.
- Viewers need an account to access the LMS, helping keep your material secure.
- Some businesses have picked up on the advantages and started to use LMSs for registering or training employees.
New technological solutions are developing all the time, but here are 5 of the best ways available today to share your slide decks with a larger audience while remaining in control.
Stay tuned for more tips to make technology work for you.
Do you have what it takes to become a DigitalChalk guest author? Contact us at marketing@digitalchalk.com to find out more!
Written by: Elizabeth Studenroth Elizabeth Studenroth has been writing for iSpring for almost a year now. She manages to successfully combine writing about e-Learning with actually teaching people at a community college. Being inspired by both learning and teaching, she is really passionate about both of her jobs. We believe it’s that passion that helps her get down to the bottom of any topic.
The DigitalChalk Blog:
Guidance to keep your business on the right course..
As part of our unlimited support offering, our blog allows us to write content with you in mind. Filled with tips and tricks, platform feature highlights, how-tos, related news, and much more, our blog is designed to hel pyou accomplish your goals. Sign up today to learn more about how DigitalChalk can help you, your business, and your students succeed.
Search Blog
Sign up for helpful advice and more for your business., you're in thanks for signing up..
Sign up now!
DigitalChalk uses the information you submit above to provide the most relevant resources and contact you about our products and services. You may unsubscribe from these communications at any time. For information on how to unsubscribe, as well as our privacy practices and commitment to protecting your privacy, check out our Privacy Policy .
Recent posts
- How do I get more employees using our LMS?
- How can I make eLearning courses more appealing to the visually impaired?
- How do I make eLearning accessible to all learners?
- When should I consider upgrading to a better LMS?
- Understanding DigitalChalk’s New Video Element: Revolutionizing Video-based eLearning
- Announcements (92)
- Business Training (52)
- DigitalChalk (55)
- eLearning Tools (56)
- Marketing (78)
- Podcast (4)
- Tips & Tricks (267)
Byte Bite Bit
How to Share a PowerPoint Presentation as a Link: Easy Online Distribution Methods
In today’s world, sharing information seamlessly is part of our daily routine. Whether it’s for work or personal reasons, being able to circulate ideas quickly and efficiently is crucial. When it comes to presentations, PowerPoint remains a staple. However, gone are the days of attaching bulky files to emails. We can now share our presentations as a link, revolutionizing how we collaborate and communicate. It streamlines the process by allowing anyone with the link to view the presentation without the need to download it, enabling online collaboration like never before.

The trick is in knowing how to turn our painstakingly crafted slides into a shareable link; it’s simpler than you might think. Picture this: you’ve just put the finishing touches on a presentation, and you’re itching to get it in front of your audience. What next? We’ll utilize cloud services like OneDrive or SharePoint, ensuring that our presentation is just a click away for colleagues and friends. With a permission level set and a link created, collaboration becomes a no-brainer. The ability to control editing access means we’re not just throwing our hard work into the wind. We can decide who can view and who can suggest or make changes, ensuring our message stays on point.
- 1.1 Using Microsoft PowerPoint Online
- 1.2 Collaborating with Others in Real-Time
- 1.3 PowerPoint Tips and Tricks for Effective Presentations
- 2.1 Different Methods to Share Your Presentation
- 2.2 Setting Up Permissions for Collaborators
- 2.3 Options for Viewing and Downloading Presentations
- 3.1 Exporting to PDF and Other Formats
- 3.2 Utilizing Online Platforms for Wide Distribution
Creating and Editing PowerPoint Presentations

We’re going to walk through the magic of bringing those slides to life and getting your team in on the action, no matter where they’re bunkered down. It’s all about working smarter, not harder.
Using Microsoft PowerPoint Online
Whipping up a storm.
Let’s roll up our sleeves and dive into Microsoft PowerPoint Online. It’s like having your trusty PowerPoint but in the cloud; all you need is a browser and an internet connection. No more “Oops, I forgot my laptop” moments! You can start from scratch or polish an existing presentation. All changes save in real-time, which means no heartbreak over lost work.
Collaborating with Others in Real-Time
Teamwork makes the dream work.
Ever played hot potato with a PowerPoint file? With real-time collaboration, it’s history. You can have your teammates chime in from their PCs or Macs. Everyone can add comments, sling feedback, and make edits faster than you can say “Synergy!” And the best part? You can see who’s doing what, minimizing the “too many cooks” chaos.
PowerPoint Tips and Tricks for Effective Presentations
Remember, it’s not just what you say; it’s how you say it. Here’s the skinny on keeping your audience locked in:
- Keep slides clean: Stick to three bullet points like a bee to honey.
- Engaging visuals: A picture is worth a thousand snoozes.
- Brevity is your buddy: Like a miniskirt, long enough to cover the subject but short enough to keep it interesting.
There you have it. It’s about working together seamlessly and making those slides pop. Now go forth and conquer those presentations like a boss!
Sharing Presentations and Managing Permissions
We’ll walk you through the essentials of sharing your PowerPoint presentations as links, along with how to nail down those pesky permission settings.
Different Methods to Share Your Presentation
Whether you’re an Office 365 veteran or a Google Drive enthusiast, sharing through the cloud is like sharing candy – it should be easy and sweet. You simply upload your PowerPoint to your preferred cloud service and hit ‘Share’. If you’re collaboring with others on Microsoft 365, sharing directly from PowerPoint lets you keep all the magic in one place.
Setting Up Permissions for Collaborators
As the gatekeeper of your presentation kingdom, you control who gets the key. Permissions are no laughing matter, and you’ll find that settings range from allowing full editing rights to viewing only. Collaborators can be anyone from your office mate to a client halfway across the world, and setting permissions ensures everyone knows their boundaries. Be like Goldilocks and choose the permission level that is ‘just right’ for your needs.
Options for Viewing and Downloading Presentations
Feeling generous and want to let your audience download the file? Or maybe you’re in the mood to keep things view-only today. Either way, you set the stage.
| View-Only | Can view, cannot edit or download | When you want to keep control of your content |
| Can edit | Can view and edit | For collaboration with teammates |
| Can download | Can view, download, and save a copy | For distributing final versions |
Remember, sharing your presentation as a link hands over a piece of your brilliance, so manage that access like a pro and bask in the glory of seamless collaboration.
Converting and Distributing Presentations
Sharing our knowledge and ideas effectively becomes a breeze when we convert our PowerPoint presentations into easily shareable formats. Whether it’s a PDF or a video, distributing content across different platforms is simpler than you might think. Let’s dive into the specifics.
Exporting to PDF and Other Formats
When we’re looking to share our PowerPoint slides without allowing others to modify them, exporting to PDF is our go-to format. Remember, a PDF file retains the formatting of our presentation, and it’s viewable on almost any device. Here’s a quick walk-through:
- Open our presentation in PowerPoint.
- Click on ‘File’ and select ‘Export’ or ‘Save As’.
- Choose ‘PDF’ from the file format options.
- Hit ‘Export’ or ‘Save’.
Aside from PDF, we can also convert our slides into images, videos, or even embed them directly into our blogs or websites. Creating a video is perfect when we want to share on platforms like YouTube or embed into social media posts. And hey, we get to showcase our presentation skills!
Utilizing Online Platforms for Wide Distribution
For wider distribution, we leverage the cloud. Platforms like Slideshare, Google Drive, or OneDrive are fantastic for reaching a broad audience. Here’s how we do it:
| Upload the presentation, right-click it, and select ‘Share’. Choose who can view or edit. | Use ‘View Only’ links to share via email or social media. | |
| Upload and publish our presentation to the Slideshare platform. | Follow Slideshare’s guidelines to optimize visibility. | |
| Use embed codes to place our presentation directly into web pages. | Ensure the website supports iframe embed codes. |
We make sure to pay attention to privacy settings when sharing. Options like ‘Anyone with the link can view’ make it effortless for our audience to access our presentations. And sharing a ‘View Only’ copy keeps our original content safe from unwanted edits. If we’re feeling savvy, scheduling posts on social media with embedded presentations can stir up some real buzz!
Related posts:
- How to Access Files on SSD: Quick and Easy Guide
- Add Emojis in Microsoft Teams: A Quick Guide to Enhance Your Chats
- Add Fonts to Microsoft Word: A Quick Guide for Custom Typography
- How to Add or Remove a Password in MS Excel: Secure Your Data with Confidence
- How to Automap a Shared Calendar in Outlook Office 365: A Step-by-Step Guide
- Remove Recommended Section in Windows 11: A Step-by-Step Guide
- Windows 11 Black Screen with Cursor Issue: Troubleshooting and Solutions
- Windows 11 Print Screen Not Working: Quick Fixes for Your Issue
- Windows 11 Remote Desktop Authentication Error: Quick Solutions Guide
- Windows Driver Foundation Wudfhost.exe High CPU Usage: Effective Solutions and Analysis
- How to Recover Deleted Emails in Outlook: A Step-by-Step Guide
- How to Access OneDrive on PC: Your Simple Step-by-Step Guide
Leave a Comment Cancel reply
Save my name, email, and website in this browser for the next time I comment.
Home Blog PowerPoint Tutorials How to Create a Presentation with PowerPoint Online
How to Create a Presentation with PowerPoint Online

An online version of PowerPoint was introduced in 2010, a few years after the Google Docs release, which came out as early as 2007. Over the years, the product, along with other Microsoft Office apps, underwent major changes, making it more user-friendly and feature-rich for end users.
Given the rise of inter-device connectivity and cloud support, tools like Microsoft 365, particularly its Word, Excel, and PowerPoint web-based counterparts, have considerably increased their capabilities, matching the performance of desktop versions. In this article, we will talk about PowerPoint Online, also called PowerPoint for Web, and how it can help presenters craft presentations and access them on the go wherever they log in.
Table of Contents
What is PowerPoint Online
Advantages of powerpoint online, getting started with powerpoint for the web, how to create a powerpoint online presentation, collaboration and sharing, saving and exporting, tips for creating high-quality slides in powerpoint online, troubleshooting common issues in powerpoint online.
- Conclus i on
PowerPoint for the Web, which was previously called PowerPoint Online, is a web-based version of PowerPoint that enables creating, viewing, editing, and sharing PowerPoint presentations online. Unlike Google Slides, PowerPoint for the Web provides better native support for PowerPoint files. It makes it possible to seamlessly work with PowerPoint files and features through a web-based browser, with OneDrive support to share and store your data. PowerPoint for the web is free to use but has limited features. However, if you are a Microsoft 365 subscriber, you can get better features when using the web-based version of PowerPoint.
PowerPoint for the web provides the same benefits as the desktop version of PowerPoint, with the added advantage of accessing these features anywhere using an Internet browser. Below is a list of advantages of using PowerPoint Online.
Easy Accessibility
You can access PowerPoint features anywhere using an Internet-connected browser without installing the PowerPoint app on your device. Furthermore, you can also upload and access files from your device anytime, anywhere, via the web.
Support for Native PowerPoint Features
Be it online collaboration, cloud storage, or access to version history, you can get native PowerPoint features via a web-based version of PowerPoint without the need to worry about compatibility issues. Furthermore, unlike Google Slides or other web-based variants of PowerPoint, PowerPoint for the web helps access native PowerPoint features without causing compatibility issues such as incorrect display of certain themes or support for various animations available in the offline version.
OneDrive Integration
The integration of PowerPoint for the web with OneDrive allows instantly storing, sharing, and accessing different versions of a file using the cloud storage support of OneDrive.
Easy Sharing
The OneDrive integration enables the online version of PowerPoint to be used for instantly sharing presentations online using a link with a specific access level (view only or editing privileges).
Online Collaboration
While PowerPoint’s offline version also provides collaboration features, using PowerPoint for the web can provide a smoother experience when looking for real-time changes to a PowerPoint file.
Version History
PowerPoint files saved with the web version come with a version history, where you can access older file versions to restore according to need. This feature is also available for the offline version, which you must turn on upload to OneDrive. In other words, version history is only supported for PowerPoint files that are saved online.
Cross-Platform Compatibility
Since you only need a web browser and a Microsoft account to access PowerPoint Online, there are no issues with having a compatible device to use the app. This means you can access PowerPoint Online using any device that can run a modern Internet browser.
Accessibility Features
PowerPoint for the web is among the few platforms that provide accessibility features for persons with disabilities, such as image ALT text and support for screen readers.
PowerPoint for the web is regularly updated, providing access to the latest features for end users.
To get started, go to Office.com or powerpoint.office.com and select the PowerPoint icon to access PowerPoint for the web. You will require a Microsoft account to log in.

Once logged in, you can create a new PowerPoint presentation or upload one from your device. All you need for accessing the web version of PowerPoint is a modern Internet browser and a device that can support it. This web-based version of PowerPoint works with all commonly used browsers and their variants, including Chrome, Mozilla Firefox, Microsoft Edge, Safari, Opera, and others.

From Office.com, you can create new PowerPoint presentations from scratch or via a template, upload new ones, or open an existing one saved to OneDrive.
Create a New Presentation with PowerPoint for the Web
Click Create or use a PowerPoint template from the options to create a new PowerPoint presentation. You can start with a specific theme or use a blank template. You can also browse through themes via Office.com to find one that best suits your needs.

Upload a PowerPoint Presentation
To upload a PowerPoint presentation, click Upload after logging into Office.com and select a file from your device.

Open an Existing PowerPoint Presentation Online
All PowerPoint presentations saved from a device are automatically uploaded to OneDrive and can be accessed via PowerPoint’s online version. As mentioned earlier, you can upload and save presentations and access them anytime.

Adjusting the Ribbon Menu Layout
You can toggle between the classic and single-line ribbon interface to suit your preferences. The Ribbon menu can also be adjusted to stay available or hidden periodically.

Naming Your Presentation
It is best to name your presentation to ensure it is easy to search and open later via OneDrive. Otherwise, a generic name will be assigned to the presentation (e.g., Presentation 1). To name your presentation, click on the generic name at the top and type in the new name.

Formatting and Design
As you start formatting your slides, the Designer feature will provide you with options to create layouts for your slides. You can optionally use this feature to get started with the basic design for your slides or use the Design tab to select design elements.

Like the desktop app, the Design tab in PowerPoint Online provides access to themes, background and slide size adjustment options, and theme variants to help you design your slides.

Adding Content
The Insert tab provides all the necessary options to add new slides, tables, pictures, shapes, icons, SmartArt, text boxes, audio, video, cameo to insert Live camera feed, and other options.

Formatting Pictures
Like the desktop version of PowerPoint, pictures can be added from your device, stock images, or via Bing search. The Picture tab can be used to format added pictures after selecting them. Various options in this tab allow you to crop, add a picture frame, and adjust the picture on the slide.

You can also access Format Options via the right-click menu.

This will open a sidebar providing options to adjust the selected image’s width, height, angle, shadow, reflection, and text margins.

Formatting Videos
PowerPoint for the web allows formatting videos via the Shape tab and Format Options via the right-click menu. The Shape tab can give a frame or shape to the video, adjust the outline, manage how it is displayed on the slide, and adjust the size of the video. Sometimes, the Shape tab might be replaced with the Video tab to show editing options. This change is particularly visible if the user is not logged in and is editing the presentation as a Guest user. The Format Options enable editing the video’s width, height, angle, text margins, shadow, and reflection.

Formatting Audio
Two major options for formatting added audio clips include the Playback tab and Audio Format tab. The Playback tab can adjust the volume, playback trigger, and other related options.

The Audio Format tab includes picture styles for the audio icon, border stylizing, rotation, and other formatting options to adjust how the audio clip appears on the slide.

Annotation Options
The Draw tab gives various tools like pens and highlighters to annotate slides or draw on the screen. Other tools include an eraser, lasso, draw with touch, and stencil.

Transitions and Animations
Like the desktop version of PowerPoint, the Transitions tab for the web version gives transitions to use for your slides. You can adjust the effects of added transitions and duration once you have added a transition for a slide.

The Animations tab can be used to apply standard transitions and adjust effects, triggers, and duration for the animations according to need.

SlideShow, Review, and View
The SlideShow tab is used to start the SlideShow from the beginning of the current slide or to initiate a Live presentation with a QR code and link for viewing the presentation Live. You can also use Rehearse with Coach, use subtitles, and edit subtitle settings. You can also learn more about some of these features from our post about how to present a PowerPoint Online .

If you are searching for the features to check spelling and grammar, comments, changes, and accessibility options, head to the Review tab.

Most PowerPoint users know that the viewing options are available at the bottom of the PowerPoint interface. However, you can also access them from the View tab in PowerPoint. The same features are available for PowerPoint for the web. This includes options like switching between Slide Sorter, Immersive Reader, and Normal View and access to Notes, Zoom, and Fit to Window options.

To share your PowerPoint presentation, click Share from the top left corner of PowerPoint Online. You can create a sharing link according to specific settings, copy the existing link, link to a slide, or view and manage access to the presentation.

Collaborators can be invited via email or link by adjusting whether a user has view-only or editing privileges.

Once the settings have been configured, a link can be generated to copy and share with users. When configuring settings, you can also directly send the link with a message to an end user.

Users collaborating on the slide deck with their names are shown at the top. A generic name is assigned to the collaborator if it’s a guest.

You can see the comments added by collaborators on the presentation by going to Comments.

Next to the Comments button is the Catch-up button that tracks and shows the changes made by real-time collaborators as you work on the presentation.

You can also access sharing options via File -> Share . You can open sharing options or generate an embed code for the presentation from here.

When generating an embed code, you can adjust the width, height, and slide advancement options and generate a code for a website.

To switch between viewing modes, you can change to view only and editing options as you collaborate or open the presentation in the desktop app. These options can be helpful for you to adjust how you wish to work or review the presentation.

To save your presentation, go to File -> SaveAs to save a copy to OneDrive, download a copy of the PowerPoint presentation, rename the file, or download the file in an alternative format such as PDF, ODP, or image.

When saving a copy of the presentation on OneDrive, you can select an existing folder or create a new one to select the file location.

You can consider the tips below to create visually appealing slides with PowerPoint Online.
Focus on Design Consistency
Use a consistent design with a color scheme, fonts, alignment, and graphics tailored to a specific format. Don’t use too many changes that might make the content appear muddled.
Avoid Heavy Multimedia
Since PowerPoint for the Web is an online platform, not everyone might have the required Internet bandwidth or hardware to run heavy presentations smoothly. Using multimedia content in moderation can help avoid such issues.
Uncluttered Slides
Cluttered slides on an online interface will likely cause compatibility issues for some viewers or the slides might not appear properly on some browsers and devices. To avoid this, try to create uncluttered slides. Using minimalist slides might just be the best way to go.
Even the Distribution of Slide Elements
By evenly distributing slide elements with proper alignment, you should be able to create online slides that are easy for the eyes to follow.
Choose Imagery Carefully
When selecting icons, graphical elements, and pictures, try not to use imagery that is too flashy and might cause issues when opened across different browsers and devices. You can use icons from the built-in icons library in PowerPoint and select pictures that don’t visually overpower the viewer.
Get Design Ideas
You can get design ideas using PowerPoint Designer to adjust your design for visual appeal and design consistency.
Productivity Shortcuts
PowerPoint for the web primarily provides most of the features in the desktop app. Below are some tips and tricks for productivity when using the web version of PowerPoint. For some shortcuts listed below, PC users must use CTRL, whereas Mac users will use Command.
- Insert New Slide using CTRL+M hotkey (Command+M for Mac)
- Use F5 to start the slideshow and Esc to end the slideshow
- CTRL+D duplicates the slide (Command+D for Mac)
- CTRL+Shift+D deletes the slide (Command+Shift+D for Mac)
- Use CTRL+S to save slide (Command+S for Mac)
- Use CTRL+W to close the presentation (Command+W for Mac)
- To open printing options, use CTRL+P (Command+P for Mac)
- Zoom in with CTRL+Plus button (Command+Plus button for Mac)
- Zoom out with CTRL+Minus button (Command+Minus button for Mac)
- Insert a table with CTRL+T (Command+T for Mac)
- Insert a hyperlink with CTRL+K (Command+K for Mac)
- Align text with CTRL+L for left, CTRL+E for center, and CTRL+R for right (Replace CTRL with Command for Mac)
Screen Freezes When Working with PowerPoint for the Web
If your screen freezes while you’re working, the web version of PowerPoint is likely encountering an issue when saving the file, showing elements, or inserting content. You can wait a while, and the issue should be resolved. Also, check your Internet connection to see that you are connected. You might want to close additional tabs and review your system usage to see if your hardware is overwhelmed due to resource-intensive apps or multiple browser tabs.
Slide Elements Don’t Appear Properly
If your browser isn’t compatible or uses a browser plugin that blocks slide elements, you might encounter issues viewing slides. Use a compatible browser and turn off any plugins that might interfere with PowerPoint’s online interface.
File Upload or Download Issues
When you are unable to upload or download files, it is likely that your Internet connection is unstable or disconnected. Check your connection to resolve the issue.
Unable to Login
This is likely caused by incorrect credentials or a recent change in credentials, such as a password. If you cannot log in despite no apparent issues, try to clear your browser’s cache or switch to another browser to see if you can log in.
PowerPoint for the web provides most features available for the desktop version and some sharing and collaboration features that require uploading the file online for use. You will notice that some of these features are smoother when used with the online version compared to the desktop version. Furthermore, the online version of PowerPoint provides access regardless of whether you have PowerPoint installed on your device. If you are someone who does not have a Microsoft 365 subscription and needs to access a PowerPoint file, you can log in for free with a Microsoft account with limited features. Alternatively, if the online version is not an option for you, you can still learn how to create a PowerPoint presentation in the installed version of Office.
Like this article? Please share
Microsoft PowerPoint, PowerPoint Online Filed under PowerPoint Tutorials
Related Articles

Filed under PowerPoint Tutorials • September 9th, 2024
How to Convert Illustrator to PowerPoint
Extract powerful graphics and integrate them into your presentation slides. Learn how to convert Illustrator to PowerPoint with this guide.

How to Convert InDesign to PowerPoint
Repurpose your indd files as presentations by learning how to convert InDesign to PowerPoint. Step-by-step guide for Windows and Mac users.

Filed under PowerPoint Tutorials • August 13th, 2024
How to Make Text Transparent in PowerPoint
Customize your presentation slides by learning how to make text transparent in PowerPoint. Ideal to create blended titles.
Leave a Reply
How-To Geek
How to share your powerpoint presentation.

Your changes have been saved
Email is sent
Email has already been sent
Please verify your email address.
You’ve reached your account maximum for followed topics.
Quick Links
Sharing your powerpoint presentation.
Aside from the traditional method of sending a PowerPoint presentation to others as an email attachment, you can also upload and share your presentation from the cloud. All you need to get started is a OneDrive account. Here’s how.
You can save a PowerPoint presentation to the cloud fairly easily. In fact, it takes only a few simple clicks. For this to work, though, you’ll need a OneDrive account. If you use Office 365, then you already have one. If not, all you need to do is create a Microsoft account and then sign in to OneDrive. This article will assume you already have a OneDrive account.
Related: How to Share Things from OneDrive
First, open the PowerPoint presentation that you’d like to share. At the top-right corner of the window, you’ll see a “Share” button. Go ahead and select it.

Once selected, the “Share” window will appear. You have a few different options here. In the “Attach a copy instead” group, you can choose to send your presentation as a PowerPoint or PDF attachment. Selecting either of these options will open your computer’s default mail client.
What we’re interested in, though, is sharing to OneDrive. To do this, select your OneDrive account under “Share.”

If you haven’t already named your presentation, you’ll be prompted to do so. After you give it a name, click “OK.”

Your presentation will now be uploaded to the cloud and the “Share” pane will appear on the right-hand side. This is where you can invite people to edit (or read) the document. In the address bar, enter the email of the recipient. Alternatively, select the icon to the right of the address bar and select a recipient from your Outlook address book.

After you’ve entered the recipient’s email, you can then assign a permission level. Once you’ve given read/write or read-only permission, you can then add an optional message. When you’re ready, click “Share.”

The recipient will receive an email providing access to the presentation.
Note: If you’re the recipient, be sure to check your spam folder! During our testing, we found the invitation in spam.
An alternative method for inviting people is to get a sharing link. At the bottom of the “Share” pane, select “Get a sharing link.”

Next, choose which type of link you’d like to provide. You can choose between a read/write link or read-only link.

A link will then be generated. Select “Copy” to copy the link to your clipboard.

Anyone you share this link with will then have access to the presentation. This will allow multiple people to collaborate on your presentation in real-time !
- Microsoft Office
- Office 2016
- Microsoft PowerPoint
- Ad Creative Eye-catching designs that perform
- Social Media Creative Engaging assets for all platforms
- Email Design Templates & designs to grab attention
- Web Design Growth-driving designs for web
- Presentation Design Custom slide decks that stand out
- Packaging & Merch Design Head-turning apparel & merch
- eBook & Digital Report Design Your digital content supercharged
- Print Design Beautiful designs for all things printed
- Illustration Design Visual storytelling for your brand
- Brand Identity Design Expertise & custom design services
- Concept Creation Ideas that will captivate your audience
- Video Production Effortless video production at scale
- AR/3D Design New creative dimensions that perform
- AI-Enhanced Creative Human expertise at AI scale
- AI Consulting Maximize AI with tailored strategies

Beyond the Brief: Creating a Comic Book With AI

The 10 Best Webflow Agencies in 2024 (Updated List)

20 Best Landing Page Design Examples & Ideas in 2024

How Amazon Delivers Creative Assets Faster Without Increasing Headcount

How Shopify Built a Growth Workshop to Unlock Rapid Experimentation

How Boomi Revitalized Lead Generation by Tripling Creative Output

The Infinite Canvas: AI in Action
Superside Virtual Summit
40 Ways to Share PowerPoint Presentations Online

Need Quality Design at Scale?
Even though PowerPoint dates back to 1987, it has never been as popular as it is today, with more than 30 million presentations created every day . What has been changing, however, is the way we use it, as we see our audience move from the other side of the conference-room table to the other side of the screen, somewhere around the world.
In the past years, just like pretty much everything business, PowerPoint has been moving online, and the shift will continue in 2018 and beyond. We hear this from our clients who are looking for ways to take PowerPoint presentations online, and we notice this in-house too, as we organize presentations for team members all across the U.S., and the globe.
Our expert PowerPoint designers , who craft awesome presentations that make our clients happy every day, have helped us narrow down the best PowerPoint online alternatives currently available, and categorized them depending on the services they offer:
A. Slide Hosting Services
With slide-hosting services, you can take your presentations anywhere and access them from almost any part of the world. There’s no need to worry about not having enough storage space on your laptop or making copies of your presentations in case you delete or lose them by accident.
1. Slideshare

Pricing: Free
How it works: Log in to SlideShare ➡️ Click Upload in the top right of the homepage ➡️ Select files to upload ➡️ Add Title, Tags, Category, Description ➡️ Set privacy settings ➡️ Click Publish
Interesting features:
- Slideshare allows users to upload PowerPoint, PDF, Keynote, and OpenDocument presentations, either publicly or privately
- Once uploaded, the presentation can be viewed on Slideshare, or it can be embedded on other websites.
- You can add Slideshare content on Linkedin, or you can connect it to your Facebook or Twitter account.
2. PowerPoint Online

How it works: Log in to Powerpoint Online ➡️ Upload the presentation directly from a file or open it from OneDrive
- PowerPoint Online is a great tool that allows its users to store and view presentations online, but also download a copy for offline storage.
- Another great feature is the Skype Document Chat for co-authoring a presentation in real-time.
3. Zoho Show

Pricing: Free
How it works: Log in to Zoho Show ➡️ Import the presentation from your computer
- Zoho Show is a great tool for online broadcasting.
- Users can share slides and collaborate with teammates.
4. Presentain

Pricing: First 7 days are free. Prices start from $3/day, $14/week, $48/month, and $288/year
How it works: Log in to Presentain ➡️ Add Presentation by uploading a file
- With Presentain, users can organize a remote presentation and the audience can join by connecting with the mobile phone to give feedback
- Presentain offers the possibility of recording the presentation and sharing it online
5. Zentation

Pricing: Free; $10 for one-time setup; $45/month for more features
How it works: Log in to Zentation ➡️ Click New Presentation ➡️ You must first upload the video narration of your presentation to YouTube ➡️ Upload your PPT presentation ➡️ Wait for 2-3 minutes for the presentation to be ready
- The presentations can be hosted on Zentation private servers
- Users can keep their presentation private
6. Shufflrr

Pricing: Free 30-day trial; $10 - $20/month per user
How it works: Log in to Shufflrr ➡️ Upload files ➡️ Organize and manage files
- Users have the option to manage files
- Shufflrr tracks users’ usage by slide, file, activity, share, likes, and comments
7. ClearSlide

Pricing: $35 - $125/month
How it works: Log in to ClearSlide ➡️ Select files and upload
- ClearSlide offers users the possibility to create team collections
- ClearSlide offers integrated communication between devices
- Users have access to real-time analytics
8. YouTube

How it works: Save your PPT presentation to video (File > Export > Create a Video > Save) ➡️ Log in to YouTube ➡️ Click Upload ➡️ Insert title, description, tags ➡️ Upload
- YouTube is a great tool for monetizing presentations/videos
- Users can get useful insights from YouTube analytics
- Users can save their favorite videos and put them into playlists

Pricing: Free for basic; $19 - $269/month for Premium
How it works: Log in to Issuu ➡️ Select the presentation file already formatted as PDF ➡️ Click upload ➡️ Insert title and description ➡️ Publish
- With Issuu, users can get a book-like view for their presentation
- Users can see where readers come from, what they read and what they share
B. Create and Share Services
Any of these online tools can be a very good alternative to PowerPoint. Users can create online presentations on any of these websites and use their features to share the final product across a variety of platforms.
10. Google Slides

How it works: Upload presentation file to Google Drive ➡️ Open file in Google Slides ➡️ Choose what kind of access you want to grant people ➡️ Share your presentation by clicking the Share button
- Google Slides offers its users ready-to-use templates, master slides, and easy-to-design slides
- It is a great tool for teams, as it allows real-time editing, commenting, and has a chat feature, so several people can work on the same presentation at once
11. PowToon

Pricing: Free; $19 - $99 for advance services
How it works: Log in to PowToon ➡️ Importing PPT feature is still in process ➡️ Select category ➡️ Choose template
- PawToon allows users to insert voice over, audio, and video
- User-friendly, easy-to-use interface with drag and drop menu
12. Slide Dog

Pricing: Free for the basic account and from $8.33/month for Slide Dog Pro, which offers more features
How it works: Download Slide Dog (right now only available for Windows) ➡️ Open Slide Dog ➡️ Drag or browse files ➡️ Rearrange the file order ➡️ Save the presentation or click Start Now when you are ready to present it
- With Slide Dog, users can combine different types of files (PDF, PPT, Prezi, pictures, etc.) in one presentation.
- Real-time sharing and remote control features are available.
- Live chat, polls, and audience feedback are available.
13. Office Sway

How it works: Log in to Sway ➡️ Choose Create New if you’re creating a presentation from scratch or upload your existing files
- Office Sway offers 3 different presentation layouts (vertical, horizontal, slideshow)
- Sway allows different ways to add content (Office files, YouTube, Bing, etc.)
- Sway can also suggest content for each user based on what they’ve already added.
14. Slides

Pricing: Sign up for free and choose one of the three plans from $5 to $20/month
How it works: Log in to Slides ➡️ Click New Deck ➡️ Select import to import presentation to the slides
- Remote-controlled and live presenting from any touch-enabled mobile device
- The possibility to display the content in vertical slides
15. Emaze

Pricing: The basic plan is free. Pro and business plans vary between $12.50 - $125/month
How it works: Log in to Emaze ➡️ Click upload presentation ➡️ Browse PPT file ➡️ Select Emaze template
- Emaze offers transition slide and templates
- Emaze presentations can be shared by link or embedded link
16. Visme

Pricing: Basic plan for free; premium plans from $19 - $30/month
How it works: Log in to Visme ➡️ Click Create New (Import files can only be done in Premium Plans) ➡️ Select category file (presentation, infographic, etc.)
Interesting feature:
- With Visme, users can add graphics, and insert video and audio to their presentations
17. Prezi

Pricing: $5 - $59/month
How it works: Log in to Prezi ➡️ Click New Presentation (import PPT presentation can only be done in the Business plan) ➡️ Select a template
- Users can insert transition slides and templates
- Prezi offers wide canvas features
- Users can zoom in and zoom out
18. Knovio

Pricing: $24 - $125/month or custom pricing for Corporate
How it works: Log in to Knovio ➡️ Upload presentation files ➡️ Start to record your narration ➡️ Publish and share
- Knovio lets users record and sync video or audio with their slides
19. Slidebank

Pricing: Works on a sliding scale - the more users you add, the lower the price per user, per month
How it works : Log in to Slidebank ➡️ Upload and manage files
- With Slidebank, users can manage their slides and search for an exact slide
- Users can drag and drop different slides to save/create a new presentation
20. Ludus

Pricing: Free; $8.25/ month for Premium
How it works: Log in to Ludus ➡️ Click Import presentation file (PDF) ➡️ Select the file to upload
- Ludus offers users graphics and image editing tools

Pricing: Free for individual use, starts from $5.80 - $28.70/month for business
How it works: Log in to Box ➡️ Upload files ➡️ Open files and share
- Box is integrated with Office online
- Users can edit files in real-time
- Box makes managing files easy
22. SlideBean

Pricing: Free with limited features; $8 - $59/month for advance services
How it works : Log in to SlideBean ➡️ Click Create New to import existing presentation file ➡️ Click Upload a File ➡️ Select the file ➡️ Give title and summary
- SlideBean offers one-click styling
- Easier online collaboration
- Users can track activity on a presentation
C. Link Sharing Services
If you're looking to share your presentation with other team members, on your own blog, or across your professional profiles, try one of these link-sharing services:
23. SlideOnline

How it works : Log in to SlideOnline ➡️ Click upload ➡️ Select the file ➡️ Upload
- SlideOnline makes social sharing easier
- Users can embed their SlideOnline presentation anywhere
24. iSpring

Pricing: Free trial; $37 - $47/month for business plans
How it works : Log in to iSpring ➡️ Upload files ➡️ Select files ➡️ Share by link, embed code or directly share via email
- iSpring Cloud offers integration with PowerPoint
- Users can convert presentations to mobile-ready courses
- iSpring Cloud helps create interactive assessments
25. Speaker Deck

How it works: Log in to Speaker Deck ➡️ Upload the PDF file ➡️ Write a title and description ➡️ Publish
- Users can put their uploaded file under a certain category
- Speaker Deck allows users to share a link of their presentation, embed it on other websites, or share it directly on Facebook or Twitter
26. Slide Boom

Pricing: Free for limited features; Slide Boom Pro for $195/year
How it works: Upload file in Guest mode ➡️ Write presentation title and select category ➡️ Write description ➡️ Click upload
- Slide Boom allows users to embed presentations to their blog or website
- Viewers can give feedback to presentations
- Slide Boom Pro allows business users to share their presentations privately with team members or customers.
27. Scribd

Pricing: Free or full-service membership for $8.99/month
How it works: Login to Scribd ➡️ Upload your file ➡️ Write a title and description ➡️ Click continue
- Once uploaded to Scribd, a presentation can be embedded in other sites
- Users can share their Scribd files directly to other platforms
28. Hashdoc

How it works: Log in to Hashdoc ➡️ Click Upload ➡️ Select file to upload ➡️ Insert title, description ➡️ Select category and topic ➡️ Upload
- With Hashdoc, users can create a shop connected to PayPal
- Hashdoc offers analytics and insights
- The documents can be embedded anywhere
29. Smart File

Pricing: $6 - $10/month or get a quote for more advanced services
How it works: Log in to Smart File ➡️ Create folder ➡️ Create user ➡️ Upload files ➡️ Create the link and send
- Smart File offers an easy-to-use file sharing and transferring solution
- Users will get email notifications
- Smart File offers automation workflows
30. OneDrive

Pricing: Free for limited capacity
How it works: Log in to OneDrive ➡️ Upload file ➡️ Open the file ➡️ Click share
- OneDrive is integrated with other Office online programs
31. Dropbox

Pricing: Free for limited capacity; start from $8.25 - $25/month for higher capacity
How it works: Log in to Dropbox ➡️ Upload file or Create Shared folder ➡️ Select files ➡️ Click Share
- Users have easy collaboration on the same file
- Dropbox offers automatic sync with other devices
- Users can manage the visibility, access, and download permissions of every file, folder, and the link they share
32. Swipe

Pricing: Free with limited features; $15 - $36/month for business
How it works: Log in to Swipe ➡️ Click upload presentation file ➡️ Select the file to upload
- Swipe offers live presenting features
33. Google Drive

Pricing: Free with limited capacity
How it works: Log in to Google Drive ➡️ Upload files ➡️ Share it
- Google Drive is a great storing and sharing solution, as it is integrated with other Google docs tools

D. Convert to a Video/PDF and Share Services
Depending on your needs, you can convert your PowerPoint presentation into a video or a PDF document and share it with your audience, team, or clients. These PowerPoint converting and sharing websites make the entire process easier, faster, and more reliable:
34. Author Stream

Pricing: Free for limited features; Pro Plans range from $4.20 - $119.95/month
How it works: Log in to Author Stream (need to enable/install Flash player) ➡️ Upload file from Local Disk, Dropbox, or Google Drive ➡️ Write a title, description and category ➡️ Click continue
- Share their presentations both privately or publicly.
- Convert PowerPoint into videos.
- Broadcast presentations live and communicate in real time.
35. PowerShow

Pricing: Free; premium plans start at $25/month
How it works: Log in to Powershow ➡️ Click Upload button ➡️ Browse and select the presentation file ➡️ Insert title and description ➡️ Select presentation category ➡️ Click upload ➡️ Once the presentation is ready, you will get notified by email
- With PowerShow, users can automatically convert their PowerPoint presentations to Flash presentations
- Users can set up pay-per-view for viewers
36. Docdroid

Pricing: Free for limited features; start from $4/month for advance plans
How it works: Log in to Docdroid ➡️ Turn your presentation to PDF and upload
- With Docdroid, users can integrate their presentations in other websites as iframes
- Docdroid offers automatic conversion, so readers can download a different format
37. SlideTalk

Pricing: Basic is free and each account receives 10 credits to use; pro videos and downloadable video cost credits which begin at $8 for 10 and get cheaper per credit the more you buy
How it works: Log in to SlideTalk ➡️ Upload slides or PPT ➡️ Type texts for each slide ➡️ Add automatic voiceover and background music ➡️ Get video and share it
- With SlideTalk, users have the possibility of adding automatic voiceover
- Users can choose background music for their presentations
- SlideTalk offers Cloud API
38. Brainshark

Pricing: Requires consultation with a sales rep
How it works: Log in to Brainshark ➡️ Click Upload Content ➡️ Select presentation file ➡️ Once uploaded click Next ➡️ Start to add your narrative to your presentation ➡️ Save
- Brainshark is a great tool for creating sales training materials
- Users can get certifications for mandatory training on the platform
39. Camtasia

Pricing: Free download without a license; $99 - $249 for added features
How it works: Download Camtasia tool ➡️ Drag and drop PPT file to Camtasia ➡️ Add narration video by recording online
- Camtasia offers users a multimedia option
40. Vcasmo

Pricing : Free for limited features; start from $10.99 - $16.99/month for premium
How it works: Log in to Vcasmo ➡️ Select and drop PPT file and upload ➡️ Add narration video by recording online
- Vcasmo offers Cloud video streaming features
- Vcasmo offers users a series of privacy options and settings—permission control, private, group, password protect, domain embed protection
- Users have the option to add subtitles
PowerPoint is still an endless resource, so if you would like to stick to it and use one of the above-listed tools only to share or store your presentation, you can always download a free PowerPoint template and get creative.
If you can’t decide on the best way to structure your PowerPoint presentation, you feel nervous about writing your own presentation, or you just want a unique design to fit your purpose and the brand’s identity and image perfectly, our team of PowerPoint designers and content writers are only a few clicks away.
Built to be an extension of in-house teams, we deliver fast, scalable, world-class design and creative solutions to over 450 globally renowned companies such as Amazon, Meta, Salesforce and Google. Connect with us on LinkedIn .

Don’t miss anything!
Join our community of 50,000+ who receive the best in design and marketing content, weekly.

These Are the 12 Best AI Presentation Makers of 2024

10 Best Places to Outsource PowerPoint Design Services in 2024

25 Best Consulting Pitch Deck Examples in 2024 (McKinsey, Deloitte & More)
Why choose creative-as-a-service with superside.

Improve your marketing performance
Get high-quality creative, ship campaigns faster and stand out from the competition.

Be more agile & responsive
Never say no to another project request. Get a hassle-free creative partner that can keep up.

Elevate your team
Allow your in-house creatives to focus on more strategic projects. Get new ideas & continuous design inspiration.

Save time & be more cost-efficient
Increase your design capacity without additional hiring and with fewer vendors to manage.
See Superside in action
Get a demo and discover how 450+ ambitious companies and 2,500 energized fans use Superside to free themselves from the shackles of limited budgets, broken processes and stretched in-house teams.
How to Share a PowerPoint
Last updated on September 11th, 2024

Sharing PowerPoint presentations is essential for collaboration, education, and communication in business and academic settings. Microsoft PowerPoint offers a built-in Share feature that makes it easier than ever to distribute your slides to colleagues, clients, or students; before, during or after the presentation. This guide will walk you through using the built-in sharing options in PowerPoint, along with additional methods for sharing your PPT presentation effectively.
The Share Option in PowerPoint
PowerPoint’s Share feature is designed to simplify the process of sharing presentations from inside the Microsoft PowerPoint interface.
To access it, open your presentation in Microsoft PowerPoint. Go to File menu, and look for the Share option. In some versions of PowerPoint, the Share option is typically located in the upper-right corner of the screen.
Clicking on this button will open up several options for sharing your presentation, tailored to suit different needs and preferences.

Step-by-Step Guide to Sharing a Presentation
Once you click on the “Share” button, PowerPoint provides different ways to share your presentation, starting with email. How to send a PowerPoint presentation through email? Go to File -> Share and click the Outlook icon (that says “Share this link to new Outlook message”). This will open the following interface and automatically attach the presentation file to the new email.

Alternatively, if you don’t use Outlook, you can still share a presentation by email. Save the presentation file and from your Email client (Mail, emClient, etc.) click to attach a new file. Now, you can select the .pptx file from your computer.
If you use a cloud based email like Gmail or Outlook, you can compose a new email and then drag & drop the file into the browser UI.
If you prefer to send a copy directly, you can choose to “Send as Attachment,” which allows you to email your presentation as a PowerPoint file or a PDF. This is a great choice if you want to give the recipient an editable or view-only copy.
Alternatively, if the presentation is too large for an email attachment, you can select the option to Send a Link or explore one of the ways to share large PowerPoint files over the Internet .
By sending a link, the method will save your PowerPoint presentation to OneDrive (Microsoft’s cloud storage service) and then generate a shareable link that can be sent to your contacts.
This link can be configured with specific permissions, such as view-only or edit access, to ensure that your content is secure.
If your presentation is already saved on OneDrive, the process becomes even more straightforward. After saving, simply click the “Share” button, select “Copy Link,” and adjust the settings to control who can access the file. This method is particularly useful when collaborating in real-time, as it allows multiple people to view or edit the presentation simultaneously.
For those using Microsoft Teams, PowerPoint offers direct integration, making it easy to share your presentation within a Teams chat or meeting. By selecting the “Share in Teams” option, you can instantly distribute your slides to all participants. Additionally, if you’re hosting a meeting in Teams, you can choose to present directly from PowerPoint by clicking “Present in Teams.” This feature is designed for seamless sharing during virtual meetings, enabling smooth, real-time collaboration.
Customizing Sharing Options when Sending a PPT Presentation to Others
One of the key advantages of using PowerPoint’s built-in sharing feature is the ability to customize your sharing settings.
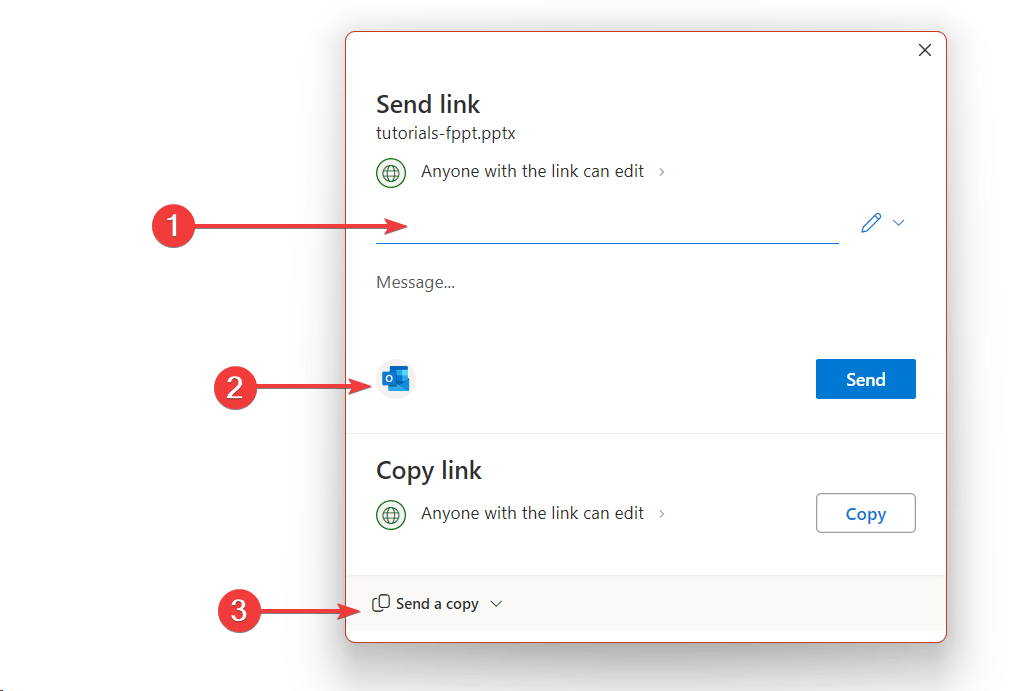
When you share via OneDrive or Teams, PowerPoint allows you to set specific permissions, such as who can view or edit the file. You can choose to make the presentation accessible to anyone with the link, restrict access to people within your organization, or limit it to specific individuals.

Furthermore, if you need to modify access settings after sharing, you can easily do so by navigating to OneDrive or Teams, locating the shared file, and adjusting the permissions. This control over your content helps prevent unauthorized access and protects your intellectual property.
Exploring Other Methods for Sharing PowerPoint Presentations
While PowerPoint’s built-in sharing feature is convenient, there are other methods you can use to distribute your presentations effectively.
How to Share a PowerPoint Presentation by Email
Sharing via email remains one of the most common approaches. You can attach your PowerPoint file directly to an email using your preferred email client.
However, keep in mind that email services often have size limits for attachments. For example, Gmail has a maximum attachment size limit of 25 MB for sending emails, Yahoo Mail allows attachments up to 25 MB per email, and Outlook has limit of 20 MB. Most of these limits are beyond the typical presentation size, unless you use too many images or big media inside the presentation. To mitigate this, consider compressing images and media files within PowerPoint or saving the presentation as a PDF to reduce the file size.
For large files, uploading them to a cloud storage service like OneDrive, Dropbox, or Google Drive and sending a shareable link is often a better solution.
How to Share a PowerPoint using Coud Storage
Cloud storage services offer an excellent alternative for sharing PowerPoint presentations, especially when dealing with large .pptx files.
Platforms like Dropbox, Google Drive, OneDrive, and iCloud allow you to upload your file, generate a sharing link, and control access permissions.
Each service comes with its own set of features and limitations, so it’s essential to choose the one that best fits your needs.
For instance, while OneDrive provides seamless integration with PowerPoint, Dropbox and Google Drive might offer better options for cross-platform compatibility.
Dropbox is a great option if you want others to see a preview of your presentation. By sharing a PDF or PPT presentation via Dropbox, the users will see a presentation preview. You can use Dropbox as a PDF Presenter Viewer in a browser.
How to Share Presentations via Microsoft Teams or Zoom
Collaboration tools like Microsoft Teams, Zoom, and Slack have also become popular for sharing PowerPoint presentations, especially in remote work environments.
These tools enable you to share and present your slides directly within their platforms, making real-time collaboration easier.
Presenting directly from PowerPoint during a virtual meeting allows for live interaction and feedback, which can be invaluable for brainstorming sessions, training presentations, or client presentations.
Sharing PowerPoint Presentations on Social Media
Social media and websites are another avenue for sharing presentations, particularly when targeting a broader audience. Uploading your presentation to platforms like LinkedIn, SlideShare, or your company’s website can increase its visibility and reach. However, it’s essential to consider privacy settings and the potential audience reach when sharing presentations publicly to protect sensitive information.
Alternative Methods for Sharing PowerPoint Presentations
If you prefer offline methods, sharing your presentation via USB drives, external hard drives, or direct device transfers can be effective.
Additionally, presentation-specific tools to host slides offer unique features tailored to hosting and sharing slides. These platforms can be an excellent alternative for those who want more control over their content’s distribution.
Troubleshooting Common Issues
When sharing presentations, you may encounter some common issues, such as links not working or permission errors.
To avoid these problems, ensure the link is correctly copied and that the recipient has the necessary permissions to access the file. If the recipient reports issues opening the presentation, double-check the sharing settings and adjust them as needed. In some cases, re-sharing the PPT again will solve it.
To prevent compatibility problems, consider saving your presentation in multiple formats, such as .pptx and PDF, to ensure it can be viewed on various devices and platforms. Remember to take special precaution with fonts used inside the presentation. Use safe-fonts whenever it is possible, so the other party does not necessarily need to have the custom fonts installed in the computer.
PowerPoint’s built-in Share feature provides a way for distributing presentations quickly and securely.
Whether you’re sharing via email, cloud storage, collaboration tools, or directly within a meeting, PowerPoint offers several options to suit your needs.
By exploring these tools, customizing your sharing settings, and understanding alternative methods, you can enhance your presentation-sharing experience and ensure that your message reaches its intended audience efficiently.
We will send you our curated collections to your email weekly. No spam, promise!
Free All-in-One Office Suite with PDF Editor
Edit Word, Excel, and PPT for FREE.
Read, edit, and convert PDFs with the powerful PDF toolkit.
Microsoft-like interface, easy to use.
Windows • MacOS • Linux • iOS • Android

- Articles of PPT
How to Share PowerPoint Presentation Online
Making a super cool presentation with Microsoft PowerPoint seems like an easy process. The real problem arises when you have to share PowerPoint online. Sending PowerPoint presentations through USB drives or emails can often get you bugged.
But you don’t have to worry because this guide has the solution! We’ll also acquaint you with another great office suite - WPS Office, which provides an easy and convenient way of sharing PowerPoint presentations online. So let’s get into it.
How to Share PowerPoint Online?
Be it for a school project or an important meeting, you will often be required to share your PowerPoint presentation. It is a breeze process and wouldn’t take much time if you do it right.
Here is how to share a PowerPoint presentation with others through email:
Step 1: Upload your presentation to online your OneDrive account if you use the PowerPoint desktop app.
Step 2: Once your presentation is uploaded online, click the “Share” option on the ribbon.
Step 3: Write the name or email address of the individuals you would like to share your presentation in the “To” section.
Step 4: Write a message for your collaborators if you want to.
Step 5: Hit the “Send” button.
Notably, you need to take a few essential steps before sending an invitation to an online PowerPoint presentation. You can allow people you wish to collaborate with to edit your presentation with the help of a drop-down menu. This option to allow access to edit is enabled by default.
Here is what you need to do before you share PowerPoint online as a link:
Step 1: Click on the drop-down menu.
Step 2: Now, you can either choose the “Anyone with the link” option or add the email addresses of specific individuals.
Step 3: Select the ‘Edit” or “View only” option based on your preference.
Step 4: Click on the Apply button to generate a shareable link.
You can now send this link to anyone you want, and they will be able to view or edit your presentation online. Additionally, you can also set an expiry date for the link and set a password for added security.
Benefits of Sharing PowerPoint Online
Sharing PowerPoint presentations become integral when you want to connect with different people on-board and share ideas. Here are some of the benefits of PowerPoint sharing online:
Hassle-Free Access
Sharing PowerPoint presentations online allows you to grant hassle-free access to your teammates. The process of sharing is smooth and quick, which helps you give miss to unwanted delays.
Helps Provide Visual Information
Grasping useful information might be boring for people. You can add different kinds of visuals, which will help your clients and teammates pay more attention to the crucial details.
Varieties of Options for Customization
You can use a range of animations, graphics, and templates when you share PowerPoint online. This will help you make your presentation more dynamic and appealing.
Enhanced Engagement
Getting your peers or clients to engage in your presentation can sometimes be challenging. You can tackle this issue by sharing PowerPoint presentations online. You can add different forms of multimedia like audio, video, link, and quizzes, which will elevate your audience's engagement level.
Real-Time Revisions
You can make revisions or updates simultaneously while sharing your presentation online. Learning how to share a PowerPoint presentation with others to edit comes in handy when making last-minute changes while working collaboratively.
Additionally, you can chat with other participants if you are not the only one in charge of the editing.
Valuable Insights
You can also get feedback on your presentation in the form of metrics like engagement, views, and time spent on it by the audience. Consequently, you will be able to get a better idea if your presentation is as per your audience’s interest.
Convenient Feedback
You can allow individuals to provide feedback and collaborate easily when you share PowerPoint online. They can co-author and leave suggestions and feedback, which will help you improve your work. While working collaboratively, others can ask questions to make the sessions more productive and interactive.
Cost-Effective
Sharing PowerPoint presentations online is cost-effective as you won’t be required to spend on printing or shipping. This could be a great benefit for small-business owners or people with limited resources.
Secured Backup
Sharing presentations online will give you a secure backup that you can access anytime. This benefit is specifically beneficial when your local files get corrupted or lost.
Long-term Access
Once you have shared a presentation online with someone, they can access it for an extended time period. This way, they can come back to the presentation whenever they have to review or reference it.
Easy Distribution
An online presentation allows you to share it with different people without having to make physical copies of the presentation or use USB drives. All you have to do is distribute the link to the presentation or invite different people to view it through email.
Best Free Alternative to Microsoft Office — WPS Office
Now that you have learned how to share PowerPoint online and its advantages let us introduce you to a great office suite, WPS Office. Besides Microsoft Office, WPS Office is the best-known tool for making and sharing presentations online.
WPS Office is a user-friendly platform that features various tools for creating, editing, and modifying documents, including spreadsheets, word processing, and of course, presentations. You can get all of these tools for free, and are very easy to access.
Moreover, WPS Office works on different operating systems, including Windows, Android, and iOS. Another notable feature of WPS Office is that you can use it in more than 47 languages.
While both WPS and Microsoft PowerPoint are considered two of the best tools for online presentations, WPS is regarded as the better option. WPS Office is free to download. It also provides an array of advanced features that you may not find in Microsoft PowerPoint.
Unlike Microsoft PowerPoint, WPS allows you to open your files in various formats, including PPTX, DOCX, TXT, and XLSX. That way, you can conveniently export your presentation in any format you want.
In addition to that, you can use WPD Office on nine different devices at the same time. This enables you to access the presentation from anywhere and anytime.
Use Word, Excel, and PPT for FREE, No Ads.
Edit PDF files with the powerful PDF toolkit.
Microsoft-like interface. Easy to learn. 100% Compatibility.
Boost your productivity with WPS's abundant free Word, Excel, PPT, and CV templates.
Use WPS to Share Your PowerPoint Online
Now that you are acquainted with WPS Office, let’s learn how it can be used to share PowerPoint presentations. Sharing presentations using WPS is not a complicated process and can be done by following simple steps.
Here is what you need to do to share PowerPoint online using WPS:
Step 1: Open your presentation on WPS Office.
Step 2: Click on the main menu that you can find on the upper left side.
Step 3: Select the “Share” button from the drop-down menu. Now you will get two options for sharing the file; you can share it either as a link or a PDF.
Step 4: If you select the share as a link option, you will further get the option to allow others to either edit or view the presentation with the help of the link. You can then “Get a link” after choosing your preferred option.
Step 5: In addition to sharing as a link, you can share your presentation online as an email attachment.
Step 6: If you want to transfer your presentation from one device to another, you can use the QR code scanning option. For this, all you need to do is open the QR code on your device and scan it from the WPS Office application on the other device.
Additionally, you can send PowerPoint presentations from your PC to your phone by logging into the same account on both of the devices and using the “Send to mobile” option.
1. Can I track who has viewed my shared PowerPoint presentation?
Yes, you can track who has viewed your PowerPoint presentation with the help of various online platforms, email tracking or third-party tracking tools, or cloud storage services.
2. Is it possible to password-protect my shared PowerPoint presentation?
Absolutely, you can keep your shared PowerPoint presentation protected with a password. Both WPS Office and Microsoft Office allow you to set a password for your presentations. That way, you can be certain that only authorized people can view or edit your presentation.
3. Is there a way to revoke access to a PowerPoint presentation that I shared with others?
Yes, it is possible to revoke access to a previously shared presentation by altering the settings. You can also disable the link to stop further access by individuals who had the link.
4. Before sharing, can I add transitions and animations to my PowerPoint presentation?
Yes, WPS Presentation allows adding transitions, animations, and other visual effects to your presentation. Remember, these effects may behave or appear a little differently when viewed on other devices or platforms.
To sum it all up, sharing PowerPoint presentations online has revolutionized how we collaborate and communicate.
With the help of platforms like WPD Office and Microsoft PowerPoint, we can eliminate traditional methods and enjoy hassle-free access with improved engagement. Among all of the other platforms, WPS Office indeed stands out as a great alternative with its advanced features.
- 1. How to Share a PowerPoint Presentation on Zoom: A Step-by-Step Guide
- 2. How to Share and Co-edit a Powerpoint Presentation with WPS Office
- 3. How to Share a PowerPoint Presentation: A Step-by-Step Guide
- 4. How to Share Your Presentation As A Link? (In Easy Methods)
- 5. How to Share One Slides from PowerPoint in a presentation
- 6. 5 Easy Ways to Share Your Presentation so Others Can View It

15 years of office industry experience, tech lover and copywriter. Follow me for product reviews, comparisons, and recommendations for new apps and software.
PDFelement: PDF Editor, Scanner
Edit, Convert, Annotate PDF
- PDFelement for Windows
- PDFelement for Mac
- PDFelement on Mac App Store
- PDF Reader for Windows
- PDFelement for iPhone/iPad
- Get from App Store
- PDFelement for Android
- Get from App Google Play
- PDF Scanner for iPhone
Cloud & SDK
- PDFelement Cloud
- PDFelement Pro DC
- PDFelement SDK
Online PDF Tools
- PDF to Word
- Compress PDF
- Word to PDF
Educational Users
- Annotate PDF
- Combine PDF
Personal Users
- Convert PDF
- Organize PDF
Professional Users
- eSign PDFs Legally
- Extract Data from PDF
- Password Protect PDF
PDF Solutions for
- Chat with PDF
- AI PDF Summarizer
- AI PDF Translator
- AI Grammar Checker
- AI Content Detector
- AI Rewrite PDF
- Explain PDF with AI
- Add Bookmarks to PDF
- Explain PDF
- Mac Software
- OCR PDF Tips
- Online PDF Tips
- Edit PDF like Word
- PDF Converter Tips
- PDF Compressor Tips
Why PDFelement
- Customer Stories
- PDF Software Comparison
- Contact Support
- PDFelement for iOS
- InstaScan for iPhone
Explore More
- Upgrade Get the best price to upgrade to the latest PDFelement 11.
- Reviews See what our users say.
- Free PDF Templates Edit, print, and customize free templates.
- PDF Knowledge PDF-related information you need.
- Download Center Download the most powerful and simple PDF tools.
- Download Download Pricing Pricing
- 6 Simple Ways to Send a PPT
Discover how to send a PPT with ease using various methods. Learn to streamline the process using Wondershare PDFelement’s innovative features.

- Send PDF to Kindle
- send photos as pdf
- Share a PDF as a Link
- Share a PDF on Facebook
- Share a PDF with Twitter
- Send PDF in Messenger
- Send PDF on Instagram
- How to Send PDF via Text
- Transfer PDFs to iPad
- Scan a Document Into an Email
- Beyond Compare
- Compare Two PDF Files
- Compare PDFs Adobe
- Foxit Compare PDF
- Compare PDF and Word Document
- 3 Methods of Using AI To Compare Two Documents: A Comprehensive Guide
- Top 12 Remote Work From Home Jobs
- Reasons You Should Go Paperless
- Digital Signature Vs. Electronic Signature
- Show the Power of Teamwork with these 6 Collaboration Tools
- Team collaboration and how to incorporate it in workplace
- Why is Self-management Important to Achieve Success?
- 5 Tips to Improve Adaptability Skills for Workplace Success
- Personality Traits: The Big 5 Model and other examples
- Tips and Tricks for Self-Confidence and Self-Esteem Building
- Why Goal Setting Is So Important
Sharing a PowerPoint presentation (PPT) is essential in today’s digital landscape. Whether for business, education, or collaborative projects, you need reliable methods to send your presentations quickly and efficiently. Wondershare PDFelement offers innovative solutions to enhance your sharing experience, including QR code sharing and PDFelement Cloud. This guide covers various methods for sending PPTs, ensuring you have the necessary tools for every situation.
In this article
How to send a ppt via email, how to send a ppt via dropbox, how to send a ppt on google drive, how to send a ppt from your phone, how to send ppts in batch, how to convert ppt to pdf before sending.

Sending a PPT via email is straightforward but challenging if the file is too large. Here's how to do it seamlessly:
- Open Your Email Client: Launch your preferred email client, Gmail or Outlook.
- Compose a New Email: Click 'Compose' or 'New Email.'
- Attach the PPT File: Click the attachment icon, navigate to your PPT file, and select it.
- Add Recipient and Message: Enter the recipient’s email address, subject, and a brief message.
- Send the Email: Click 'Send.'
Handling Large Files:
- Compress the PPT: Reduce the file size by compressing images and removing unused slides. Go to 'File' > 'Compress Pictures' in PowerPoint and choose your compression options.
- Use File Compression Tools: Tools like WinRAR or 7-Zip can compress the file into a ZIP folder. Right-click your PPT file, select 'Add to Archive', and choose 'ZIP'.
- Upload to PDFelement Cloud: Upload your presentation to PDFelement Cloud. This cloud storage solution allows you to bypass size limitations by simply sharing a link to the file. Here’s how:
- Open PDFelement and upload your PPT file to PDFelement Cloud.
- Generate a shareable link or QR code and include it in your email.

Dropbox is an excellent tool for sharing large files. Here's how to leverage it for your PPT:
- Upload the PPT to Dropbox:
- Open Dropbox and sign in.
- Click on 'Upload Files' and select your PPT file.
- Wait for the upload to complete.
- Share the File:
- Once uploaded, hover over the file and click 'Share'.
- Enter the recipient’s email address and add a message if desired.
- Click 'Send' or 'Copy Link' and paste the link in an email.
Using PDFelement with Dropbox:
- Integration: PDFelement integrates seamlessly with Dropbox. You can save your PPT to Dropbox from PDFelement and generate a shareable link or QR code.
- Secure Sharing: PDFelement provides options to add passwords and expiration dates to your Dropbox links, enhancing security.

Google Drive is another popular cloud storage service for sharing files. Follow these steps:
- Upload the PPT to Google Drive:
- Open Google Drive and sign in.
- Click 'New' > 'File Upload' and select your PPT file.
- Right-click the uploaded file and select 'Get Link'.
- Choose the sharing settings (e.g., view only, edit access).
- Copy the link and share it via email or other messaging platforms.
Using PDFelement with Google Drive:
- Integration: PDFelement integrates with Google Drive, allowing you to upload and share files directly. Open PDFelement, upload your PPT to Google Drive, and generate a shareable link or QR code.
- Enhanced Features: PDFelement allows you to annotate and add comments to your PPT before sharing, making it easier for recipients to understand your notes and revisions.
Sending a PPT from your phone is incredibly convenient when you’re on the move. Here’s how:
- Open your email app.
- Compose a new email and attach the PPT file from your phone’s storage.
- Send the email.
- Dropbox/Google Drive:
- Open the Dropbox or Google Drive app.
- Upload the PPT file.
- Share the link via email or messaging apps.
- Using PDFelement Mobile App:
- Open the PDFelement app on your phone.
- Upload your PPT to PDFelement Cloud.
- Generate a shareable link or QR code.
Advantages of Using PDFelement Mobile:
- Convenience: Access your PPTs anytime, anywhere.
- QR Code Sharing: Instantly generate a QR code for your file and share it with others for quick access.
- Secure Cloud Storage: Store your files in PDFelement Cloud and ensure they are safe and accessible.
When you need to send multiple PPTs, batch processing can save time. Here’s how:

- Compress all PPT files into a single ZIP folder. Right-click the selected files, choose 'Send to', and select “Compressed (zipped) folder.”
- Attach the ZIP folder to your email.
- Cloud Storage:

- Upload all PPT files to a single folder in Dropbox or Google Drive.
- Share the folder link with recipients.
- Using PDFelement:

- Open PDFelement and create a ZIP file containing all your PPTs.
- Upload the ZIP to PDFelement Cloud.
- Generate a shareable link or QR code and share it with your recipients for easy access.
Batch Processing with PDFelement:
- Efficiency: PDFelement allows you to batch convert PPTs to PDFs and upload them to PDFelement Cloud in one go.
- Organization: Keep all your presentations organized and easily accessible in one place.
- Security: Add password protection to your ZIP file or individual PDFs before sharing.
Converting PPT to PDF can make your presentation easier to share and view. Here’s how:
- Using PowerPoint:

- Open the PPT file.
- Go to 'File' > 'Save As'.
- Choose PDF from the file format options and save.
- Share the PDF via email or cloud storage.

- Open PDFelement and select 'Create PDF'.
- Choose the PPT file and convert it to PDF.
- Save and share the PDF via email or cloud storage.
Benefits of Using PDFelement:
- High-Quality Conversion: PDFelement ensures your PPT is converted to PDF without losing quality.
- Annotation Tools: Before sharing, add comments, highlights, and annotations to your PDF.
- Security Features: Add passwords and permissions to your PDF for secure sharing.
- Use QR Codes: PDFelement 11 allows you to share files using QR codes, making it easier for recipients to access the presentation. Simply generate a QR code for your file and share it.
- Utilize PDFelement Cloud: Store and share your presentations securely using PDFelement Cloud. Access your files from anywhere and share them with ease.
- Compress Before Sharing: Always compress your PPT files if they are too large. This helps in faster uploading and downloading.
- Annotate and Comment: Use PDFelement’s annotation tools to add comments and highlights to your presentations before sharing.
Thanks to the wide array of options available today, sharing a PowerPoint presentation has never been simpler. Whether emailing your presentation, storing it in the cloud, or converting it to PDF, Wondershare PDFelement elevates the process with innovative features. With QR code sharing, you can provide instant access to your presentation, allowing recipients to view it with a scan. Additionally, PDFelement Cloud ensures your presentation is always accessible and easily shareable from anywhere. These powerful tools not only make your presentation more accessible but also ensure it looks polished and professional, enhancing the overall impact of your work.
People Also Ask
How do i send a large powerpoint file via email, can i send a ppt directly from my phone, how do i convert a ppt to a pdf, what are the new features of pdfelement 11 for sharing ppts, how do i ensure my ppt is secure when sharing, can i batch process ppts using pdfelement, you may also like.
- How to Share a PDF as a Link
- How to Share a PDF on Facebook
- How to Share a PDF on Twitter
- Apple Event: What's New
- Enter Our Giveaway
- Meta Quest 4
- Google Pixel 9
- Apple Vision Pro 2
- Nintendo Switch 2
- Samsung Galaxy Ring
- Yellowstone Season 6
- Recall an Email in Outlook
- Stranger Things Season 5
How to create a Powerpoint Presentation

Powerpoint presentations are a great way to share information with a team, but making them is a skillset in its own right. We've got guides on general Powerpoint use , but if you're keen to just get started making a slideshow right now, this is the way.
How to create a Powerpoint presentation
How to build your first slide, how to add more slides to a powerpoint presentation, how to make an awesome slideshow presentation.
Here's how to make a Powerpoint presentation.
What You Need
Powerpoint or Microsoft 365 subscription
The first step in building your fancy slideshow is to create the presentation itself. Here's how to do it.
Step 1: Download and install Powerpoint (as part of Microsoft 365 ) if you haven't already, then open the app up.
Step 2: The home screen will give you a range of options for selecting templates and premade presentations to give you a great starting-off point. Select one of them if they're applicable. For even more options, select the New tab from the left-hand menu.
Alternatively, if you want to start from a blank canvas, select Blank presentation.
Step 3: From there, it's a good idea to name and save the presentation so you can come back to it later. Select File > Save or* Save As*, then name the file on the right, choose a location for it, and select Save .
Step 1: Your first slide will automatically have text fields for a title and subtitle. If you want to have that on your first slide, select them, then type in what you want them to read. You can also click and drag them around, or resize them using your mouse.
Hover your mouse over the white circles, then click and drag them to resize the box. Alternatively, select the rotational arrows near the corners of the box, to rotate it.
If you don't want those text fields, select their boundary individually and press the Delete key to remove them.
Step 2: If you want to add more text to this slide (or any others in the future), select the Insert tab, then select Text box. Click on the slide where you want the box to appear, then use your mouse to drag the box to the desired shape.
Then click the box and type in what you want that text box to say. The contextual home menu will automatically adjust to give you quick access to font choices and other text style options.
You can access more detailed text formatting options by selecting the Format tab. There you'll find options for changing text coloring, its outline, and any text effects you want to use.
Step 3: To add pictures to your slideshow, select the Insert tab, then select Pictures in the top-left. You'll then have the option to insert an image from your local PC, a selection of stock images, or a range of online images.
You can also change the background of your PowerPoint slides .
Step 4: You can also freehand draw or annotate your slides, using the Draw tab, or alter the entire theme of the slideshow by selecting Design.
Step 1: To add a new slide to your presentation, select the Insert tab at the top of the screen, then select New slide on the left. Then choose the type of slide you want. You can have a blank slide to do it all yourself, or you can get a headstart on its design by copying a previous slide, using the same theme as another part of your presentation, or having a predefined layout.
Step 2: Think you've gone too far with the slides? If you decide to revise your presentation, perhaps remove a graph or truncate some text, you can easily delete a page from your PowerPoint .
Step 3: When your presentation is complete, you're ready to share it with an audience. Before you do, remember to add some notes to your PowerPoint slides . These are for your eyes only, and will help you to keep the presentation on topic and avoid forgetting your lines.
Want even more tips on making a great slideshow? We've got you covered. Check out our guide on how to use Microsoft Powerpoint , for all the most important tips.
We've also got a guide for more tips and tricks for making engaging and attractive slides .
Editors’ Recommendations
- The best PowerPoint templates
- How to change the background in Powerpoint
- 5 ways to add music to PowerPoint
- How to print a PowerPoint presentation with notes
- How to convert PDF to PowerPoint
- How-To Guides

While PowerPoint is widely used to develop presentations, using Google Slides has become a popular alternative. Part of what makes it so popular is that it's free to use, as is other Google software such as Google Docs and Google Sheets – which is a stark contrast to the premium price you'll pay for Microsoft Office and PowerPoint.
Even if you know how to use Microsoft PowerPoint, you might want to jump ship to Slides, and Google makes it easy to do so. In fact, it takes little more than a few clicks to convert a PowerPoint to Google Slides. Whether you need to change the format for a coworker or want to permanently switch to the free platform, here's a look at how to convert your PowerPoint into a Google Slides presentation.
We all know that Microsoft’s PowerPoint software has been a presentations staple for a few decades now. And whether you only used it in school once or twice, or you use it for work on a daily basis, there’s always something new to learn about the classic Microsoft platform.
Even if you know how to use PowerPoint, did you know that you can embed videos in your presentations?
Creating a successful slideshow is no small task. So, if you’re new to Microsoft PowerPoint, you’ll need to familiarize yourself with the features and tools you need to build a presentation.
We’ll guide you through the process of creating a PowerPoint slideshow by adding slides and elements as well as how to present the show when you finish. These basics are just what you need as a beginner and should get you off to a terrific start with PowerPoint.
- Add, change, hide, or delete comments in a presentation Article
- Share your PowerPoint presentation with others Article
- Save a presentation as a video Article
- Inspect a presentation Article
- Save PowerPoint presentations as PDF files Article

Share your PowerPoint presentation with others

Select Share .
If your presentation isn't already stored on OneDrive, select where to save your presentation to the cloud.
Choose a permission level, like Anyone with a link , or maybe just people in your company. You can also control if people can edit or just view the doc.
Select Apply .
Enter names and a message.
Select Send .
You can also copy the link and then paste it in an email, social media post, or even a text message.
For info on collaborating with others on a document, see Work together on PowerPoint presentations .
To stop sharing, see Stop sharing OneDrive files or folders or change permissions.
Share by using a traditional email attachment:
If you don't want to share a document with others to collaborate on, simply use a traditional email attachment to send the presentation to others.
From OneDrive for Business or SharePoint, share a PDF or copy of a presentation by email
This feature is only available if you have a Microsoft 365 subscription . If you are a Microsoft 365 subscriber, make sure you have the latest version of Office .
To send your presentation as a copy or a PDF, select Share .

Select Attach a Copy Instead in the Share dialog box.

Select either PowerPoint Presentation or PDF .

PowerPoint will open the email application and attach the file to a new message. Enter the recipients details and a short message, and click Send .
From OneDrive, share a PDF or copy of your presentation by email

Select Send as attachment in the Share pane.

Select either Send a copy or Send a PDF .

PowerPoint will open the email application and attach the file to a new message. Enter the recipients details and a short message, and click Send .
You can share or co-author a presentation in PowerPoint for macOS. If you allow others to edit your presentation, changes they make will be merged into the original presentation. If you want to share your presentation, you can:
Invite people to view or edit the file located in the cloud, like your OneDrive.
Send a link to your file saved to the cloud.
Send a copy of the file as an email attachment.
Note: If you're looking for information about saving a presentation in JPEG or PDF format, see File formats supported in PowerPoint .
Invite people to view or edit your presentation
Save your file to the cloud and then invite people to view or edit it. That way, whenever you update your file, everyone you share with will have the latest version.
In the upper right corner, click the Share icon and then click Invite People .

If the file is on your device, you'll be asked to upload the file to the cloud first.

Invite users by adding their email addresses to the invite field. When adding names for the first time, PowerPoint will prompt to access your Contacts.
To allow your users to edit the file, click the Can Edit check box. Add any comments in the comments field and click Share .

The recipients receive an email with a link to the shared file.
Share a link to your presentation
You can copy the link to your presentation and paste it in another shared file or email to the recipients.
In the upper right corner, click the Share icon and then click Copy Link .

Paste the link wherever you need.
Send your presentation as an email attachment
If you don't want to save your file to the cloud, you can share it as an email attachment.
In the upper right corner, click the Share icon and then click Send Attachment .

Click Presentation or PDF .

PowerPoint will open your email application and attach your file to a new message. Just fill in the details, like email addresses and a short message, and click Send .
Share and co-author a presentation in PowerPoint for Mac
File formats supported in PowerPoint

Need more help?
Want more options.
Explore subscription benefits, browse training courses, learn how to secure your device, and more.

Microsoft 365 subscription benefits

Microsoft 365 training

Microsoft security

Accessibility center
Communities help you ask and answer questions, give feedback, and hear from experts with rich knowledge.

Ask the Microsoft Community

Microsoft Tech Community

Windows Insiders
Microsoft 365 Insiders
Was this information helpful?
Thank you for your feedback.
IMAGES
VIDEO
COMMENTS
Share your PowerPoint presentation with others. Windows macOS. Select Share. If your presentation isn't already stored on OneDrive, select where to save your presentation to the cloud. Choose a permission level, like Anyone with a link, or maybe just people in your company. You can also control if people can edit or just view the doc.
Share and collaborate with PowerPoint for the web. Share your presentation. Select Share on the ribbon. Enter the names or email addresses of the people you want to share with. Or select the drop-down to change permissions. Allow editing is checked by default. To change permission to view only, uncheck this box and select Apply.
Here's how to create a link for a PowerPoint: Click on Copy link on the same sharing window I showed you above. PowerPoint Online creates a URL that you can send to others to collaborate on the presentation with you. Create a link to view the PowerPoint presentation using the Get a link option.
Click here to try VEED free. 2. Just email it! This is a simple, easy to use method for PPT sharing. Aside from just picking the target address, making an email attachment, and clicking the Send button, you may want to automate and customize emailing to your needs.
To invite other people to access your PowerPoint file and collaborate, take these steps: With the presentation open, select the Share button in the top right corner of the ribbon. If you have not yet stored your presentation to OneDrive or SharePoint in Microsoft 365, a message will direct you to do so. (You can also simply share a copy of the ...
In this video, you'll learn the basics of sharing your presentation in PowerPoint 2019, PowerPoint 2016, and Office 365. Visit https://edu.gcfglobal.org/en/p...
Sharing PowerPoint presentations online lets us work together in real time. It simplifies collaboration with features such as inviting collaborators, managing permissions, and real-time editing. Inviting Collaborators and Managing Permissions. To start, we select the Share button on the ribbon. We can then enter the names or email addresses of ...
The first thing to note is the "Share" section. Here, you'll see the two methods for sharing the presentation, and anyone with whom you've already shared it. With the "Invite People" method of sharing, you can do the following: Type the email addresses of those with whom you'd like to collaborate. Leave a note for the recipients.
To share a PowerPoint presentation via OneDrive: - Click the Share button in the top right corner. - Sign in with your Microsoft account if prompted. - Choose whether you want to share for editing or view-only. - Generate the link and copy it for sharing.
In your web browser, jump over to PowerPoint.com, a fast shortcut to the PowerPoint's online version. If you're not already logged in, enter the same Office credentials that you set up earlier. You'll see a list of PowerPoint presentations saved to your OneDrive. Double-click on your desired presentation to open it.
By saving it online, you can set up a collaborative editing PowerPoint. This is how to share a PowerPoint with multiple users. To save a presentation in OneDrive, go to the File > Save As menu in PowerPoint. When the Save As menu appears, click on Online Locations. From the Place dropdown, choose OneDrive.
Share and collaborate in PowerPoint. Share your presentation. On the ribbon, select Share. If your presentation isn't already saved to OneDrive, you'll be prompted to save it there. In the Send Link dialog box, do the following: Enter the names or email addresses of the people you want to share with. Select the drop-down to change permissions ...
1. Use Presentation Hosting. There's a bunch of web-based slide hosting services out there that can help you upload and share a presentation without quality losses or security implications, for example, SlideShare, MyPlick, and Slideboom.
Here are five of the best ways to share a PowerPoint presentation online. Each has its own advantages, so find the method that works best for your current situation. 1. Let others download your original file. Of course, one method is to simply upload your PowerPoint to Google Drive or DropBox and give the link to a friend.
Converting PowerPoint to PDF: Open our presentation in PowerPoint. Click on 'File' and select 'Export' or 'Save As'. Choose 'PDF' from the file format options. Hit 'Export' or 'Save'. Aside from PDF, we can also convert our slides into images, videos, or even embed them directly into our blogs or websites.
Create a New Presentation with PowerPoint for the Web. Click Create or use a PowerPoint template from the options to create a new PowerPoint presentation. You can start with a specific theme or use a blank template. You can also browse through themes via Office.com to find one that best suits your needs.
First, open the PowerPoint presentation that you'd like to share. At the top-right corner of the window, you'll see a "Share" button. Go ahead and select it. Once selected, the "Share" window will appear. You have a few different options here. In the "Attach a copy instead" group, you can choose to send your presentation as a ...
A comprehensive list of 40+ websites that you can use to share PowerPoint presentations online, including slide hosting and presentation design services. Services. Services. Ad Creative. Eye-catching designs that perform. ... Presentation Design. Custom slide decks that stand out. Packaging & Merch Design. Head-turning apparel & merch.
Sharing PowerPoint presentations is essential for collaboration, education, and communication in business and academic settings. Microsoft PowerPoint offers a built-in Share feature that makes it easier than ever to distribute your slides to colleagues, clients, or students; before, during or after the presentation. This guide will walk you through using the built-in sharing options in ...
Here is how to share a PowerPoint presentation with others through email: Step 1: Upload your presentation to online your OneDrive account if you use the PowerPoint desktop app. Step 2: Once your presentation is uploaded online, click the "Share" option on the ribbon. Step 3: Write the name or email address of the individuals you would like ...
Share and collaborate with PowerPoint. Share your presentation. Select Share on the ribbon. Enter the names or email addresses of the people you want to share with. Or select the drop-down to change permissions. Allow editing is checked by default. To change permission to view only, uncheck this box and select Apply.
Sharing a PowerPoint presentation (PPT) is essential in today's digital landscape. Whether for business, education, or collaborative projects, you need reliable methods to send your presentations quickly and efficiently. Wondershare PDFelement offers innovative solutions to enhance your sharing experience, including QR code sharing and ...
Click Slide Show > Present Online > Office Presentation Service. Select the Enable remote viewers to download the presentation check box if you want to allow your audience to download a copy of the presentation file. Click Connect. Important: You won't be able to email your presentation directly from PowerPoint on a Windows RT PC.
How to add more slides to a Powerpoint presentation. Step 1: To add a new slide to your presentation, select the Insert tab at the top of the screen, then select New slide on the left. Then choose ...
Share your PowerPoint presentation with others. Windows macOS. Select Share. If your presentation isn't already stored on OneDrive, select where to save your presentation to the cloud. Choose a permission level, like Anyone with a link, or maybe just people in your company. You can also control if people can edit or just view the doc.