
Where Does PowerPoint Save Recordings? [Here’s Where!]
By: Author Shrot Katewa
![Where Does PowerPoint Save Recordings? [Here’s Where!]](https://artofpresentations.com/wp-content/uploads/2023/01/ezgif.com-gif-maker-6.webp "powerpoint save video from presentation")
It is really annoying when you finish recording a PowerPoint presentation and you don’t get to see the complete presentation that you just finished recording! The truth is that the presentation is embedded on the slides itself. But, how do you access the recordings and how do you share the recorded presentation?
PowerPoint saves the recording specific to each slide on the slide itself. However, to access the complete recording of your presentation, you need to export your presentation as a video file. Click on the “File” tab, then click “Save As” and change the file format to an “.MP4” file.
In this article, I will share with you all the details of not just how to record a presentation correctly, but also how to locate the recorded file and share it with your colleagues or clients.
So, without further ado, let’s get started!
1. How to Record a Presentation in PowerPoint?
To know how the video or audio recordings work in PowerPoint, let us first understand how to record a presentation in PowerPoint. We shall take two examples to understand this further i.e. recording yourself giving the presentation with your video camera, and recording just the audio narration.
1.1 How to Record Yourself Giving a PowerPoint Presentation With Video?
Microsoft PowerPoint allows you to record yourself presenting the slides. You can also use features like laser pointer, pen, highlighter, etc. during the recording. To record yourself presenting a PowerPoint presentation, follow the steps mentioned below:
Step-1: Click on the “Record” tab

In the menu ribbon located at the top of the screen, click on the “Record” tab to open the “Record” menu.
Step-2: Click on the “From Beginning” option
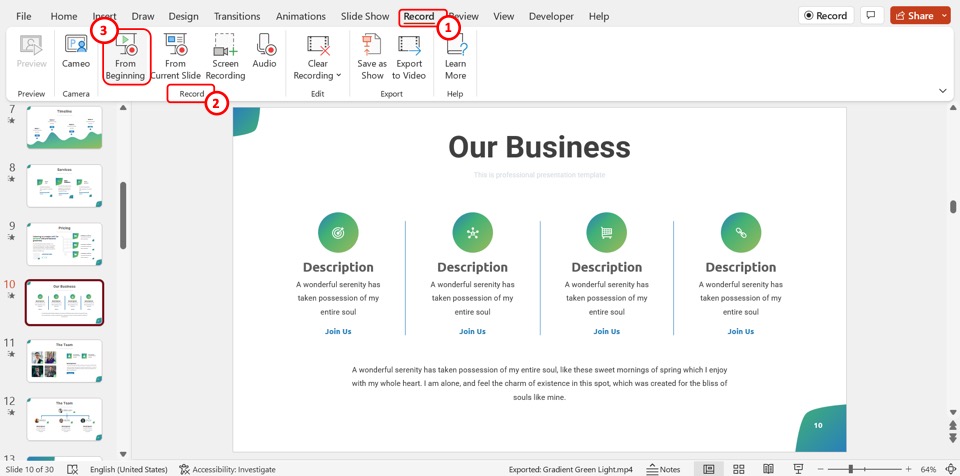
Click on the “From Beginning” option in the “Record” group of the “Record” menu. This will open the recording screen.
Step-3: Click on the “Camera” icon
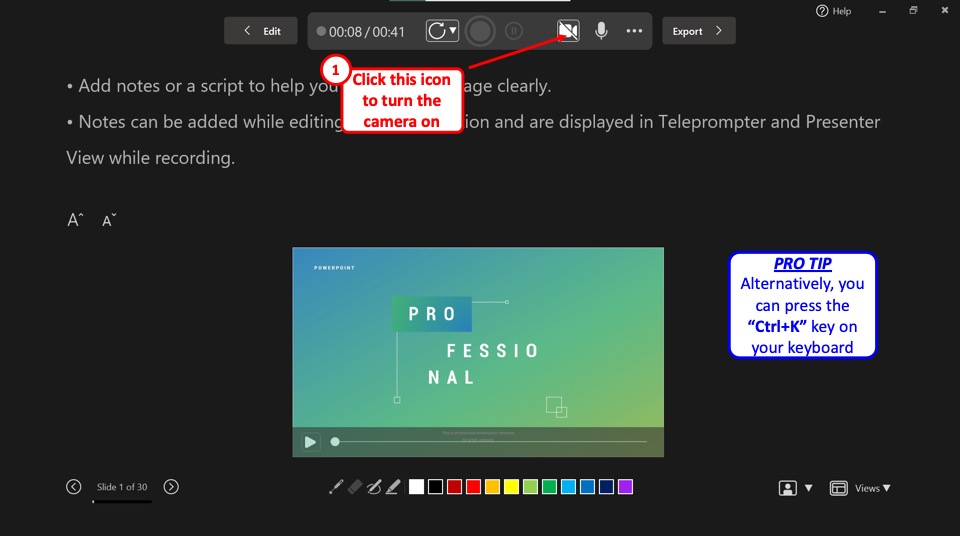
In the toolbar at the top of the screen, click on the “Turn camera on” option which is the camera icon. Alternatively, you can press the “Ctrl+K” keys on your keyboard to turn on the device camera to record yourself.
Step-4: Click on the “Start recording” option
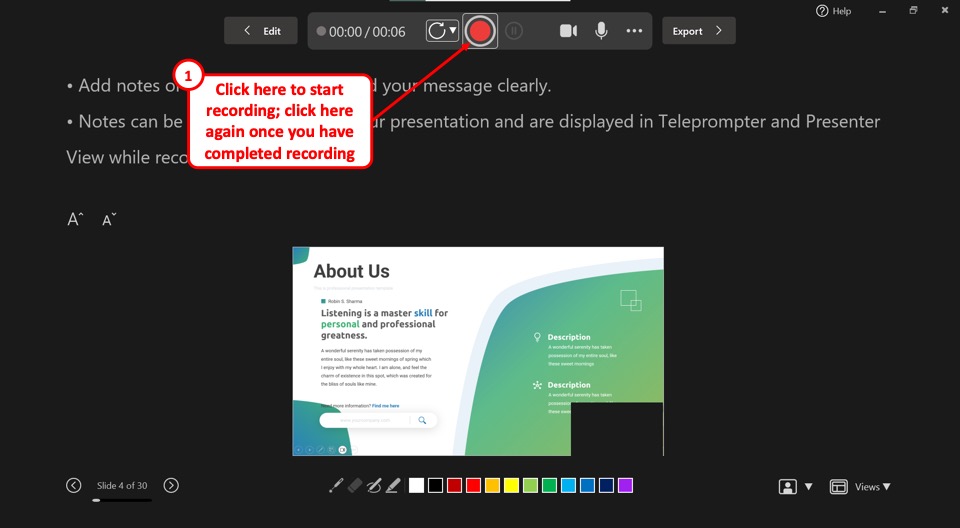
Now you can start recording yourself presenting. Click on the “Start Recording” option which is the circle icon with a large red dot in the middle. When you are done presenting, click on the same icon to stop recording.
Step-5: Click on the “Close” option
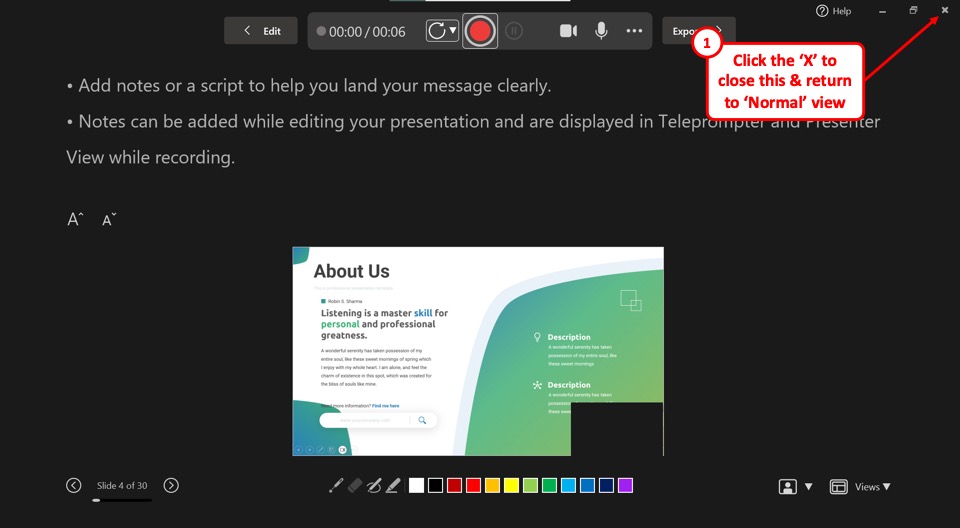
Click on the “Close” option which is the “X” icon at the top right corner of the recording screen to return to the “Normal” view.
Once you have finished the recording, you will notice that the part of the video that talks about slide 1 gets automatically added to the first slide, and part of the video where you talk about slide 2 is added to the 2nd slide .
Likewise, your entire recording gets automatically divided across every single slide wherever you had any comments to add!
You may not notice this at first, however, just look for the camera video that gets embedded to the bottom right corner of your slide.
Now, how do you extract your recordings? I will explain that in the subsequent sections.
1.2 How to Record a PowerPoint Presentation with Audio?
If you wish to record just the audio narration for your presentation without showing your face or using your camera, you can do so by choosing the following methods.
To be honest, there are a couple of different ways to record audio narration for your presentation.
Method 1 – Using the “Record” Feature
The first method is quite similar to the one described above. The only difference is that you need to turn off the camera before you begin recording the presentation.
This will record the presentation with just your voice for each slide. Since we’ve already covered the steps, I won’t show you the steps for this method and I shall focus on the second method for recording audio narration for your presentation.
Once the recording is complete, follow the steps mentioned in section 1.3 below to convert it into a cohesive recorded presentation.
Method 2 – Using the “Audio” Recording Feature
The second method involves recording the audio for a presentation on each slide. This method allows you to record audio for a slide individually and not the whole presentation at once.
Here’s what you need to do to record just the audio for the presentation.

The first step is to click on the “Record” tab in the menu ribbon at the top of the screen. This will open the “Record” menu.
Step-2: Click on the “Audio” option
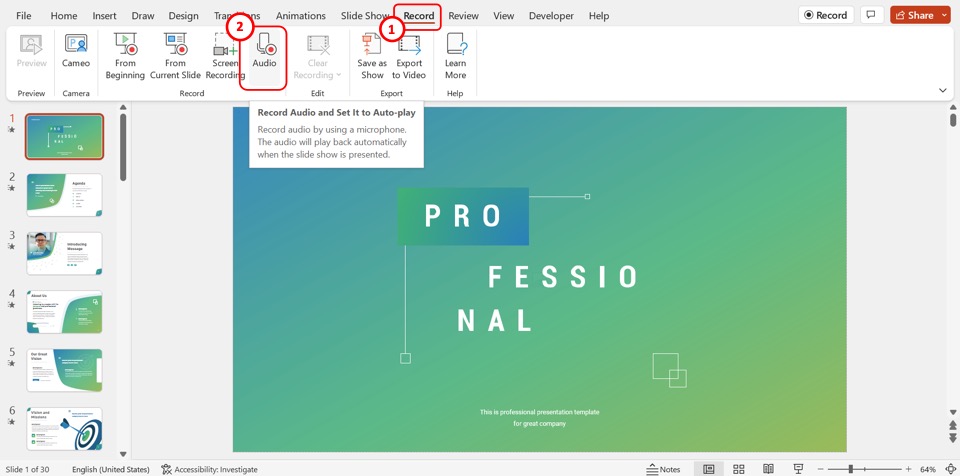
In the “Record” group of the “Record” menu, click on the “Audio” option. This will open the “Record Sound” dialog box.
Step-3: Click on the “Name” box
In the “Record Sound” dialog box, click on the “Name” box. Then you can type in a file name for the audio recording.
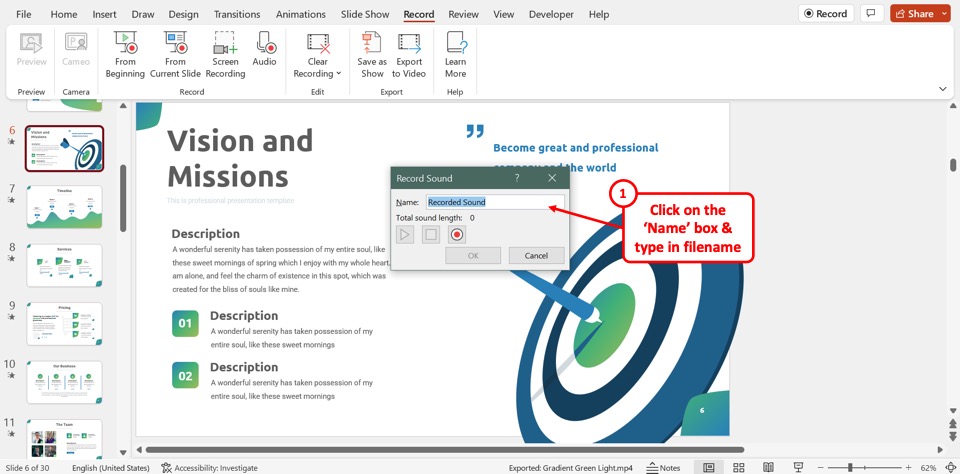
Step-4: Click on the “Record” icon
The next step is to click on the “Record” icon in the “Record Sound” dialog box. It is the black circle with a large red dot inside. When you are done recording audio, click on the “Stop” option which is the square icon.
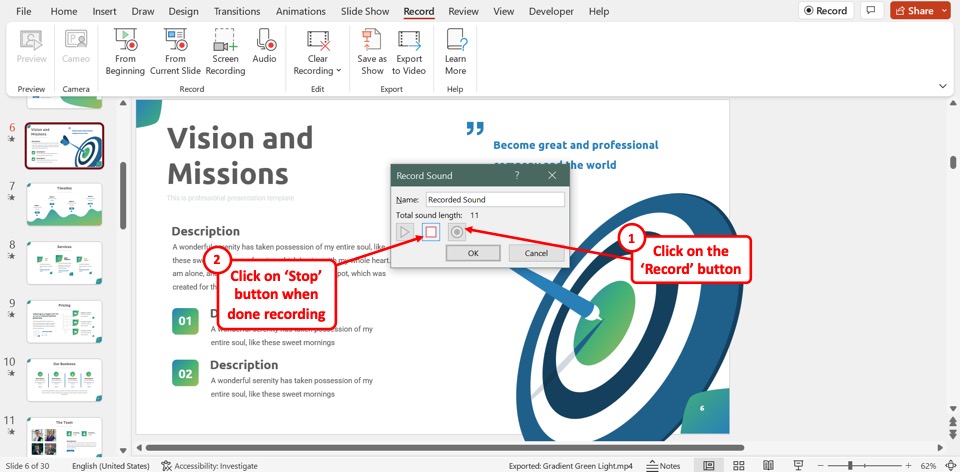
Step-5: Click on the “Ok” button
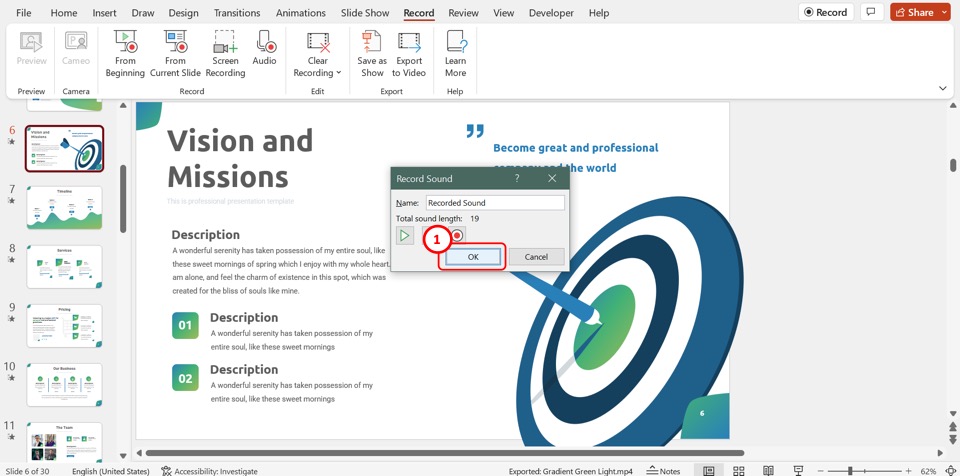
Now all you have to do is click on the “OK” button at the bottom of the “Record Sound” dialog box to save the audio recording.
Repeat the process for each slide where you want to add an audio recording. Once you’re done recording the audio narration for your presentation, save the file and proceed for section 1.3 below to make it into a cohesive presentation.
1.3 How to Save Your PowerPoint Presentation Recording?
Once you have recorded your complete presentation using the aforementioned methods, it is now time to save your presentation recording.
One mistake that people often make is to try and save the camera video embedded on the file. However, this will only save the camera video and not your entire presentation.
The correct way to save your PowerPoint presentation recording is to save the file as a video. However, do this only once you have finished recording your presentation.
Here’s what you need to do to save your recorded presentation into a video:
Step-1: Click on the “Save” option
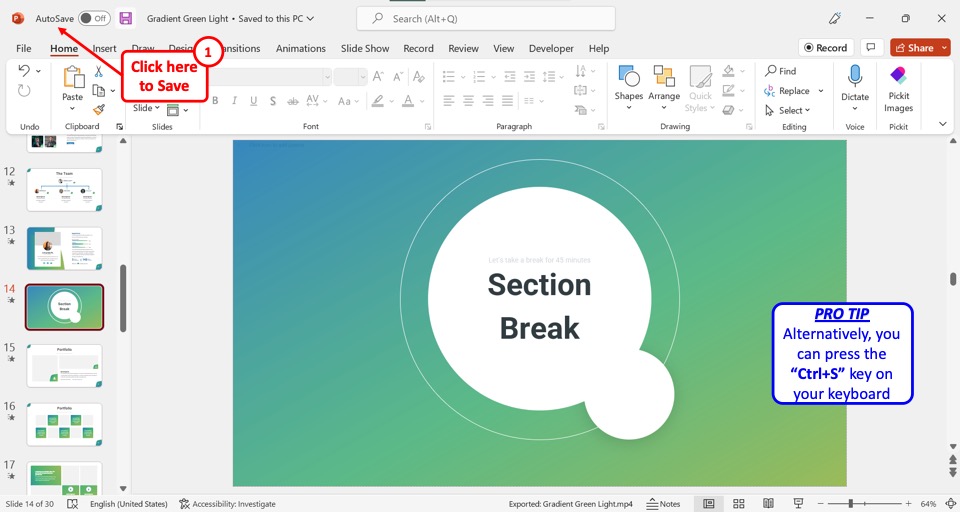
On the left corner at the top of the screen, click on the “Save” option. Alternatively, you can press the “Ctrl+S” keys on your keyboard to save all the changes made to the presentation file.
Step-2: Click on the “Export to Video” option
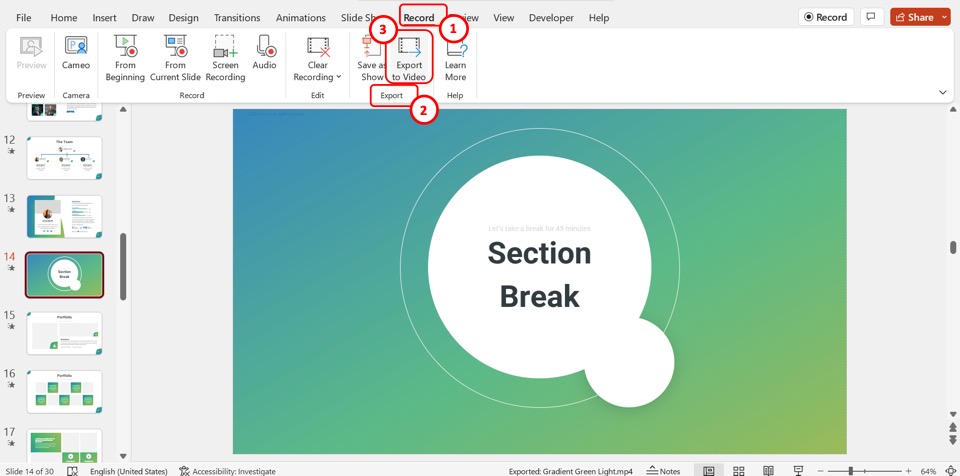
Click on the “Record” tab in the menu ribbon to open the “Record” menu. Then click on the “Export to Video” option in the “Record” menu. This will open the recording screen.
Step-3: Click on the “Export Video” option

In the recording screen, click on the “Export Video” button at the bottom to save the presentation recording as a video file.
1.4 Recording a Presentation into a PowerPoint Show File
You can also convert your presentation into a PowerPoint Show file (.ppsx file). This allows you to directly open the file into a presentation.
This option works great when you don’t have any audio components to your presentation and when you don’t want to record yourself to give a presentation. Instead, all you want to show is the presentation itself in the “Slideshow” mode.
I’ve written a detailed article about how you can loop your presentation using a PowerPoint Show file . Make sure to check out that article to understand a use case for this type of a presentation recording.
Nevertheless, here’s what you need to do to record your presentation as a .ppsx file.
Step-1: Click on the “File” tab
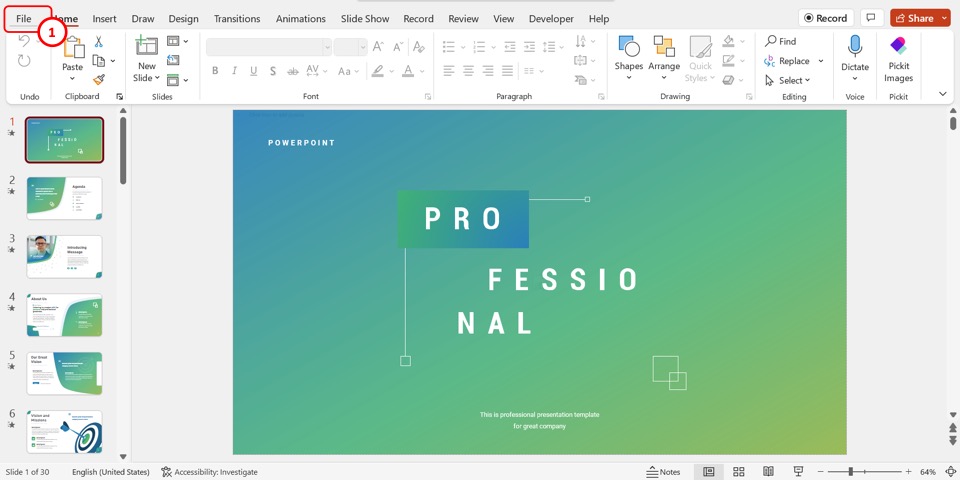
In the menu ribbon located at the top of the screen, click on the “File” tab. This will open the “File” screen.
Step-2: Click on the “Save As” option
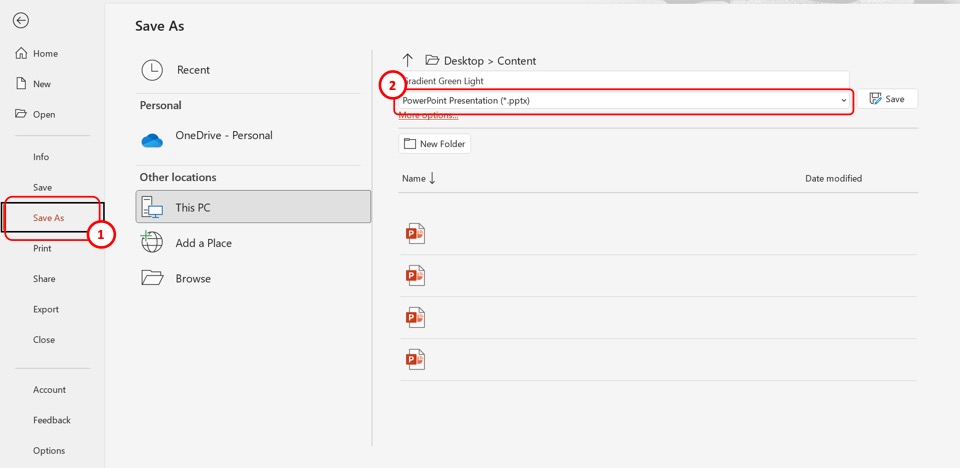
In the menu sidebar on the left side of the “File” screen, click on the “Save As” option. Then click on the second box in the “Desktop” section of the “Save As” screen.
Step-3: Click on the “PowerPoint Show (.ppsx)” option
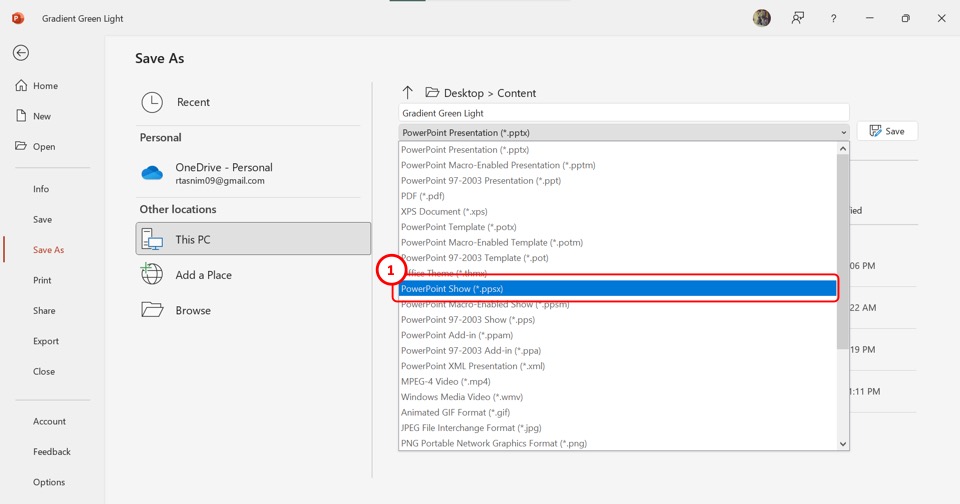
Now all you have to do is click on the “PowerPoint Show (.ppsx)” option from the dropdown list to save the PowerPoint presentation as a recording.
Step-4: Click on the “Save” button
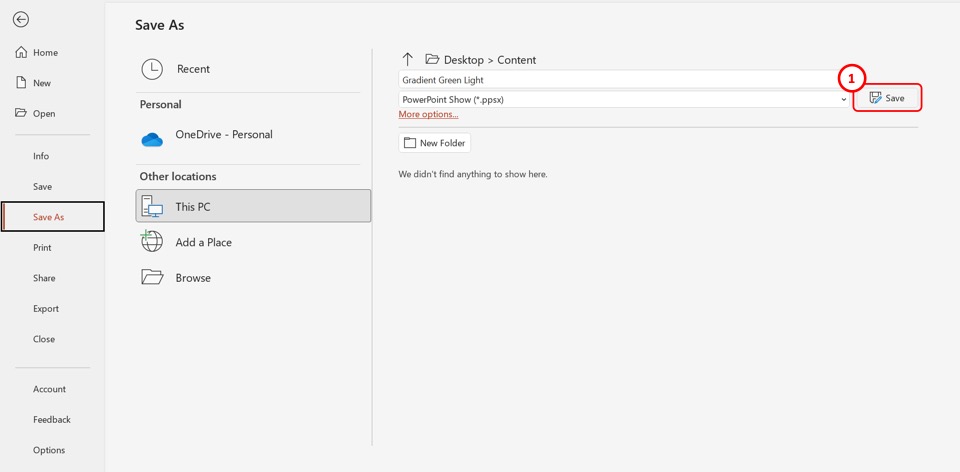
Finally, click on the “Save” button next to the “Save As” box to save the PowerPoint recording. This will save all the transitions, animations, and audio as a slideshow.
2. Where Does PowerPoint Save Recordings?
As I previously mentioned, typically PowerPoint saves the presentation recording as a video embedded into the presentation slide. You can access the complete recording only when you save your entire presentation and convert it into a video file.
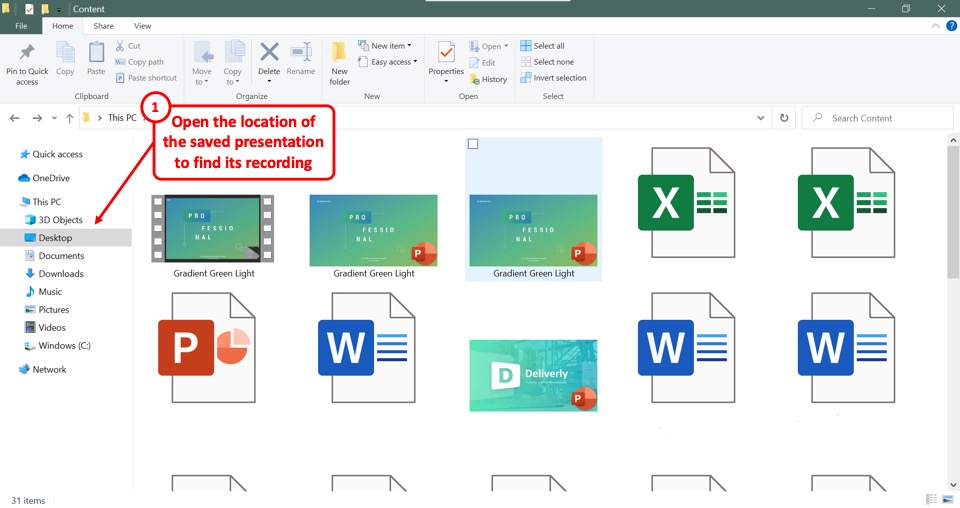
This video file is saved in the same folder as the location of your original PowerPoint file. To find the recording or the slideshow, all you have to do is open the location of the PowerPoint presentation file.
2.1 Where does PowerPoint Save Recordings on Mac?
In Microsoft PowerPoint for Mac, you can save a presentation recording as an “MP4” or a “MOV” file. Just like Windows, you get an option to choose the location of the folder to save the video recording of your PowerPoint presentation.
That said, if you want to access just the video from the camera, it is usually saved in the “Movies” folder available on your Mac device.
3. How to Find Saved PowerPoint Recordings?
In Microsoft PowerPoint, you cannot select the destination for saving the default presentation recording as the files are saved within the presentation itself.
The difficult bit is often recognizing that the presentation has been recorded as it is often difficult to notice any change to the presentation at the end of the recording.
However, there are ways you can know that the presentation has been recorded and access the recordings!
Method-1: Click on the video inserted in the slide

When you record yourself presenting a Microsoft PowerPoint file, the recording is embedded in each slide as a video. To find the recording, all you have to do is open the slide and find the video embedded in there.
Method-2: Click on the “Video Exported Successfully” notification
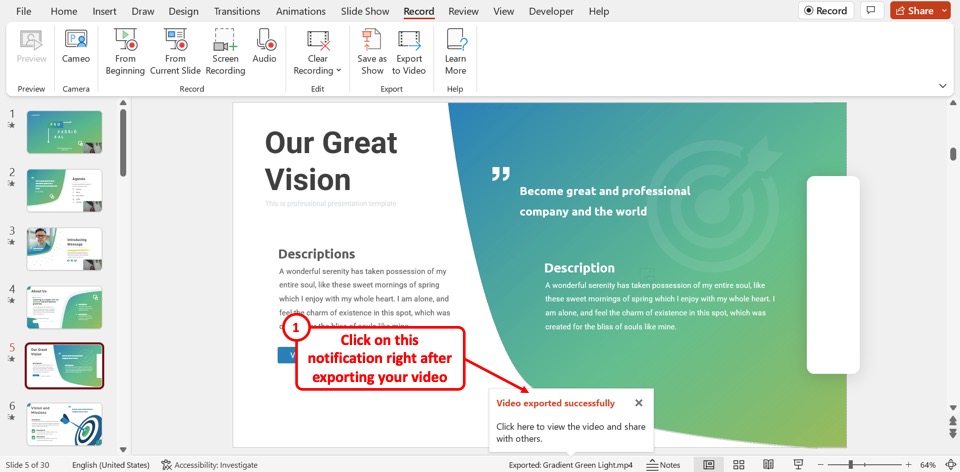
When you save a presentation recording using the “Export to Video” option, the “Video exported successfully” notification will appear at the bottom of the screen. All you have to do is click on the notification to open the recorded video without having to look for it in your desktop files.
Method-3: Open the PowerPoint location
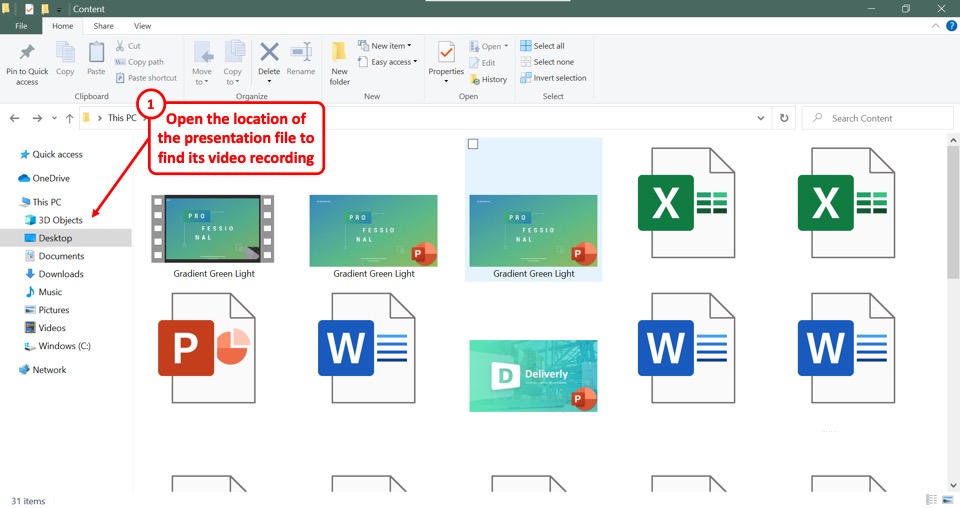
Since recordings are saved in the location of the original PowerPoint presentation file, you can simply open the file location to find the recorded presentation file.
4. Where does PowerPoint Save Audio?
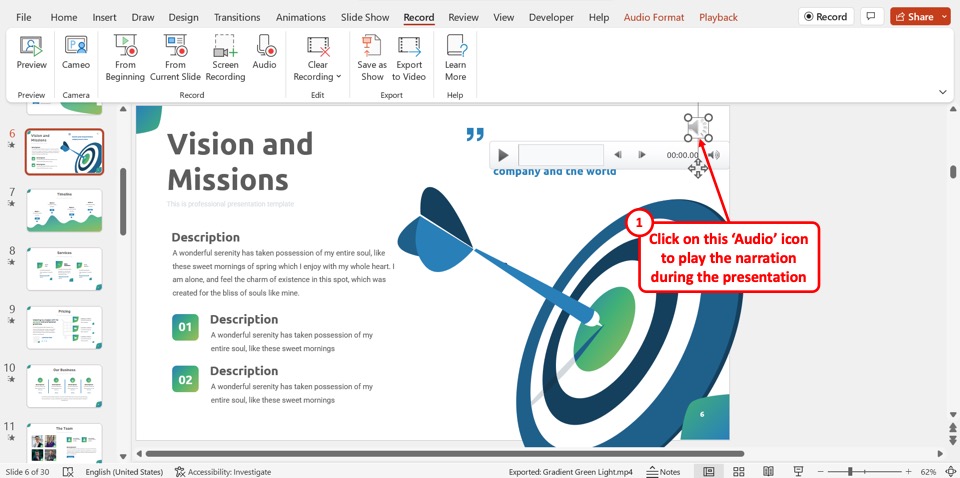
In Microsoft PowerPoint, the recorded audio is embedded into each slide rather than saved as a separate file. You can find the recorded audio as the “Audio” icon which is a megaphone icon in the middle of the slide. To play the narration, all you have to do is click on the “Audio” icon on the slide during the presentation.
Credit to cookie_studio (on Freepik) for the featured image of this article (further edited).
Tutorial: Save your PowerPoint as a Video
It pays to know how to save PowerPoint as video. Whether you are preparing a PowerPoint presentation for work, school , non-profit, staff training or investor relations. Content marketing is one of the biggest trends of the past couple of years and knowing how to distribute your content via various media is critical to business success. This article will guide and show you, step by step, how to save your PowerPoint presentation in video format. Next, we discuss the advantages of PowerPoint to video conversion and how you can put a single presentation to greater use. This guide is written by 24Slides’ Powerpoint experts and includes instruction on using PowerPoint for Mac.

6 Reasons to save PowerPoint as video
So you are considering saving your PowerPoint presentation as video? Before we show you how to do it, let’s talk about why it’s a great idea to convert your PowerPoint to video.
- You can show your presentation to a wider audience by sharing the video on YouTube and other video platforms.
- Your audience do not need to have a copy of Microsoft PowerPoint to view your presentation.
- Burn your presentation video on CD or DVD and giveaway as promotional material to clients or potential customers.
- Leverage your presentation and increase the return on investment (ROI) of your presentations by distributing them as video.
- The technical ability of your audience will not become a barrier to delivering your message. Your video becomes easy to access without the knowledge and understanding of powerpoint.
- Your audience will see your presentation exactly as you have intended it to be seen. Unlike sharing it as a presentation, some slides may get deleted or changed.
Now that you know why you’re on the right track by learning how to save PowerPoint presentations as video, let’s get into the process of exactly how to do it.
How to save PowerPoint 2010 as a video
If you are still using PowerPoint 2010 to create your presentations, you’ll be pleased to know you can still convert your PowerPoint to video. The process is som simple that you’ll wonder why you haven’t been doing this all along.
Whether your presentation contains just text or is a multimedia presentation with sound narration, transitions and video, you will be able to convert it into video. Microsoft PowerPoint allows you to save PowerPoint as video in Windows Media Video (.wmv) file format. If you plan for sharing your presentation as a video before creating it, you can decide whether to record the narration before creating the presentation.
Here are the steps you need to follow:
- Create your PowerPoint presentation as normal and save it.
- If you’re using narration for your presentation, record the narration and add timings to the slideshow.
- Select the File menu and click on Save & Send .

- Under the Save & Send menu, find and click on Create a Video .

- Click on the Computer & HD Displays option to customise the video size and quality (small, medium and large size & quality).

- Click the Don’t Use Recorded Timings and Narrations to select if you’re using timings and narrations.

- Click Create Video and another dialogue box opens.

- Enter appropriate filename and saving location to save your newly created video.
Once your presentation to video conversion is complete, the video is ready to share via Facebook, Youtube, Vimeo or email.
How to save a PowerPoint 2007 presentation as video
There are many users still running Microsoft Office 2007, hence PowerPoint 2007 on their computers. If you are one of them, don’t worry, there are ways to convert your PowerPoint to video using a bundled Microsoft product, Windows Movie Maker.
If you want to convert a PowerPoint 2007 presentation to video and you are running a newer version of the program, you can open the file within PowerPoint 2013. You can then use the Create a Video feature to convert your PowerPoint to video.
Alternatively, if you only have access to PowerPoint 2007 and have a copy of Windows Movie Maker installed, you can save your presentation as image files (.jpg). Once you’ve saved each slide, fire up Windows Movie Maker and start a new project.

Next, import all the slides you saved as images into the new project and create your video.

Note: You can include transitions in Windows Movie Maker. However, animations will not convert when you save the slides as image (.jpg) files. Make sure you modify your slides to remove any animations and ensure you do not lose vital parts of your message before saving as images.
If your presentation has narration, you can import the the sound file directly into Windows Movie Maker. If you do not have the source audio file, you can save the presentation as a web page (a separate .wav file is created). You can then import the .wav file into your Windows Movie Maker video.
How to convert your PowerPoint to video in PowerPoint 2013 in 7 Steps
Turning your PowerPoint 2013 presentation slides into a video is easier than you think. In seven simple steps, you can turn your presentation into a video you can share with viewers wherever they are. Here’s how you do it.
- Access Powerpoint’s Backstage View by clicking on File.

- Select Export and click on Create a Video to access the video export menu.

- Click on the Create a Video option and expand the Computer and HD Displays option to select output video size and quality settings.

- Click on the drop down arrow to expand the Use Recorded Timings and Narrations menu. Use this to select whether you’re using recorded timings or not. If not using recorded timings and narrations, set the duration of each slide using the timings option at the bottom.

- Click the Create Video button to show the Save As dialogue box.

- Select the location where you want to save your video and choose a suitable filename for the video file. Also choose the video file type.

- Click Save and PowerPoint will begin converting your presentation to video. This may take a couple of seconds or a few minutes depending on the size of your presentation.

When the video creation is complete, the video is ready to view, upload to your website, Facebook, YouTube or sharing by email.

How to save a presentation as a movie file in PowerPoint For Mac
If you have an Apple computer running a Mac version of PowerPoint, you can convert your presentation into a movie for easier and wider distribution. The process is similar to Windows system with the inevitable differences between the operating systems. In just a few simple steps, you will be able to turn your powerful presentation into a movie file. The following limitations apply:
- The output is a .mov file compatible with only the Quicktime player or 3rd party converting programs.
- You will lose transitions and animations within the presentation and so make sure you modify your presentation prior to converting it.
- You will also lose narration during the conversion process, you may wish to add the narration as an audio soundtrack to the movie.
The steps are as follows:
- Click on File and choose Save as Movie .

- Click Movie Options to add a background soundtrack (music or your narration) or credits.

- Click Movie Settings to adjust the output quality and video size settings. You can also choose the slide durations, to create a looping video and slide transitions under this option.

- Click OK to close the Movie Options dialogue box.

- Click Save to start creating your video. The process will take a couple of seconds or longer depending on the size and quality options you select.
Once the process is complete, your movie is ready for playback or to convert into other file formats and share via Social Media or other outlets. If you’re using PowerPoint for Mac 2008 and 2011, these steps will work for either.
How to create a video from PowerPoint 2016
You can create a full-fidelity video from your presentation in PowerPoint 2016 in MPEG-4 (.mp4) or Windows Media Video (.wmv) format. In just six steps, you can turn your presentation into a video you can share and distribute on Facebook, YouTube, burn to DVD or via email. Here’s how you go about it:
- Click on the File tab to show file options.

- Scroll down and select Export and navigate to Create a Video.

- Select your video settings preference (video quality, timings and narration, video size).

- Click on Create a Video.

- Choose a filename, saving location and video type (.mp4 or .wmv).

- Click on Save to start video creation process.
This article has shown you how to convert and save PowerPoint as video. Once you’ve delivered a powerful presentation to an audience, making it available afterwards is always a great idea, especially for training presentations. To maintain the presentation in its entirety, saving it as a video and distributing it is the best option. By converting a presentation to video, you are able to reach a wider audience through YouTube, Facebook and other video hosting and sharing sites. We hope you’ve gained some useful insights on how you can achieve that following the simple, step by step guides for the version of PowerPoint you are running.

Did you know?
At 24slides, we provide stunning Powerpoint presentation services and are able to help you and your team have an incredible presentation to film. Take a look at some examples of our work and let’s get in touch . Alternatively, feel free to browse and download hundreds of free Powerpoint templates from our library.
You might also find this interesting: How to Create Social Media Videos With PowerPoint
Create professional presentations online
Other people also read

How To Convert Google Slides To PowerPoint and Vice Versa

How To Add Animations To PowerPoint

How To Create The Best PowerPoint Presentation Background
How To Save Video In PowerPoint
Are you looking to take your PowerPoint presentations to the next level?
This step-by-step guide by teacher Regina Griffin from Oregon, US, will show you how to save videos in PowerPoint.
Key Takeaways:
Why save video in powerpoint.
Saving videos in PowerPoint serves multiple purposes, enhancing the overall quality of presentations and enabling offline playback for increased accessibility.
Through visual aids, you can illustrate concepts, demonstrate processes, and provide real-world examples, making the information more digestible for viewers. This interactive nature of videos fosters better retention and comprehension among your audience, whether in educational settings or business meetings.
Enhances Presentation Quality
Utilizing videos effectively can help to reinforce key points, provide real-world examples, and create a lasting impression on viewers.
Allows for Offline Playback
By embedding videos directly into PowerPoint presentations, users can ensure that their content remains accessible even in offline settings, eliminating the need for a reliable internet connection. This feature is particularly helpful during conferences, workshops, or meetings where there may be limited or no access to the Internet.
Increases Accessibility
By leveraging videos within PowerPoint, presenters can create dynamic content that captures the audience’s attention and improves information retention. With the ability to embed videos directly into slides, speakers can seamlessly transition from discussing concepts to demonstrating them visually. PowerPoint provides tools for adjusting video playback settings, such as starting the video automatically or only when clicked. This flexibility enables speakers to tailor the video experience to meet the specific needs of their audience, ensuring a more engaging and impactful presentation.
Step-by-Step Guide for Saving Video in PowerPoint
Inserting a video into powerpoint.
To insert a video from a file, navigate to the ‘Insert’ tab on the PowerPoint ribbon menu. Click on the ‘Video’ option and select ‘Video on My PC’ to choose the video file from your computer. Alternatively, if you want to insert a video from an online source like YouTube, go to the ‘Insert’ tab, click on ‘Video,’ and then choose ‘Online Video.’ Inserting videos directly from online platforms allows for dynamic content. Remember to ensure a stable internet connection and consider downloading the video for offline use to avoid any streaming issues during your presentation.
Adjusting Video Playback Settings
In the Playback tab, you can further refine the viewing experience by incorporating narrations to provide additional context to your content. You can fine-tune the timings of each video clip to synchronize with your slide transitions for a more polished and professional presentation.
Saving the PowerPoint Presentation
Tips for choosing the right video format.
Selecting the appropriate video format is crucial for ensuring compatibility, quality, and resolution when embedding videos in PowerPoint presentations.
Compatibility with PowerPoint
One of the most common video formats that is widely supported for PowerPoint use is MP4, making it a safe choice for ensuring playback compatibility. Other supported formats include AVI, WMV, and MOV.
File Size and Compression
When deciding on the right video format for your PowerPoint presentations, it’s essential to strike a balance between maintaining a good quality video and managing storage efficiency. Large video files can slow down your presentation’s performance and take up precious space on your device, potentially causing issues during sharing or playback. To ensure seamless playback and efficient storage management, it’s advisable to optimize your video files before embedding them into your slides. This can include converting videos to more compressed formats or adjusting resolution and bitrate settings to find the sweet spot for quality and size.
Quality and Resolution
Common issues and troubleshooting.
Encounter common issues like videos not playing, audio syncing problems, or decreased video quality after saving in PowerPoint? Here are some troubleshooting tips to address these challenges.
Optimize the video and audio settings before saving your presentation to maintain quality. Check for software updates or reinstall multimedia codecs if needed to resolve any playback issues within PowerPoint.
Video Not Playing in Presentation
Corrupted video files may cause playback issues. Try to repair the video file using reliable software or consider reinserting a fresh copy into the presentation.
Audio Not Syncing with Video
One common reason for audio synchronization issues in PowerPoint could be mismatched audio and video settings. Check that both the audio and video formats are compatible and well-suited for the presentation platform.
Video Quality Decreased after Saving
If you notice a decline in video quality after saving your presentation in PowerPoint, review compression settings, file formats, and export options to maintain optimal video clarity.
The file format you choose can also influence video resolution. For best results, consider using formats like MP4 or WMV, which are compatible with PowerPoint and maintain quality.
When you integrate videos into your PowerPoint presentations, you add a dynamic element that captivates your audience and conveys information more effectively. Visual content has a strong impact on memory retention, making your message more memorable. By embedding videos directly in your slides, you eliminate the need for external links or separate files, ensuring a seamless viewing experience for your viewers. This convenience not only enhances the professionalism of your presentations but also streamlines the sharing process, enabling swift distribution across different platforms.
Additional Resources for PowerPoint Video Saving
Understanding these advanced features can help you customize your slideshows according to your specific needs and audience preferences. Troubleshooting tips on common video playback issues can save you time and effort when facing technical glitches.

Frequently Asked Questions
1. how do i insert a video into my powerpoint presentation, to insert a video into your powerpoint presentation, go to the insert tab and click on the video button. from there, you can choose to insert a video from your computer or search for online videos to add to your presentation., 2. can i save a video within my powerpoint presentation, yes, you can save a video within your powerpoint presentation. when you insert a video, it automatically becomes a part of your presentation and will be saved with it., 3. what file formats are supported for videos in powerpoint, powerpoint supports a variety of video formats, including .mp4, .avi, .wmv, and .mov. you can also embed videos from online sources such as youtube or vimeo., 4. how do i resize a video in powerpoint, to resize a video in powerpoint, click on the video and drag the corner handles to adjust the size. you can also right-click on the video and select “size and position” to enter specific dimensions., 5. can i save a powerpoint presentation with a video on a usb drive, yes, you can save a powerpoint presentation with a video on a usb drive. make sure to save the video file and the powerpoint file together on the usb drive to ensure the video plays correctly., 6. how do i compress a video in powerpoint to reduce file size, to compress a video in powerpoint, click on the video and go to the playback tab. from there, click on “compress media” and choose an option such as “internet quality” or “low quality” to reduce the file size of the video., similar posts, how to make a pecha kucha in powerpoint, how to fade one picture into another in powerpoint, how to go to next slide in powerpoint without clicking, how to convert ppt to video in powerpoint 2007, how to save presentation in powerpoint, how to underline without text in powerpoint.
Byte Bite Bit
How to Save PowerPoint as Video: Step-by-Step Guide for Beginners
Saving a PowerPoint presentation as a video can transform a static slideshow into an engaging, dynamic experience. To convert your PowerPoint presentation into a video, simply open your presentation, go to the ‘File’ menu, select ‘Export,’ and then ‘Create a Video.’ This process preserves all your narration, animations, and timings, bringing your content to life in a fluid format.

We always make sure to select the right video quality for our needs. Ultra HD (4K) provides the sharpest quality, ideal for large screen displays, while Full HD (1080p) works perfectly for standard scenarios. With PowerPoint’s flexibility, we can choose the video format that suits our specific requirements, whether it’s MP4 or MOV.
Once the video is saved, it’s ready to be shared with anyone, anywhere. This makes it incredibly easy for us to distribute our presentations across various platforms. Whether delivering a lecture, pitching a new idea, or simply sharing information, converting PowerPoint presentations to video ensures our message is clear and impactful.
- 1.1 Leveraging Narrations and Timings
- 1.2 Designing for Your Audience
- 2.1 Choosing the Right Video Format
- 2.2 File Size and Quality Considerations
- 3.1 Incorporating Transitions and Animations
- 3.2 Adding Visuals and Slide Timings
- 4.1 Optimizing for Different Platforms
- 4.2 Ensuring Accessibility and Reach
Creating Engaging Presentations
To create engaging presentations, we need to focus on two key elements: leveraging narrations and timings and designing specifically for our audience.
Leveraging Narrations and Timings
Leveraging narrations and recorded timings adds a personal touch to our presentations, making them more engaging. Recorded narrations allow us to guide our audience through complex slides with ease. This feature is excellent for training courses where explanations are crucial.
Recorded timings ensure each slide is displayed for an optimal duration, improving the presentation quality . We can rehearse our presentations and use the “Use Recorded Timings and Narrations” option in PowerPoint to streamline the recording process. These elements enrich the viewer’s experience, making it more interactive and engaging.
Designing for Your Audience
Designing for our audience involves understanding their preferences and expectations. We can enhance our slides with eye-catching visuals without overloading them with text. For instance, using bullet points , bold text , and relevant images can keep our audience’s focus.
Thinking about our audience’s needs helps in crafting slides that are both informative and engaging. Avoid clutter and maintain a consistent design theme throughout. Whether we are designing for a corporate setting or an educational environment, adjusting our design approach based on our audience’s expectations is critical for a successful presentation.
Exporting to Video
Saving your PowerPoint presentation as a video can enhance your project’s reach and presentation. By converting to video, you make your content accessible on various platforms and add a dynamic edge to static slides.
Choosing the Right Video Format
When exporting, the two primary video formats we encounter are MP4 and MOV . These formats ensure compatibility with most devices and platforms. MP4 is often the most versatile and universally accepted format.
To create your video in PowerPoint:
- Go to File > Export .
- Click on Create a Video .
- Select your desired format—MP4 or MOV—from the drop-down menu.
Each format has its advantages, but MP4 is typically smaller in size while maintaining quality, making it ideal for sharing.
File Size and Quality Considerations
Determining the right balance between file size and video quality is crucial. Higher video quality results in larger files, which may be problematic for sharing or storage.
In the video export settings, we have options such as Presentation Quality , Internet Quality , and Low Quality . Presentation Quality offers the best visuals but results in the largest file. For general purposes, Internet Quality suffices, balancing size and clarity.
To adjust these settings:
- File > Export > Create a Video .
- Choose the quality from the first drop-down menu.
- Note that high-resolution settings can drastically increase file size.
Remember, animations , transitions , and embedded media within your slides also influence the final video size and export time.
By understanding and optimizing these factors, we can ensure our PowerPoint videos are both high-quality and manageable in size.
Enhancing Video Presentations
To create engaging video presentations from our PowerPoint slides, focusing on transitions, animations, and multimedia elements can significantly enhance the overall quality.
Incorporating Transitions and Animations
When converting PowerPoint presentations into videos, transitions and animations play a key role in keeping viewers engaged. Transitions provide smooth visual connections between slides, like smooth wipes, fades, or more dynamic effects such as flips. For instance, a fade transition between key points can make your video feel more cohesive and professional.
Using animations, we can spotlight essential elements on each slide. Animations, such as fly-in for text or zooming in on images, can guide the viewer’s attention exactly where we want it. However, subtle animations typically work best to avoid overwhelming the viewer.
Precise control over timing is crucial. Ensuring that animations are synchronized with narrated content can make the presentation appear more coherent and polished. The PowerPoint tools let us set the duration for transitions and specify when animations should start, making our content flow naturally.
Adding Visuals and Slide Timings
Including visuals such as images, videos, and graphics enriches the storytelling aspect of our presentations. Graphics can simplify complex data, while relevant videos add a dynamic element.
Setting appropriate slide timings ensures each point is adequately covered without lingering too long or moving too quickly. By clicking on “Rehearse Timings,” we can practice our delivery and adjust the time each slide remains on screen. This practice session helps us get the pacing right, offering viewers a balanced experience.
For those aiming for higher video quality, we can choose resolutions like Full HD (1080p) or Ultra HD (4K) . This choice ensures our visual content looks sharp, even on large screens.
In summary, blending thoughtful transitions, animations, visuals, and precise slide timings can transform a basic PowerPoint into a captivating video presentation.
Sharing and Compatibility
When we save a PowerPoint presentation as a video, sharing and ensuring compatibility across different platforms is crucial. We want our videos to be seamlessly viewable and accessible to a wide audience, regardless of device or platform.
Optimizing for Different Platforms
Optimizing our videos for different platforms involves considering the requirements and preferences of each platform:
Each platform may have unique requirements, so tailoring the video format and quality ensures better viewing experiences.
Ensuring Accessibility and Reach
Ensuring accessibility means making our videos available to everyone, including those with disabilities, and reaching a global audience:
By prioritizing accessibility and reach, we ensure that our videos are inclusive and cater to a broader audience.
Related posts:
- How to Record a PowerPoint Presentation: Step-by-Step Guide for Professionals
- How to Crop a Picture into a Circle in PowerPoint: A Step-by-Step Guide
- How to Copy a Slide from One PowerPoint to Another: A Step-by-Step Guide
- How to Make a Picture a Circle in PowerPoint: Step-by-Step Guide
- How to Print Notes in PowerPoint: A Step-by-Step Guide
- How to Add Narration to PowerPoint: Step-by-Step Guide for Effective Presentations
- How to Insert PDF into PowerPoint: A Step-by-Step Guide for Seamless Integration
- How to Play PowerPoint Slides Automatically Without Clicking: Step-by-Step Guide
- How to Embed Excel into PowerPoint: A Step-by-Step Guide
- How to Add Hyperlink in PowerPoint: A Step-by-Step Guide
- How to Do a Voice Over on PowerPoint: Easy Steps for Professionals
- How to Add Notes to PowerPoint: Enhance Your Presentations with Ease
Leave a Comment Cancel reply
Save my name, email, and website in this browser for the next time I comment.

How to Extract All Video or Audio Files from a PowerPoint Deck

Try This Great Trick to Easily Extract All Embedded Video or Audio from a PowerPoint Presentation
Avantix Learning Team | Updated August 11, 2021
Applies to: Microsoft ® PowerPoint ® 2013, 2016, 2019 and 365 (Windows)
If you want to extract embedded video or audio files from a Microsoft PowerPoint deck to use in another presentation, you can copy and paste them between presentations or you can extract them by converting the presentation to a zip file type. Starting in PowerPoint 2010, video and sound files are embedded (copied into the presentation) by default.
In newer versions of PowerPoint, you can right-click a video or audio file (typically in Normal View), select Save Media As from the drop-down menu and save the file with a new name on your PC or a shared drive.
The following trick to extract all media works with any Microsoft PowerPoint file using XML (Extensible Markup Language) format. XML files are stored as a package and can therefore be unzipped. They also end with an "x" such as .pptx (2007 and later versions).
Note: You can't extract YouTube videos that are embedded in a presentation using this method.
Recommended article : How to Insert or Embed a Video from a File in PowerPoint (and Control Playback)
Do you want to learn more about PowerPoint? Check out our virtual classroom or live classroom PowerPoint courses >
Extract video and audio files by changing the file extension
In order to use the following procedure, Windows Explorer must be set so that it shows file names with extensions.
To extract embedded video and audio files from a PowerPoint deck:
- In Windows Explorer, select the presentation (it should have a .pptx extension) with the embedded video and audio you wish to extract.
- Right-click and choose Copy or press Ctrl + C.
- Right-click and choose Paste or press Ctrl + V.
- Right-click the copy of the presentation and choose Rename in the drop-down menu.
- Change the file extension .pptx to .zip (Windows must be set to display file extensions).
- Press Enter. A dialog box appears warning you that the file may become unusable if you change the extension.
- Click Yes to continue. The file icon changes to a folder icon.
- Double-click the zipped folder. The zipped folder contains multiple folders (some contain information such as XML code or properties).
- Double-click the ppt folder.
- Double-click the media folder to view image, video and audio files. Each file is given a generic name.
- Copy these files (or the entire folder) to another location for use in other presentations and to rename the files. Copying to another location will unzip the files. You can also click the Extract button in Windows Explorer to extract the files to another location.
Linked audio and video files will not be extracted.
This article was first published on July 15, 2017 and has been updated for clarity and content.
Subscribe to get more articles like this one
Did you find this article helpful? If you would like to receive new articles, join our email list
More resources
How to Insert a Video in PowerPoint (from a File on Your PC or Shared Drive)
How to Embed a YouTube Video in PowerPoint
PowerPoint Keyboard Shortcuts to Play and Control Video During a Slide Show
A Beginner's Guide to Video Formats in PowerPoint
Related courses
Microsoft PowerPoint: Intermediate / Advanced
Microsoft PowerPoint: Design for Non-Designers
Microsoft PowerPoint: Animations Bootcamp
Microsoft Word: Intermediate / Advanced
Microsoft Word: Power User
VIEW MORE COURSES >
Our instructor-led courses are delivered in virtual classroom format or at our downtown Toronto location at 18 King Street East, Suite 1400, Toronto, Ontario, Canada (some in-person classroom courses may also be delivered at an alternate downtown Toronto location). Contact us at [email protected] if you'd like to arrange custom instructor-led virtual classroom or onsite training on a date that's convenient for you.
Copyright 2024 Avantix ® Learning
You may also like

How to Insert or Type E with an Accent Mark in PowerPoint (È, É, Ê, Ë, è, é, ê, or ë)
You can insert or type e with an accent mark in PowerPoint using built-in tools or keyboard shortcuts (including Alt code shortcuts). The letter e can be inserted with an accent in both upper or lower case in text boxes or placeholders on slides, the slide master or layouts. The following are common accents in upper or lower case – È, É, Ê, Ë, è, é, ê, or ë.

How to Fade a Picture or Part of a Picture in PowerPoint (Using a Gradient)
You can fade a picture in PowerPoint by drawing a rectangle shape on top of the picture and then filling the rectangle with a gradient from opaque to transparent. This technique is often used to fade an image into the background of a slide. Since the rectangle is placed on top of the image and then text may be placed on top of the rectangle, you may need to reorder the objects.

How to Lock an Image, Shape or Other Object in PowerPoint
You can now lock an image, shape or other object in PowerPoint. Objects can be locked in Normal View or Slide Master View. Only PowerPoint 365 users can lock objects to prevent moving and resizing. This is helpful if you want to select and move other objects on the slide or prevent others from moving or resizing an object. You can lock items using the context menu or the Selection Pane.
MORE POWERPOINT ARTICLES >
Microsoft, the Microsoft logo, Microsoft Office and related Microsoft applications and logos are registered trademarks of Microsoft Corporation in Canada, US and other countries. All other trademarks are the property of the registered owners.
Avantix Learning |18 King Street East, Suite 1400, Toronto, Ontario, Canada M5C 1C4 | Contact us at [email protected]
Our Courses
Avantix Learning courses are offered online in virtual classroom format or as in-person classroom training. Our hands-on, instructor-led courses are available both as public scheduled courses or on demand as a custom training solution.
All Avantix Learning courses include a comprehensive course manual including tips, tricks and shortcuts as well as sample and exercise files.
VIEW COURSES >
Contact us at [email protected] for more information about any of our courses or to arrange custom training.
Privacy Overview
Pin it on pinterest.
- Print Friendly
Home Blog PowerPoint Tutorials How To Convert a PowerPoint Presentation to a HD Video in 3 Steps
How To Convert a PowerPoint Presentation to a HD Video in 3 Steps
There are many reasons why you may consider converting a PowerPoint presentation to a High-Definition video ; for example if you want to share a presentation online through YouTube or Vimeo, create a self-running presentation or save the slide show video to a DVD.

In this article we will guide you on how to convert a PowerPoint presentations to a High Definition video (as an MP4 video file,Windows Media Video .wmv file or QuickTime Video File .mov) using Microsoft PowerPoint.
PowerPoint lets you save presentations as videos directly from the File > Save As dialog box; however if you need to choose the output video quality while saving the presentation then it is recommended to use the File > Export > Create a Video option.
High Definition (HD) or high-quality presentation uses a higher resolution (1280×720 or 1920×1080) to save the video information. It can improve the overall experience while watching a presentation online or playing a PowerPoint slideshow in a kiosk. It would be the preferred format if you plan to upload your video presentation to YouTube or Vimeo, and have higher quality. The main drawback is that the presentation video file size will be bigger and more bandwidth may be required.

Why You Should Convert a PowerPoint to a Video Format?
Converting a PowerPoint to a video format can have several advantages. From making intuitive videos to engaging your audience to address complex topics in just a few minutes.
Create a Video Slideshow
You can use the converted video file to create a video slideshow for display at an event or edit the content of the video to generate a video presentation.
Create Presentations and Tutorials
PowerPoint enables users to export their videos with voice-over narration and animations. This can help create extensive presentations for an audience
Use Professional Editing Software to Create Engaging Videos
Adding a voice-over, additional graphics, and some footage can help create a professional-looking presentation by using a video editing application. Similar to how you use Instagram tools to convert images into a stunning video, some famous video editing apps that can help you make the most out of your converted PowerPoint file to a video format include Adobe Premiere Pro, Camtasia Studio, iMovie, Final Cut Pro, etc. If you are a Windows user, you can look into alternatives to Final Cut Pro like Lightworks, Movavi Video Editor, and Shotcut.
Create a Video Instead of Using PowerPoint
You can convert PowerPoint to video by simply letting your slides play out, making the presentation easy to play for end users without the need to have PowerPoint installed. This approach can also be helpful if you intend to present your slides using a video player instead of PowerPoint, as the latter might not be available everywhere, whereas video players often come with all types of desktop and mobile operating systems.
Upload a Video Online
Many presenters also like to upload their presentations online for an audience. A teacher might be interested in making his/her presentation available for students, or an industry expert might wish to share a concept with others in the industry by uploading a video to a YouTube channel. Either way, converting your PowerPoint to a video can help make the content easily shareable via video streaming platforms like YouTube and Vimeo. Such a video can also be shared privately via file-sharing apps like Box, Dropbox, OneDrive, Google Drive, etc.
How To Convert PowerPoint to Video (Windows)
Step 1 – go to file > export.
The first step to save a PowerPoint presentation as a HD video go to File -> Export and then click Create a Video button.

Step 2 – Choose Video Resolution
Now, select a resolution to export your video. Other than the Standard (825×480) resolution, the high-definition resolution options include HD (Medium 1280×720), Full HD (Large 1920×1080), or Ultra HD 4K (Largest file size 1920×1080). If you are using an older version of PowerPoint, you might have limited options to select between HD resolutions, since versions older than PowerPoint 2013 only supported HD videos (1280×720).

Optional Step: Save Narrations, Laser Pointer Gestures & Recorded Timings in the Video Exported from PowerPoint
Aside from saving the PowerPoint presentation as an HD video, you can also save a video file that incorporates all the recorded timings during a rehearsal, narrations, and even laser pointer gestures.
In case you have recorded narrations for your slides, you can use them or select Record a Video option to instantly start narrating your slides. The Preview Timings and Narrations option in the same drop-down menu does what it says, it enables you to check and ensure that your narrations are correctly timed with your slides, so you can make necessary edits before finalizing your video.

Optional Step: Select Slide Duration
Choose the default time spent on each slide (in seconds) and whether to save the narrations, timings, and gestures. By default, 5.00 seconds are spent on each slide unless you have a different timing recorded for the presentation slideshow.

Step 3 – Select Video Format and Create a Video Presentation
Click Create Video button and choose the destination folder and output file name. For end users wondering how to convert ppt to MP4, this is the step where you can select MP4 as your output format. PowerPoint supports saving slide decks to MP4 or WMV video formats. Once you confirm, wait a few seconds in order for the file is being saved on your hard disk. Presentations with a lot of slides may require a longer wait time.

Something good about saving presentations as a video file is that all animations, transitions, and media are preserved.

How to Convert PowerPoint to Video (Mac)
How to Convert PPT to Video in Mac? If you’re wondering how to make a PowerPoint into a video on Mac, the steps are quite similar to how you would export PowerPoint to video on a PC, with a few minor differences.
To convert PowerPoint to video on Mac, go to File -> Export.
Step 2 – Choose Video Format
If you have been wondering how to save PowerPoint as MP4 on Mac, this is the step where you can pick a video file format to save your presentation as a video, including MP4 and MOV.
The difference between the PC and Mac during this step is the difference in the availability of video conversion options. The PC version, along with MP4, allows saving a video in the Windows Media Video (WMV) format, unlike Mac, which offers QuickTime video format (MOV) instead.
Step 3 – Select Video Resolution and Create Video
The new version of PowerPoint for Mac allows saving a presentation in HD (Medium 1280×720), Full HD (1920×1080), or Ultra HD 4K (1920×1080) format. The higher the resolution, the higher the file format, so make sure you have enough disk space to save a very heavy file, especially if you opt for Ultra HD 4K resolution.
Save Narrations, Laser Pointer Gestures & Recorded Timings (Optional)
To save narrations, recorded timings, and laser point gestures, select the Use Recorded Timings and Narrations option.
Select Slide Duration (Optional)
To precisely time how long each slide is presented in the video, select the time duration. The default duration is 5.00 seconds, unless you have specified time for each slide separately in the presentation.
Select Export to create your video. Depending on the resolution you have selected, it might take several minutes before the video is converted. Higher resolutions take more time to conversion.
Saving videos from PowerPoint can help you at the time you need to share a presentation slideshow online (for example, uploading it via YouTube or Vimeo, or any other online video platform ), but you can also use this technique to prepare a PowerPoint presentation for a kiosk, make interactive PowerPoint presentations or create a self-running presentation. PowerPoint presentations saved as videos can also be easily run from mobile devices without the need for PowerPoint to be installed on the device. If you wish to save your PowerPoint to video in a format easily accessible, you can opt for PowerPoint save as MP4 instead of using WMV or MOV file formats that are not supported by all types of video players.
Alternatively, check our article about how to insert a video into PowerPoint .
Converting a PowerPoint presentation to a video format can be beneficial for several reasons. It allows for easy sharing on platforms like YouTube or Vimeo, creates self-running presentations, and is ideal for situations where PowerPoint may not be available. Additionally, videos can include voice-over narration, animations, and other enhancements that make them engaging and easy to distribute.
Saving a PowerPoint presentation as an HD video (1280×720, 1920×1080, or Ultra HD 4K) provides better quality, making it more visually appealing for online sharing or display at events. HD videos maintain the presentation’s clarity and impact, especially when viewed on large screens or digital platforms.
To convert a PowerPoint presentation to a video on Windows: – Go to File -> Export -> Create a Video. – Choose the desired video resolution (HD, Full HD, or Ultra HD). – Optionally, adjust slide timings and narration settings. – Click “Create Video,” select the video format (MP4 or WMV), and save the file.
Yes, you can include narrations, laser pointer gestures, and recorded timings in your video. When exporting your PowerPoint presentation to a video, select the “Use Recorded Timings and Narrations” option to include these elements. You can also record new narrations or use previously recorded ones.
You can adjust the duration of each slide in the video by setting the default time spent on each slide in the export settings. The default is usually 5 seconds per slide, but you can customize this duration according to your needs.
On Windows, you can save your PowerPoint presentation as either an MP4 or WMV file. MP4 is widely compatible across most devices and platforms, while WMV is a Windows-specific format.
To convert a PowerPoint presentation to a video on Mac: – Go to File -> Export. – Choose the desired video format (MP4 or MOV). – Select the video resolution and other settings. – Click “Export” to save your presentation as a video.
The primary difference is in the video formats supported. On Windows, PowerPoint can save videos in MP4 and WMV formats. On Mac, the available formats are MP4 and MOV. Additionally, the interface may differ slightly between operating systems.
Like this article? Please share
mp4, Presentation Ideas, Presentation Videos, Video, Windows Media Video, wmv Filed under PowerPoint Tutorials
Related Articles

Filed under PowerPoint Tutorials • August 6th, 2024
How to Add, Delete and Re-arrange PowerPoint Slides
Build a faster workflow in PowerPoint by learning how to add, delete and re-arrange PowerPoint slides with the help of this guide.

Filed under Business • July 24th, 2024
How to Create a Demo Presentation
Discover the secrets behind successful demo presentations and what they should contain with this article. Recommended PPT templates included.

Filed under Presentation Ideas • July 3rd, 2024
How to Use Spin the Wheel to Engage Your Audience
Create engaging PowerPoint presentations by using the Spin the Wheel metaphor in your presentations. Full guide here.
6 Responses to “How To Convert a PowerPoint Presentation to a HD Video in 3 Steps”
Can’t believe no one has commended you for this helpful tutorial! We want to mount several TVs in the lobby and exam rooms of our veterinary hospital to run informational presentations for our clients about pet care, our services, and helpful products. Recording a PowerPoint as a video and then putting it on a USB thumb drive to connect to the TV seems like it will be an effective, inexpensive way to get that accomplished. Thank you so much!
I second the above comment. Thank You
how to present a power point presentation on a smart tv..and having it loop over to continuous display..keep running.
This was very helpful. I had no clue that this could be done. I dedicated a PC to running the Power Point presentation for our lobby. Having it run on the TV via USB will free up that resource for us.
I haven’t dug into it yet, but is there a way to make it loop?
I keep getting this audio data not supported. Is there anyway to remove this?
Send us your issue to [email protected] we might be able to help you.
Leave a Reply
How to Extract a Video from PPT

Featured In
Table of contents, the art of uncovering hidden treasures in your presentation, why extract a video from ppt a glimpse into the possibilities, how to extract a video from a powerpoint slide: the ultimate guide, extracting video from powerpoint on windows: a step-by-step tutorial, extracting video from powerpoint on macos: unleashing your creative potential, speechify slides, google slides, adobe spark:, frequently asked questions.
The Art of Uncovering Hidden Treasures in Your PresentationHave you ever found yourself wondering how to extract a video from a PowerPoint (PPT) presentation?...
Have you ever found yourself wondering how to extract a video from a PowerPoint (PPT) presentation? Look no further! In this comprehensive guide, we will explore the step-by-step process of unveiling the multimedia gems embedded in your slides, ensuring that your presentation's full potential is realized.
Extracting a video from PPT means saving a video file that is embedded or included in a PowerPoint presentation as a separate file. This allows you to access and use the video independently of the PowerPoint file, opening up various possibilities for your multimedia content.
- Reusability and Sharing: Extracting videos allows you to easily share and reuse media files in different contexts, be it in another presentation or on social media platforms.
- Editing and Customization: Once extracted, videos can be edited and customized to fit specific requirements, giving you greater creative control over your content.
- Backup and Archiving: Save important media files separately for backup purposes, ensuring that you don't lose valuable content.
- Cross-Platform Compatibility: Extracted videos can be converted to various formats, making them compatible with different platforms and devices.
- Enhanced Accessibility: Separate video files can be easily accessed and played on a range of devices, enhancing the reach of your content.
- Identify the Video File: Open your PowerPoint presentation and locate the slide containing the video.
- Use the "Save Media" Option (PowerPoint 2010 and Later): In PowerPoint 2010 and later versions, you can simply right-click on the video, select "Save Media As," and choose a file name and location to save the video file.
- Alternative Method for Earlier Versions of PowerPoint: In versions prior to PowerPoint 2010, the process is a bit more complex and may require converting the PowerPoint file to a zip file and extracting the media files from the zip folder.
- Open Your PowerPoint File: On your Windows computer, open the PowerPoint presentation containing the video.
- Access the Drop-Down Menu: Right-click on the video and select the "Save Media As" option from the drop-down menu.
- Choose File Format and Save: Select the desired video format (e.g., MP4, WMV) and choose a file name and location to save the video file on your computer.
- Open Your PowerPoint File on Mac: Open the Microsoft PowerPoint presentation on your Mac device.
- Access the Context Menu: Control-click or right-click on the video and choose "Save Media As" from the context menu.
- Save and Enjoy: Select the desired file format (e.g., MOV, MP4) and save the video file to your preferred location on your Mac.
Top AI Slide Editors
Pricing: Free to try
Speechify Slides is a comprehensive creative AI suite for individuals and teams. Create stunning AI videos slides or even from text prompts, add voice overs, background music and free stock images. All your projects are free to use for personal or commercial use.
Top Features : Templates, text to video, real-time editing, resizing, transcription, video marketing tools.
Speechify is clearly the best option for slide to video. It also provides seamless integration with the Speechify Studio suite of AI products for people who need to create stunning videos and voice overs. Perfect for teams of all sizes.
Cost : Free basic version, paid plans start at $7/month.
Prezi is a creative presentation tool that allows you to create non-linear presentations, with its unique zooming canvas and smart structures, which can make your slides more engaging and interactive. Prezi enables users to work collaboratively and access presentations from anywhere.
Top 5 Features :
- Non-linear presentations with a zooming canvas.
- Collaborative features for team projects.
- Access to presentations from anywhere.
- Extensive library of templates and images.
- Integration with other tools such as Microsoft PowerPoint and Google Slides.
Cost : Free basic version, paid plans start at $14/month.
Visme is an all-in-one visual communication tool that allows you to create presentations, infographics, reports, and more. With its drag-and-drop editor and range of templates, you can easily create high-quality visual content.
- Drag-and-drop editor for easy content creation.
- Range of templates for presentations, infographics, and more.
- Interactive features such as pop-ups and rollovers.
- Analytics to track viewer engagement.
Cost : Paid plans start at $8/month.
Slidebean is a presentation tool that allows you to create professional-looking slides in minutes. With its AI-powered design assistant and range of templates, you can easily create a presentation that fits your brand.
- AI-powered design assistant.
- Range of templates for different purposes.
- Branding features to ensure consistency.
- Integration with other tools such as Google Slides.
Cost : Free basic version, paid plans start at $9.99/month.
Haiku Deck is a presentation tool that focuses on simplicity and clarity. With its intuitive interface and range of templates, you can easily create a presentation that is both visually appealing and easy to understand.
1. Intuitive interface for easy content creation.
2. Range of templates for different purposes.
3. Focus on simplicity and clarity.
4. Integration with other tools such as Microsoft PowerPoint and Google Slides.
5. Cloud-based storage for easy access.
Cost : Free basic version, paid plans start at $5/month.
Zoho Show is a presentation tool that allows you to create, collaborate, and broadcast presentations. With its range of features and integration with other Zoho apps, you can easily create a presentation that fits your needs.
- Collaboration features for team projects.
- Integration with other Zoho apps.
- Broadcasting feature to reach a wider audience.
Cost : Free basic version, paid plans start at $19/month.
Powtoon is a presentation tool that allows you to create animated presentations and videos. With its range of templates and animation features, you can easily create a presentation that is both engaging and informative.
- Range of templates for presentations and videos.
- Animation features for engaging content.
- Voice-over feature for narrations.
Cost : Free basic version, paid plans start at $12.95/month.
Canva is a design tool that allows you to create a range of visual content, including presentations. With its range of templates and design features, you can easily create a presentation that is both visually appealing and professional.
- Range of templates for presentations and other visual content.
- Cloud-based storage for easy access.
Cost : Free.
Google Slides is a presentation tool that allows you to create, edit, and collaborate on presentations. With its integration with other Google Workspace apps, you can easily create a presentation that fits your needs.
- Integration with other Google Workspace apps.
Adobe Spark is a presentation tool that allows you to create visually stunning presentations, web pages, and videos. With its range of templates and design features, you can easily create a presentation that stands out.
1. Range of templates for presentations, web pages, and videos.
2. Design features for visually stunning content.
3. Integration with other Adobe apps.
4. Collaboration features for team projects.
There could be various reasons such as file format incompatibility, file size limitations, or version-specific restrictions.
In the "File" menu, select "Save As," choose the MP4 format from the drop-down menu, and then save the file.
Right-click on the video, choose "Save Media As," and save the file to your desired location.
In the "File" menu, select "Export," choose "Create a Video," select video quality, and then save the file.
Go to the "Insert" tab, select "Video," choose "Video on My PC," and then select the video file you want to insert.
In the "File" menu, select "Export," choose "Create a Video," set video quality and timings, and then save the file.
Best AI Avatar Generators: Reviewed and Ranked
Read Aloud: Transforming the Way We Experience Text

Cliff Weitzman
Cliff Weitzman is a dyslexia advocate and the CEO and founder of Speechify, the #1 text-to-speech app in the world, totaling over 100,000 5-star reviews and ranking first place in the App Store for the News & Magazines category. In 2017, Weitzman was named to the Forbes 30 under 30 list for his work making the internet more accessible to people with learning disabilities. Cliff Weitzman has been featured in EdSurge, Inc., PC Mag, Entrepreneur, Mashable, among other leading outlets.
How-To Geek
How to add a video to a microsoft powerpoint presentation.

Your changes have been saved
Email is sent
Email has already been sent
Please verify your email address.
You’ve reached your account maximum for followed topics.
Quick Links
Embedding videos versus linking to videos, supported video formats in powerpoint, how to insert a video into a powerpoint presentation, manage an embedded video's playback in powerpoint.
Videos can make presentations even more interesting or exciting. If you're looking to add a video to your Microsoft PowerPoint presentation, it's easy to do so. We'll show you how.
In PowerPoint, you can either embed a video or link to a video from your presentation. If you embed a video, your video becomes part of the presentation, which increases the overall size of the presentation file.
Related: How to Send PowerPoint Presentations With an Embedded Video
If you link to a video, PowerPoint only adds a reference to that video in your presentation. The downside of this method is that you need to send the video file separately if you share your presentation with someone. We have written a guide on how to send PowerPoint presentations with videos , so check that out.
In this guide, we'll focus on embedding a video in your presentation so you don't have to worry about sending separate files. And, if you're looking to add a YouTube video to your presentation , there's a way to do that, too.
Related: How to Embed a YouTube Video in PowerPoint
PowerPoint supports multiple video formats, including ASF, AVI, MP4, M4V, MOV, MPG, MPEG, and WMV. If your video is already in one of these formats, you can quickly add that to your presentation.
If your video is in another format, you can convert it to a supported format and then add it to your presentation.
Related: How to Use Handbrake to Convert Any Video File to Any Format
First, make sure the video you want to add to your presentation is saved on your Windows or Mac computer. Then, open your presentation with PowerPoint on your computer.
On the PowerPoint window, in the left sidebar, click the slide in which you want to add a video.

At the top of the PowerPoint window, click the "Insert" tab.

In the "Insert" tab, under the "Media" section (which is to the extreme right side of the interface), click "Video."

You'll now see an "Insert Video From" menu. Here, select "This Device."

Your computer's standard "open" window will open. In this window, access the folder that has your video file. Then double-click your video file to add it to your presentation.

You'll see your selected video in your presentation. To resize this video, click it and use the handles around the video to change its size. Then drag the video to place it at its desired location in your slide.

If you'd like to test the video, at the bottom-left corner of the video, click the play icon.

And you're all set.
Now that you have added a video to your presentation, you might want to change how it plays in your slides. In PowerPoint, you have multiple ways to change your video's playback.
To access these playback options, first, click your video in your presentation. Then, at the top of the PowerPoint window, click "Playback."

In the "Playback" tab, under the "Video Options" section, you will find various options to manage your video's playback.

For example, to change how your video starts to play in your presentation, click the "Start" drop-down menu and select one of these options:
- In Click Sequence : This plays your video in the click sequence. This means if you press the button for the next slide, your video will play.
- Automatically : This option automatically plays your video when the slide with your video opens.
- When Clicked On : Select this option to play your video only when you click it.

The other options are "Play Full Screen," which opens your video in full screen, and "Loop Until Stopped" that plays your video over and over again until you manually stop it.
Before you close PowerPoint, make sure you save your presentation so that your embedded video is saved with it. Do this by clicking File > Save in PowerPoint's menu bar.

And that's how you make your PowerPoint presentations even more engaging by including videos in them. Exciting!
If you don't want to add a video but you do want audio, you can add music to your presentations . This also helps enhance your presentation quality.
Related: How to Add Music to Your PowerPoint Presentation
- Microsoft Office
- Microsoft PowerPoint

Extract files or objects from a PowerPoint file
If you want to separately use files or objects from a PowerPoint presentation, such as videos, photos, or sounds, you can extract them by converting the presentation to a “zipped” file folder. Note, however, that you can't extract PDFs or .dotx files.
The following procedure works on Windows, but not on macOS.
Tip: We recommend that you make a copy of your presentation first, and then do the following procedure on the copy. This ensures that your original presentation is preserved.
Before you do this procedure, make sure File Explorer is set so that it shows file names with file extensions.
Make file extensions visible in File Explorer
The steps to set File Explorer (previously called Windows Explorer) to show file names with file extensions differs, depending on which version of Windows you have.
If you're using Windows 10 or Windows 8:
In File Explorer, on the View menu, in the Show/hide group, select the File name extensions check box.
If you're using Windows 11:
In File Explorer, on the toolbar, select View > Show , and ensure that File name extensions is selected.
If you're using Windows 7, Windows Vista, or Windows XP:
In Windows Explorer, click Folder and Search Options . In Windows 7, this is under Organize . In Windows Vista and Windows XP, on the Tools menu, click Folder Options .
On the View tab, under Files and Folders , clear the check box for Hide extensions for known file types .
Open a presentation as a folder
To open a presentation as a folder, use Explorer to navigate to the folder containing the presentation that you want, and then do the following:
Click the presentation that you want, right-click it, and then click Rename .
Change the file extension ( .pptx ) to .zip . Press Enter to set the name, then click Yes in the Rename dialog box.
Double-click the zipped file to open an Explorer window for the content files.
The zipped file contains several folders, many of which contain information such as XML code or properties. Objects such as videos, sound files, or pictures are found in the ppt folder, in the media subfolder.

Double-click the media subfolder to open it, select file you want to extract, copy it, then navigate to a suitable folder elsewhere in your system, and paste the file there.
Restore the original presentation
To restore the original presentation, repeat steps 1 and 2 in the procedure above, this time changing the file extension from .zip to .pptx .
Top of Page

Need more help?
Want more options.
Explore subscription benefits, browse training courses, learn how to secure your device, and more.

Microsoft 365 subscription benefits

Microsoft 365 training

Microsoft security

Accessibility center
Communities help you ask and answer questions, give feedback, and hear from experts with rich knowledge.

Ask the Microsoft Community

Microsoft Tech Community

Windows Insiders
Microsoft 365 Insiders
Was this information helpful?
Thank you for your feedback.
IMAGES
VIDEO
COMMENTS
Right-click (or Control-click on macOS) the audio icon or video, and click Save Media as. Tip: Ensure your disk has enough space to save the media file, otherwise you'll have to free up space and try again. In the Save Media as dialog box, choose a folder and also enter a name for the media file. If the Save Media as option doesn't appear on ...
On the File menu, select Save to ensure all your recent work has been saved in PowerPoint presentation format (.pptx). Select File > Export > Create a Video. (Or, on the Recording tab of the ribbon, select Export to Video.) In the first drop-down box under the Create a Video heading, select the video quality you want, which pertains to the ...
In the Seconds spent on each slide box, select the default time you want to spend on each slide. Select Create Video. Enter a file name and then browse to the location you want to save your video. In the Save As type box, select if you want to save the video as a MPEG-4 Video or Windows Media Video. Tip: The MPEG-4 Video format is recommended ...
Step-1: Click on the "Save" option. On the left corner at the top of the screen, click on the "Save" option. Alternatively, you can press the "Ctrl+S" keys on your keyboard to save all the changes made to the presentation file. Step-2: Click on the "Export to Video" option.
To turn a PowerPoint presentation into a video, first, open your presentation with the PowerPoint app on your Windows or Mac computer. In the top-left corner of PowerPoint, click the "File" option. From the sidebar that opens after clicking the "File" option, select "Export." In the "Export" menu, click "Create a Video."
Watch this video to learn how to convert your PowerPoint presentation into a video. When you make a recording of a presentation, all its elements (narration,...
Learn how to publish your own video using Microsoft PowerPoint with narration, annotations, animations, and timings. As full disclosure, I work at Microsoft ...
📽️💻 How to Save a PowerPoint Presentation as a Video | MicrosoftIn this tutorial, learn how to easily convert your PowerPoint presentation into a video for...
Under the Save & Send menu, find and click on Create a Video. Click on the Computer & HD Displays option to customise the video size and quality (small, medium and large size & quality). Click the Don't Use Recorded Timings and Narrations to select if you're using timings and narrations. Click Create Video and another dialogue box opens.
Open your PowerPoint presentation and navigate to the slide where you want to insert the video. Click on the 'Insert' tab in the top menu bar. Select 'Video' from the options available in the 'Media' group. Choose whether to insert a video from a file on your computer, an online video, or embed code from a website.
Browse to the location where you want to save the file and give it a name then press "Save.". While the video is being created, you will see the small progress bar at the bottom of your PowerPoint window. Wait till this is done and then go to your video. Now you can double-click your video file and it will automatically play with your video ...
Once you've specified exactly what you want, choose " Create Video ", the button on the bottom of the screen. You'll be prompted for a file name, as usual: Notice that the format is MPEG-4 Video, the long, fancy name for "MP4". Pay attention to where you're saving it and click " Save " to proceed.
Save in a video format. Select File > Export. (Don't use Save As, because it doesn't offer video options.) Open the File Format list and select the video format that you want (MP4 or MOV). If the MP4 and MOV options aren't in your version of PowerPoint, see Requirements below for more information. Select the video Quality you want: Presentation ...
From the drop-down menu that appears, select "Video on My PC" if you're using a Windows machine or "Movie from File" if you're on a Mac. A dialog box will then open. Navigate to the location of the video, select it, and click "Insert." With the video now embedded in your presentation, save and then close PowerPoint.
To convert your PowerPoint presentation into a video, simply open your presentation, go to the 'File' menu, select 'Export,' and then 'Create a Video.'. This process preserves all your narration, animations, and timings, bringing your content to life in a fluid format. We always make sure to select the right video quality for our needs.
In Windows Explorer, select the presentation (it should have a .pptx extension) with the embedded video and audio you wish to extract. Right-click and choose Copy or press Ctrl + C. Right-click and choose Paste or press Ctrl + V. Right-click the copy of the presentation and choose Rename in the drop-down menu.
Learn how to extract an embedded video from a PowerPoint presentation. You may want to do this if you have lost the original copy of the video and all you ha...
The first step to save a PowerPoint presentation as a HD video go to File-> Export and then click Create a Video button. How to Convert PPT to Video Presentations Step 2 - Choose Video Resolution. Now, select a resolution to export your video. Other than the Standard (825×480) resolution, the high-definition resolution options include HD ...
Open your PowerPoint presentation and navigate to the slide containing the video. Right-click on the video and select 'Save Media as.'. Choose the file format you want (mp4, wmv, etc.). Select the location on your computer where you want to save the video file. Enter a file name and click 'Save.'.
In this Microsoft PowerPoint Tutorial I show you how to quickly export video from PowerPoint, this super easy method will export MP4 format video straight ou...
Open Your PowerPoint File: On your Windows computer, open the PowerPoint presentation containing the video. Access the Drop-Down Menu: Right-click on the video and select the "Save Media As" option from the drop-down menu. Choose File Format and Save: Select the desired video format (e.g., MP4, WMV) and choose a file name and location to save ...
On the PowerPoint window, in the left sidebar, click the slide in which you want to add a video. At the top of the PowerPoint window, click the "Insert" tab. In the "Insert" tab, under the "Media" section (which is to the extreme right side of the interface), click "Video." You'll now see an "Insert Video From" menu.
To open a presentation as a folder, use Explorer to navigate to the folder containing the presentation that you want, and then do the following: Click the presentation that you want, right-click it, and then click Rename. Change the file extension (.pptx) to .zip. Press Enter to set the name, then click Yes in the Rename dialog box.
Coordinates work with program staff and other members of the communications department as necessary. Writes, edits, and produces or assists in the production of a variety of materials, including e-newsletters and bulletins, social media posts reports, presentations, proposals, advertisements, PSAs, press releases, publications, videos and podcasts.