Set and Check User Rights Assignment via Powershell
You can add, remove, and check user rights assignment (remotely / locally) with the following powershell scripts..
Posted by : blakedrumm on Jan 5, 2022


Local Computer
Remote computer, output types.
This post was last updated on August 29th, 2022
I stumbled across this gem ( weloytty/Grant-LogonAsService.ps1 ) that allows you to grant Logon as a Service Right for a User. I modified the script you can now run the Powershell script against multiple machines, users, and user rights.
Set User Rights
How to get it.
All of the User Rights that can be set:
| Privilege | PrivilegeName |
|---|---|
| SeAssignPrimaryTokenPrivilege | Replace a process level token |
| SeAuditPrivilege | Generate security audits |
| SeBackupPrivilege | Back up files and directories |
| SeBatchLogonRight | Log on as a batch job |
| SeChangeNotifyPrivilege | Bypass traverse checking |
| SeCreateGlobalPrivilege | Create global objects |
| SeCreatePagefilePrivilege | Create a pagefile |
| SeCreatePermanentPrivilege | Create permanent shared objects |
| SeCreateSymbolicLinkPrivilege | Create symbolic links |
| SeCreateTokenPrivilege | Create a token object |
| SeDebugPrivilege | Debug programs |
| SeDelegateSessionUserImpersonatePrivilege | Obtain an impersonation token for another user in the same session |
| SeDenyBatchLogonRight | Deny log on as a batch job |
| SeDenyInteractiveLogonRight | Deny log on locally |
| SeDenyNetworkLogonRight | Deny access to this computer from the network |
| SeDenyRemoteInteractiveLogonRight | Deny log on through Remote Desktop Services |
| SeDenyServiceLogonRight | Deny log on as a service |
| SeEnableDelegationPrivilege | Enable computer and user accounts to be trusted for delegation |
| SeImpersonatePrivilege | Impersonate a client after authentication |
| SeIncreaseBasePriorityPrivilege | Increase scheduling priority |
| SeIncreaseQuotaPrivilege | Adjust memory quotas for a process |
| SeIncreaseWorkingSetPrivilege | Increase a process working set |
| SeInteractiveLogonRight | Allow log on locally |
| SeLoadDriverPrivilege | Load and unload device drivers |
| SeLockMemoryPrivilege | Lock pages in memory |
| SeMachineAccountPrivilege | Add workstations to domain |
| SeManageVolumePrivilege | Perform volume maintenance tasks |
| SeNetworkLogonRight | Access this computer from the network |
| SeProfileSingleProcessPrivilege | Profile single process |
| SeRelabelPrivilege | Modify an object label |
| SeRemoteInteractiveLogonRight | Allow log on through Remote Desktop Services |
| SeRemoteShutdownPrivilege | Force shutdown from a remote system |
| SeRestorePrivilege | Restore files and directories |
| SeSecurityPrivilege | Manage auditing and security log |
| SeServiceLogonRight | Log on as a service |
| SeShutdownPrivilege | Shut down the system |
| SeSyncAgentPrivilege | Synchronize directory service data |
| SeSystemEnvironmentPrivilege | Modify firmware environment values |
| SeSystemProfilePrivilege | Profile system performance |
| SeSystemtimePrivilege | Change the system time |
| SeTakeOwnershipPrivilege | Take ownership of files or other objects |
| SeTcbPrivilege | Act as part of the operating system |
| SeTimeZonePrivilege | Change the time zone |
| SeTrustedCredManAccessPrivilege | Access Credential Manager as a trusted caller |
| SeUndockPrivilege | Remove computer from docking station |
Note You may edit line 437 in the script to change what happens when the script is run without any arguments or parameters, this also allows you to change what happens when the script is run from the Powershell ISE.
Here are a few examples:
Add Users Single Users Example 1 Add User Right “Allow log on locally” for current user: . \Set-UserRights.ps1 -AddRight -UserRight SeInteractiveLogonRight Example 2 Add User Right “Log on as a service” for CONTOSO\User: . \Set-UserRights.ps1 -AddRight -Username CONTOSO\User -UserRight SeServiceLogonRight Example 3 Add User Right “Log on as a batch job” for CONTOSO\User: . \Set-UserRights.ps1 -AddRight -Username CONTOSO\User -UserRight SeBatchLogonRight Example 4 Add User Right “Log on as a batch job” for user SID S-1-5-11: . \Set-UserRights.ps1 -AddRight -Username S-1-5-11 -UserRight SeBatchLogonRight Add Multiple Users / Rights / Computers Example 5 Add User Right “Log on as a service” and “Log on as a batch job” for CONTOSO\User1 and CONTOSO\User2 and run on, local machine and SQL.contoso.com: . \Set-UserRights.ps1 -AddRight -UserRight SeServiceLogonRight , SeBatchLogonRight -ComputerName $ env : COMPUTERNAME , SQL.contoso.com -UserName CONTOSO\User1 , CONTOSO\User2
Remove Users Single Users Example 1 Remove User Right “Allow log on locally” for current user: . \Set-UserRights.ps1 -RemoveRight -UserRight SeInteractiveLogonRight Example 2 Remove User Right “Log on as a service” for CONTOSO\User: . \Set-UserRights.ps1 -RemoveRight -Username CONTOSO\User -UserRight SeServiceLogonRight Example 3 Remove User Right “Log on as a batch job” for CONTOSO\User: . \Set-UserRights.ps1 -RemoveRight -Username CONTOSO\User -UserRight SeBatchLogonRight Example 4 Remove User Right “Log on as a batch job” for user SID S-1-5-11: . \Set-UserRights.ps1 -RemoveRight -Username S-1-5-11 -UserRight SeBatchLogonRight Remove Multiple Users / Rights / Computers Example 5 Remove User Right “Log on as a service” and “Log on as a batch job” for CONTOSO\User1 and CONTOSO\User2 and run on, local machine and SQL.contoso.com: . \Set-UserRights.ps1 -RemoveRight -UserRight SeServiceLogonRight , SeBatchLogonRight -ComputerName $ env : COMPUTERNAME , SQL.contoso.com -UserName CONTOSO\User1 , CONTOSO\User2
Check User Rights
In order to check the Local User Rights, you will need to run the above (Get-UserRights), you may copy and paste the above script in your Powershell ISE and press play.
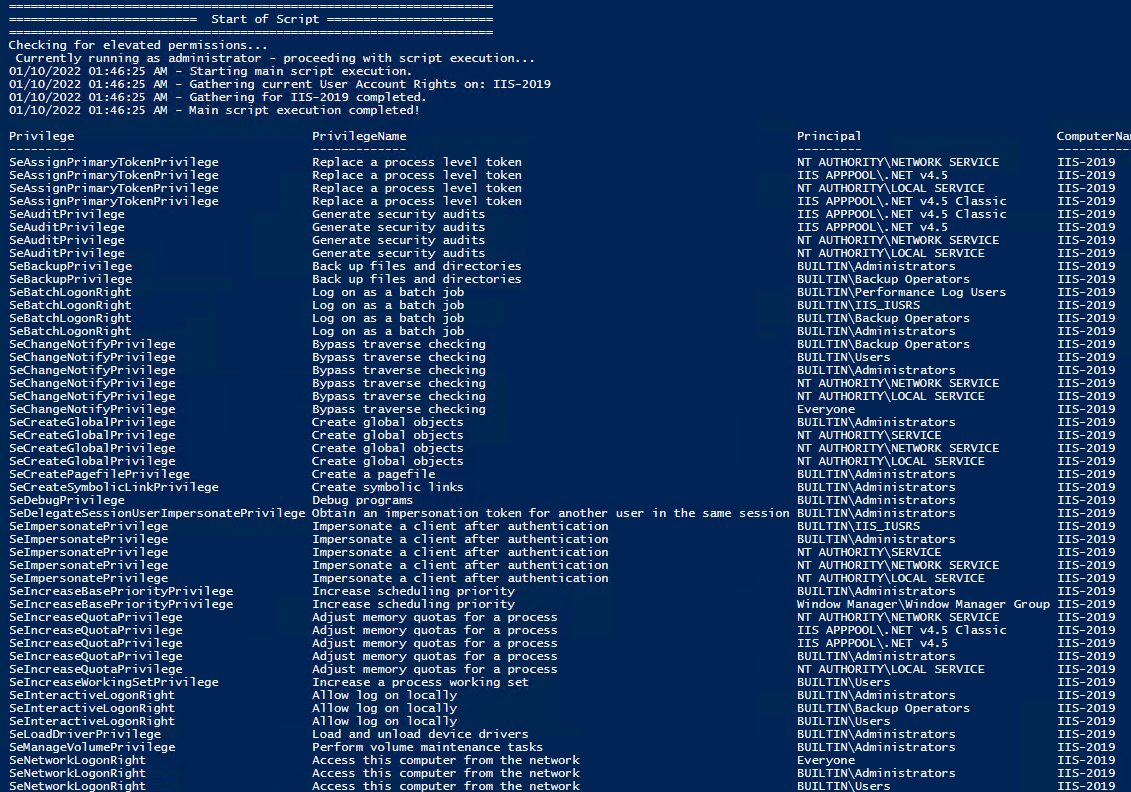
Note You may edit line 467 in the script to change what happens when the script is run without any arguments or parameters, this also allows you to change what happens when the script is run from the Powershell ISE.
Get Local User Account Rights and output to text in console:
Get Remote SQL Server User Account Rights:
Get Local Machine and SQL Server User Account Rights:
Output Local User Rights on Local Machine as CSV in ‘C:\Temp’:
Output to Text in ‘C:\Temp’:
PassThru object to allow manipulation / filtering:
I like to collaborate and work on projects. My skills with Powershell allow me to quickly develop automated solutions to suit my customers, and my own needs.
Email : [email protected]
Website : https://blakedrumm.com
My name is Blake Drumm, I am working on the Azure Monitoring Enterprise Team with Microsoft. Currently working to update public documentation for System Center products and write troubleshooting guides to assist with fixing issues that may arise while using the products. I like to blog on Operations Manager and Azure Automation products, keep checking back for new posts. My goal is to post atleast once a month if possible.
- operationsManager
- troubleshooting
- certificates

Managing User Rights in Powershell
Managing User Rights Assignments in Powershell
Windows User Rights, also known as Windows Privileges, are traditionally managed via GPO or in the simplest of cases via the server’s Local Security Policy. These assignments control special permissions that are often needed by IIS applications or other application hosting on Windows Servers.
So how can we manage these assignments in Powershell? There’s no obvious solution provided in Powershell, but there are several options are available. None of which are a pure Powershell solution, but some are close.
- Wrap the ntrights.exe process in Powershell. This is relatively simple, but the downside is having an external dependency on the ntrights.exe file.
- Embed a wrapper class to the LSA API in your script. This is a pretty good solution but certainly bloats your script.
- Load and Reference the Carbon DLL (If you haven’t already checked out this Powershell library, you should it is very powerful and regularly updated. I choose this approach because it keeps the script clean and compact, it returns an array of strings for easy interrogation. It does require a dependency on carbon.dll, but this library provides a ton of functionality beyond just this.
I like the 3rd option, its very clean, and I like working with the Carbon library.
Now lets take this script to the next level and wrap it into a DSC Script implementation. We can use this same logic in a DSC configuration to make sure our desired User Rights Assignments are kept in place.
What else can we do? We could also create a Custom DSC Resource to have a cleaner DSC Configuration.
Related Posts

Local Administrator Audit Script

Powershell Log Archival Script
My new stories.


- PowerShell Forum Directory
- Publications
Managing Privileges using PoshPrivilege
A recent project of mine has been to write a module to manage privileges on a local system. What I came up is a module called PoshPrivilege that allows you to not only look at what user rights are available on a local or remote system, but also provide the ability to Add, Remove, Enable and Disable the privileges as well.
If you are running PowerShell V5, you can download this module from the PowerShell Gallery:
Otherwise, check out my GitHub page where I am maintaining this project:
https://github.com/proxb/PoshPrivilege
I won’t spend time talking about how I wrote this module and my reasons behind it. What I will say is that instead of writing out C# code and then using Add-Type to compile it, I went with the Reflection approach of building out everything from the pinvoke signatures for methods to the Structs and even the Enums.
Let’s get started by looking at what is available in this module. The first function that is available is Get-Privilege and it comes with a few parameters. This function’s purpose is to let you view what privileges are currently available on the system (local or remote) as well as what is currently applied to your current process token.

A quick run through of using this function with various parameters:

If this one looks familiar, then it is probably likely that you have used the following command:

I opted for boolean values instead to determine the state for easier filtering if needed.
Up next are the Enable/Disable-Privilege functions. These work to Enable or Disable the privileges that are currently available on your local system to your process token. This means that if something like SeDebugPrivilege isn’t available on your system (such as being removed via Group Policy), then you cannot use Enable-Privilege to add your process token to this privilege. As in the previous image where we can see what is enabled and disabled, these are the only privileges that are available for me to work with.
To show this point, I am going to enable both SeSecurityPrivilege and SeDebugPrivilege so you can see that while the first privilege will show as Enabled, the other will not appear as it has not been made available.

As you can see from the picture, SeSecurityPrivilege has been enabled as expected, but SeDebugPrivilege is nowhere to be found. If we want SeDebugPrivilege, we will need to go about this another way which will be shown shortly.
Disabling a privilege can be done using Disable-Privilege as shown in the example below.

Now that I have covered Enabling and Disabling of the privileges and their limitations, I will move onto the Add/Remove-Privilege functions which allow you to add a privilege for a user or group or remove them on a local system. Note that this only works up until it gets reverted if set by group policy. This will also note show up if you look at the privileges available on your current process token (you will log off and log back in to see it).
Remember that I do not have SeDebugPrivilege available to use? Well, now we can add it to my own account using Add-Privilege.

We can see it is now available, but as I mentioned before, it doesn’t show up in my current process. A logoff and login now shows that it is not only available, but already enabled.

With this now enabled, we could disable it as well if needed using Disable-Privilege. I added my account for show, but we can also add groups this was as well.
As with Adding a privilege, we can remove privileges as well using Remove-Privilege.

As with Add-Privilege, you will need to log off and log back in to see the change take effect on your account.
Again, you can install this module using Install-Module if running PowerShell V5 and this project is out on GitHub to download (and contribute to as well). Enjoy!
Share this:
4 responses to managing privileges using poshprivilege.
I downloaded the scripts from Github, but getting compile errors.
Specifically the errors are around the WInOS Structures listed below:
Unable to find type [LUID]: make sure that the assembly containing this type is loaded. Unable to find type [LSA_UNICODE_STRING]: make sure that the assembly containing this type is loaded. Unable to find type [LARGE_INTEGER]: make sure that the assembly containing this type is loaded. Unable to find type [LUID_AND_ATTRIBUTES]: make sure that the assembly containing this type is loaded. Unable to find type [TokPriv1Luid]: make sure that the assembly containing this type is loaded.
Unable to find type [TOKEN_INFORMATION_CLASS]: make sure that the assembly containing this type is loaded.
Unable to find type [ProcessAccessFlags]: make sure that the assembly containing this type is loaded.
BTW, I have posted the full error log @ https://docs.google.com/document/d/18boeWSbvlLwpoIAMTJAp0ooNaLxe6kniYrJr_q3ZNMQ/edit?usp=sharing
Just a question, how can I grant the SESecurityPrivilege to the Set-Acl process ? If I do a whoami /priv I can see my useraccount (PS –> run as administrator) I can see the privilege is enabled, but when I try to run the script I have I get the following error :
Set-Acl : The process does not possess the ‘SeSecurityPrivilege’ privilege which is required for this operation. At C:\Scripts\SESOG\ImportACLSEv2.ps1:16 char:16 + $acl | Set-Acl $path + ~~~~~~~~~~~~~ + CategoryInfo : PermissionDenied: (P:\Common:String) [Set-Acl], PrivilegeNotHeldException + FullyQualifiedErrorId : System.Security.AccessControl.PrivilegeNotHeldException,Microsoft.PowerShell.Commands.SetAclCommand
The script looks like this : $par = Import-Csv -Path “c:\scripts\sesog\ImportMainCC.csv” -Delimiter “;”
foreach ( $i in $par ) { $path= $i.Path $IdentityReference= $i.IdentityReference $AccessControlType=$i.AccessControlType $InheritanceFlags= $i.InheritanceFlags $PropagationFlags=$i.PropagationFlags $FileSystemRights=$i.FileSystemRights echo $path $IdentityReference $acl = Get-Acl $path $permission = $IdentityReference, $FileSystemRights, $InheritanceFlags, $PropagationFlags, $AccessControlType $accessRule = new-object System.Security.AccessControl.FileSystemAccessRule $permission $acl.SetAccessRule($accessRule) $acl | Set-Acl $path }
In the import csv a path is set and exported export rights from the original location (I am doing a fileserver migration) but on each of the folders mentioned the inherentance flag has been removed.
Pingback: PowerShell Magazine » The case of potentially broken PackageManagement for Windows 10 Insiders
You are a lifesaver! I have been fretting over how to manage service account rights on remote servers – each OU has a corresponding AD security group and GPO, and doing this manually is both time-consuming and fraught with error. I can’t wait to try this out. First PoshWSUS, then this …you rock.
Leave a comment Cancel reply
Translate this blog.
- Search for:
Recent Posts
- Dealing with Runspacepool Variable Scope Creep in PowerShell
- 2018 PowerShell Resolutions
- Quick Hits: Getting the Local Computer Name
- Recent Articles on MCPMag
- Quick Hits: Finding all Hyperlinks in an Excel Workbook
- Querying UDP Ports with PowerShell
- Changing Ownership of File or Folder Using PowerShell
- PowerShell and WPF: Writing Data to a UI From a Different Runspace
- Quick Hits: Ping Sweep One Liner
- Using Background Runspaces Instead of PSJobs For Better Performance
- PowerShell and Events: Permanent WMI Event Subscriptions
- Building a Chart Using PowerShell and Chart Controls
- Locating Mount Points Using PowerShell
- Sharing Variables and Live Objects Between PowerShell Runspaces
- Using PowerShell Parameter Validation to Make Your Day Easier
- background jobs
- Internet Explorer
- performance
- powerscripting
- Regular Expressions
- scripting games 2012
- scripting games 2013
- scripting guy
- winter scriting games 2014
Email Subscription
Enter your email address to subscribe to this blog and receive notifications of new posts by email.
Email Address:
Sign me up!
- 5,582,739 Visitors Since August 5, 2010
- Entries feed
- Comments feed
- WordPress.com

- Already have a WordPress.com account? Log in now.
- Subscribe Subscribed
- Copy shortlink
- Report this content
- View post in Reader
- Manage subscriptions
- Collapse this bar
Stack Exchange Network
Stack Exchange network consists of 183 Q&A communities including Stack Overflow , the largest, most trusted online community for developers to learn, share their knowledge, and build their careers.
Q&A for work
Connect and share knowledge within a single location that is structured and easy to search.
How to Set Logon User Rights with the Ntrights.exe in windows 10(64 bit) [duplicate]
I need to know whether ntrights.exe 64 bit version exists?
If not, which is the 64 bit equivalent of ntrights.exe?
Thanks in advance.
- command-line
What is an equivalent for ntrights.exe on Windows 10?
Set and Check User Rights Assignment via Powershell You can add, remove, and check User Rights Assignment (remotely / locally) with the following Powershell scripts.
Read the blakedrumm page for detailed instructions, and download the script .
I just tested it successfully on Windows 2022 Standard.
- 1 This look really useful but all of the links are broken. – user2871239 Commented Jan 26, 2023 at 13:35
Not the answer you're looking for? Browse other questions tagged windows-10 command-line 64-bit .
- The Overflow Blog
- Where does Postgres fit in a world of GenAI and vector databases?
- Mobile Observability: monitoring performance through cracked screens, old...
- Featured on Meta
- Announcing a change to the data-dump process
- Bringing clarity to status tag usage on meta sites
Hot Network Questions
- Who was the "Dutch author", "Bumstone Bumstone"?
- What unique phenomena would be observed in a system around a hypervelocity star?
- Which hash algorithms support binary input of arbitrary bit length?
- Is there a phrase for someone who's really bad at cooking?
- Has the US said why electing judges is bad in Mexico but good in the US?
- Do I need a level shifter in between if I want to connect 3.3 V output signals to TTL-compatible inputs?
- What prevents a browser from saving and tracking passwords entered to a site?
- How does the summoned monster know who is my enemy?
- How did Oswald Mosley escape treason charges?
- How much of a discount do you get when buying cards on sale?
- Do the amplitude and frequency of gravitational waves emitted by binary stars change as the stars get closer together?
- Background for the Elkies-Klagsbrun curve of rank 29
- What explanations can be offered for the extreme see-sawing in Montana's senate race polling?
- Can Shatter damage Manifest Mind?
- How can I automatically save my renders with incremental filenames in Blender?
- How do eradicated diseases make a comeback?
- Why does a halfing's racial trait lucky specify you must use the next roll?
- A short story about a boy who was the son of a "normal" woman and a vaguely human denizen of the deep
- 3D printed teffilin?
- Why is Legion helping you whilst geth are fighting you?
- Historical U.S. political party "realignments"?
- Rings demanding identity in the categorical context
- Dutch Public Transportation Electronic Payment Options
- What is the meaning of “即采即发”“边采边发”?

- IT Administration Forum
- PowerShell Forum
- Community Forum
- PowerShell Group
- Earning as 4sysops member
- Member Ranks
- Member Leaderboard – This Month
- Member Leaderboard – This Year
- Member Leaderboard – All-time
- Author Leaderboard – 30 Days
- Author Leaderboard – 365 Days
- Cloud Computing
- Write for 4sysops
- User rights assignment in Windows Server 2016
4sysops - The online community for SysAdmins and DevOps
Built-in local security principals and groups
Center for internet security, local policies/user rights assignment.
- Recent Posts
- Microsoft Remote Desktop for Mac not working after upgrade (errors 0x3000064 and 0x3000066) - Thu, Aug 15 2024
- UniGetUI (formerly WingetUI): GUI for winget, Chocolatey, and PowerShell Gallery - Wed, Jul 17 2024
- What is Microsoft Dev Home? - Wed, Jul 3 2024
Security policy settings are sets of rules that control various aspects of protection. They include account policies, local policies, user rights assignment, the Windows firewall, software restrictions, and so on. There are several ways to configure security policy settings. The most common are:
- Group policy objects (GPO) – Used in Active Directory domains to configure and regularly reapply security settings to multiple computers.
- Local security policy (secpol.msc) – Used to configure a single (local) computer. Note that this is a one-time action. If another administrator changes these settings, you will need to manually change them back to the required state.
As most organizations use an Active Directory domain, it is preferred to apply security settings via group policies. You should have at least three security baselines created and linked in your domain, based on the following machine types:
- Domain Controllers (DC)
- Member Servers (MS)
- User Workstations

Configuring user rights assignment via Goup Policy
If you have multiple versions of operating systems (OS) running on these machines, you should create separate baselines for each OS version, as some settings might not be available. This also enables stricter configuration for older systems, as they are usually less secure.

Security policies do not support generated group names
The following groups are used throughout this article:
- Administrators – Members of this group have full, unrestricted access to the computer. Even if you remove some privileges from the Administrators group, a skilled administrator can still bypass those settings and gain control of the system. Only add highly trusted people to this group.
- Authenticated Users – A special security principal that applies to any session that was authenticated using some account, such as a local or domain account.
- Local account and member of Administrators group – A pseudogroup available since Windows Server 2012 R2. It applies to any local account in the Administrators group and is used to mitigate pass-the-hash attacks (lateral movement).
- Remote Desktop Users – Members of this group can access the computer via Remote Desktop services (RDP).
- Guests – By default, this group has no permissions. I don't think there is any need to use the Guest account and group today.
The Center for Internet Security (CIS) is a well-known non-profit organization that focuses on cybersecurity. To improve your knowledge of cybersecurity, you can access their free materials:
- CIS Controls – A set of 20 basic and advanced cybersecurity actions (controls). Using these, you can stop the most common attacks.
- CIS Benchmarks – Guidelines with specific configuration steps and detailed explanations. CIS Benchmarks are available for various products such as Windows Server, SQL Server, Apple iOS, and many more.
Both can be downloaded in exchange for your email address. There's no need to worry—there will be no further email, unless you choose to receive them.
Many companies and institutions create their security baselines based on CIS. I recommend you read CIS Controls. It really helped me to understand the importance of various security actions and settings.

CIS Benchmarks example
User rights assignments are settings applied to the local device. They allow users to perform various system tasks, such as local logon, remote logon, accessing the server from network, shutting down the server, and so on. In this section, I will explain the most important settings and how they should be configured.
For each setting, the following format is used:
Name of the setting: Recommended value, or values
Access Credential Manager as a trusted caller: No one (empty value)
Access to the Credential Manager is granted during Winlogon only to the user who is logging on. Saved user credentials might be compromised if someone else has this privilege.
Access this computer from the network: Administrators, Authenticated Users
Required for users to connect to the computer and its resources, such as an SMB share, shared printers, COM+, etc. If you remove this user right on the DC, no one will be able to log on to the domain.
Note : On DCs, you should also add the “ENTERPRISE DOMAIN CONTROLLERS“ group.
Allow log on locally: Administrators
The default configuration includes the Users group, which allows a standard user to log on to the server console. Limit this privilege only to administrators.
Allow log on through Remote Desktop Services: Administrators, Remote Desktop Users
It's common practice that some applications are used via RDP sessions by standard users. This privilege is also frequently required for remote assistance offered by an organization's helpdesk. If a server is running Remote Desktop Services with the Connection Broker role, the Authenticated Users group must also be added to this privilege.
Note: On the DC, it is recommended to allow only administrators to connect via RDP.
Back up files and directories: Administrators
This is a sensitive privilege that allows a user to bypass NTFS permissions (only via an NTFS API interface, such as NTBACKUP). A malicious user could backup and restore data on a different computer, thereby gaining access to it.
Deny access to this computer from the network/Deny log on through Terminal Services: Local account and member of Administrators group, Guests
The default value is only Guests. You should add the second group to prevent pass-the-hash attacks, so if a local elevated user is compromised, it cannot be used to elevate privileges on any other network resource, or access it via RDP.
Force shutdown from a remote system/Shut down the system: Administrators
Only administrators should be able to shut down any server, to prevent denial-of-service (DoS) attacks.
Manage auditing and security log: Administrators
This is a sensitive privilege, as anyone with these rights can erase important evidence of unauthorized activity.
Note: If you are running MS Exchange, the “Exchange Servers” group must be added to DCs.
Restore files and directories: Administrators
Attackers with this privilege can overwrite data, or even executable files used by legitimate administrators, with versions that include malicious code.
Take ownership of files or other objects: Administrators
User having this privilege can take control (ownership) of any object, such as a file or folder, and expose sensitive data.
Deny log on as a batch job/Deny log on as a service/Deny log on locally: Guests
To increase security, you should include the Guests group in these three settings.
Debug programs/Profile single process/Profile system performance: Administrators
This setting allows a user to attach a debugger to a system or process, thereby accessing critical, sensitive data. It can be used by attackers to collect information about running critical processes, or which users are logged on.
Change the system time: Administrators, Local Service
Changes in system time might lead to DoS issues, such as unavailability to authenticate to the domain. The Local Service role is required for the Windows Time service, VMware Tools service, and others to synchronize system time with the DC or ESXi host.
Create a token object: No one (empty value)
Users with the ability to create or modify access tokens can elevate any currently logged on account, including their own.
Impersonate a client after authentication: Administrators, Local Service, Network Service, Service
An attacker with this privilege can create a service, trick a client into connecting to that service, and then impersonate that account.
Note: For servers running Internet Information Services (IIS), the "IIS_IUSRS" account must also be added.
Load and unload device drivers: Administrators
Malicious code can be installed that pretends to be a device driver. Administrators should only install drivers with a valid signature.
I hope this article helped you to understand why it is important to define a security baseline for your systems. Many of the settings are already configured properly following server deployment; however, if they are not controlled by a GPO, they can be manipulated by malicious users. Be careful to whom you grant administrator permissions.
- Windows Server security features and best practices
- Security options in Windows Server 2016: Accounts and UAC
- Security options in Windows Server 2016: Network security
IT Administration News
- OpenAI searches for an answer to its copyright problems – The Verge
- Whats New in Microsoft Teams | August 2024 – Microsoft Community Hub
- Metas Llama AI engine sees rapid growth in open source adoption
- Vulnerabilities surge by 43 percent over 2023
- New Hotpatching Feature for Windows Server 2025 Evaluation VMs in Azure Cuts Downtime for Critical Updates
Read All IT Administration News
Join our IT community and read articles without ads!
Do you want to write for 4sysops? We are looking for new authors.
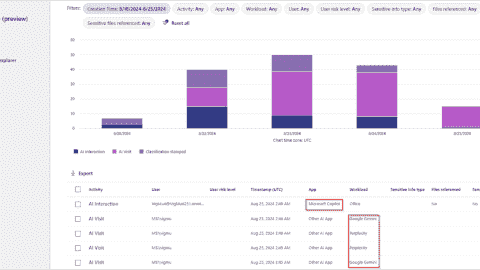
Microsoft Purview AI Hub – Monitor and block AI applications
Send email notifications about expiring Active Directory passwords with a PowerShell script
Unifying endpoint management and security: An overview of ManageEngine Endpoint Central
New storage features in Windows Server 2025: NVMe-OF initiator, update for S2D, deduplication for ReFS
E-MailRelay: Free SMTP server for Windows
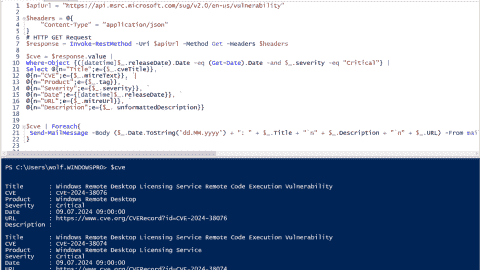
Receive critical Microsoft security alerts by email
Addressing OpenSSH vulnerabilities CVE-2024-6387 and CVE-2024-6409
Authenticator backup: Microsoft, Google, Amazon, Authy
Delegated Managed Service Accounts in Windows Server 2025
List groups in Linux
Install Let’s Encrypt certificates on Windows with Certbot and export as PFX
Create and remove group in Linux, add user, switch primary group
Audit and disable NTLMv1

Enable FIDO passkey authentication for IAM users in AWS

Enable Microsoft Entra ID passkey authentication
KeePassXC: A free cross-platform password manager for Windows, macOS and Linux

Configuring external authentication methods in Microsoft 365 with Microsoft Entra ID

Integrate Microsoft Graph activity logs for Microsoft 365 with Azure Monitor

Disable Basic Authentication for SMTP AUTH in Exchange Online

Rotate BitLocker recovery passwords, delete used keys from Active Directory
Created a domain account to use as a service account and then tried to run powershell cmdlets against the active RDS management server.
Gave that account local admin access on the broker servers and then was able to get further.
Got the error “Access is denied” when trying to run the invoke-RDUserLogoff(with correct hostserver and unifiedsessionID values) to log off a session using that account.
Need to know what permissions should be granted to the account to provide ability to run this command and where like on the broker or the session host.
I can’t run the RD cmdlets on the RD broker to remove a user session without local administrator privileges on the broker and session host.
I need to know what user permissions are necessary to run these cmdlets as giving local admin is not desired.
Sir we are having user1 in server1. We want to collect logs of server1 from server2 using credentials of user1. Surprisingly even after entering the credentials of user1 in event viewer it is taking loggedin credentials of the user logged into server2.
Leave a reply Click here to cancel the reply
Please enclose code in pre tags: <pre></pre>
Your email address will not be published. Required fields are marked *
Notify me of followup comments via e-mail. You can also subscribe without commenting.
Receive new post notifications

Subscribe to Newsletter
Follow 4sysops.
Please ask IT administration questions in the forums . Any other messages are welcome.

Log in with your credentials
or Create an account
Forgot your details?
Create account.

Set Allow Log On Locally User Rights via Powershell, C# and CMD
Description:.
In this article, I am going to explain about how to set or configure Allow Log on Locally User rights/permission/privilege using Local Security Policy , Powershell , C# and Command Line tool.
Configure Allow log on locally user rights via Local Security Policy GUI
- Grant Allow log on locally user rights via Powershell
- Set Allow log on locally user rights via Command Line
- Set Allow log on locally user permission using C#
Follow the below steps to set Allow log on locally user rights via Local Security Policy
1. Open the Run window by pressing ‘ Windows’ + ‘ R’ keys. 2. Type the command secpol.msc in the text box and click OK.

3. Now the Local Security Policy window will be open, in that window navigate to the node User Rights Assignment ( Security Settings -> Local Polices ->User Rights Assignment ). In right side pane, search and select the policy Allow log on locally .

4. Double-click on the policy Allow log on locally , in the opened window click the button Add User or Group, select the user account you want to set Allow log on locally rights and click OK, and click Apply button to finish.

Set or Grant Allow log on locally user rights via Powershell
We can set the Allow log on locally user rights using Powershell by importing the third party DLL ( Carbon ). Before you run the below script you need to the download latest Carbon files from here Download Carbon DLL .
Steps to follow to set Allow log on locally user rights via Powershell :
1. Download latest Carbon files from here Download Carbon DLL . 2. If you have downloaded the files, extract the zip file and you could see the Carbon DLL inside bin folder (In my case: C:UsersAdministratorDownloadsCarbonbinCarbon.dll ). 3. Copy the below Powershell script commands and place it notepad or textfile. 4. Now you can replace your Carbon DLL path in following script for the variable $CarbonDllPath 5. You can also replace the user identity that you are going to set log on locally user rights in the variable $Identity 6. Now run as Powershell window with Admin Privilege ( Run as Administrator ) 7. Copy the edited Powershell script and Run it in Powershell to configure Allow log on locally user rights.
Powershell output :

Other web site links for Carbon DLL: https://bitbucket.org/splatteredbits/carbon/downloads http://pshdo.com/ http://get-carbon.org/help/Grant-Privilege.html
Set Allow log on locally user right via Command Line tool
You can use the NTRights.exe utility to grant or deny user rights to users and groups from a command line or a batch file. The NTRights.exe utility is included in the Windows NT Server 4.0 Resource Kit Supplement 3. Use the below command to set log on locally user right using cmd.
Refer: http://support.microsoft.com/kb/266280
Set Log on Locally user right
Revoke Log on Locally user right
Set or Grant Allo Log on locally right/permission to user using C#
You can use the below function GrantLogonLocallyRights to set log on locally rights to user using C# code. This function uses the class LsaWrapper.
LsaWrapper class file
Share this:
Related posts.
- Change local system user account password using Powershell
- Remove user from local Administrator group using PowerShell
- Unlock AD User Account using Powershell script
- Check if AD user exists with PowerShell
- Set Office 365 user password via Powershell
Leave a Comment Cancel reply
Save my name, email, and website in this browser for the next time I comment.
Get the Reddit app
PowerShell is a cross-platform (Windows, Linux, and macOS) automation tool and configuration framework optimized for dealing with structured data (e.g. JSON, CSV, XML, etc.), REST APIs, and object models. PowerShell includes a command-line shell, object-oriented scripting language, and a set of tools for executing scripts/cmdlets and managing modules.
Local Security Policy User Rights Assignments
I'm trying to find a clean way to grant some local security policy user rights assignments to some service accounts in Powershell.
I found two things that look promising
cSecurityOptions - This looks like it does everything I need and it's part of the Powershell gallery but it is for DSC and I'm using a regular Powershell script. Can I access these cmdlets in a regular 1 liner Powershell script statement?
UserRights.psm1 - This also looks like it does everything I need but it's in the technet gallery. As far as I know this is less regulated and I can't do something like Install-Module to install it automatically.
If I can get #1 to work that would be best. If that is not possible, is there an alternative in the gallery that can be used to assign rights in the local security policy that can be done with all built-in modules or gallery modules? I want to do this as cleanly as possible without accessing registry keys or external .exe files (as I've seen in some older examples)
Using Powershell 5.1 on Windows 2012.
Thanks in advance.
By continuing, you agree to our User Agreement and acknowledge that you understand the Privacy Policy .
Enter the 6-digit code from your authenticator app
You’ve set up two-factor authentication for this account.
Enter a 6-digit backup code
Create your username and password.
Reddit is anonymous, so your username is what you’ll go by here. Choose wisely—because once you get a name, you can’t change it.
Reset your password
Enter your email address or username and we’ll send you a link to reset your password
Check your inbox
An email with a link to reset your password was sent to the email address associated with your account
Choose a Reddit account to continue
This browser is no longer supported.
Upgrade to Microsoft Edge to take advantage of the latest features, security updates, and technical support.
Get-Role Assignment Policy
This cmdlet is available in on-premises Exchange and in the cloud-based service. Some parameters and settings may be exclusive to one environment or the other.
Use the Get-RoleAssignmentPolicy cmdlet to view existing management role assignment policies in your organization.
For information about the parameter sets in the Syntax section below, see Exchange cmdlet syntax .
Description
For more information about assignment policies, see Understanding management role assignment policies .
You need to be assigned permissions before you can run this cmdlet. Although this topic lists all parameters for the cmdlet, you may not have access to some parameters if they're not included in the permissions assigned to you. To find the permissions required to run any cmdlet or parameter in your organization, see Find the permissions required to run any Exchange cmdlet .
This example returns a list of all the existing role assignment policies.
This example returns the details of the specified assignment policy. The output of the Get-RoleAssignmentPolicy cmdlet is piped to the Format-List cmdlet.
For more information about pipelining and the Format-List cmdlet, see About Pipelines and Working with command output .
This example returns the default assignment policy.
The output of the Get-RoleAssignmentPolicy cmdlet is piped to the Where cmdlet. The Where cmdlet filters out all of the policies except the policy that has the IsDefault property set to $True.
-DomainController
This parameter is available only in on-premises Exchange.
The DomainController parameter specifies the domain controller that's used by this cmdlet to read data from or write data to Active Directory. You identify the domain controller by its fully qualified domain name (FQDN). For example, dc01.contoso.com.
The DomainController parameter isn't supported on Edge Transport servers. An Edge Transport server uses the local instance of Active Directory Lightweight Directory Services (AD LDS) to read and write data.
| Type: | Fqdn |
| Position: | Named |
| Default value: | None |
| Required: | False |
| Accept pipeline input: | False |
| Accept wildcard characters: | False |
| Applies to: | Exchange Server 2010, Exchange Server 2013, Exchange Server 2016, Exchange Server 2019 |
The Identity parameter specifies the name of the assignment policy to view. If the name contains spaces, enclose the name in quotation marks (").
| Type: | MailboxPolicyIdParameter |
| Position: | 1 |
| Default value: | None |
| Required: | False |
| Accept pipeline input: | True |
| Accept wildcard characters: | False |
| Applies to: | Exchange Server 2010, Exchange Server 2013, Exchange Server 2016, Exchange Server 2019, Exchange Online, Exchange Online Protection |
Input types
To see the input types that this cmdlet accepts, see Cmdlet Input and Output Types . If the Input Type field for a cmdlet is blank, the cmdlet doesn't accept input data.
Output types
To see the return types, which are also known as output types, that this cmdlet accepts, see Cmdlet Input and Output Types . If the Output Type field is blank, the cmdlet doesn't return data.
Was this page helpful?
Additional resources
Select Product
Machine Translated
Citrix Workspace
Workspace Platform
Workspace user interface (UI)
Global App Configuration service
Get started with Citrix Workspace
System Requirements
Prepare for Citrix Workspace
Deliver DaaS with Citrix Workspace
User access
User experience
Activity Manager
Configure access to workspaces
Configure a custom domain
Configure Workspace URLs
Configure authentication
Customize workspace experience
Customize the appearance of workspaces
Customize workspace interactions
Customize security and privacy policies
Integrate services into workspaces
Optimize DaaS in Citrix Workspace
Aggregate Virtual Apps and Desktops in workspaces
Optimize connectivity with Direct Workload Connection
Service continuity
Enable single sign-on (SSO) for workspaces with Citrix Federated Authentication Service (FAS)
Configure Citrix Workspace app using Global App Configuration service
Configure settings for cloud stores
Configure settings for on-premises stores
Configure test channel
Manage Citrix Workspace app versions
Manage plug-ins
Manage settings for user group using configuration profile
Clone settings across stores, channels, and configuration profiles
Citrix Workspace security overview
Configure Workspace using PowerShell
Document History
This content has been machine translated dynamically.
Dieser Inhalt ist eine maschinelle Übersetzung, die dynamisch erstellt wurde. (Haftungsausschluss)
Cet article a été traduit automatiquement de manière dynamique. (Clause de non responsabilité)
Este artículo lo ha traducido una máquina de forma dinámica. (Aviso legal)
此内容已经过机器动态翻译。 放弃
このコンテンツは動的に機械翻訳されています。 免責事項
이 콘텐츠는 동적으로 기계 번역되었습니다. 책임 부인
Este texto foi traduzido automaticamente. (Aviso legal)
Questo contenuto è stato tradotto dinamicamente con traduzione automatica. (Esclusione di responsabilità))
This article has been machine translated.
Dieser Artikel wurde maschinell übersetzt. (Haftungsausschluss)
Ce article a été traduit automatiquement. (Clause de non responsabilité)
Este artículo ha sido traducido automáticamente. (Aviso legal)
この記事は機械翻訳されています. 免責事項
이 기사는 기계 번역되었습니다. 책임 부인
Este artigo foi traduzido automaticamente. (Aviso legal)
这篇文章已经过机器翻译. 放弃
Questo articolo è stato tradotto automaticamente. (Esclusione di responsabilità))
Translation failed!
When you first enable Workspace, the system creates a Workspace URL of the form customername.cloud.com that can be used to access the Workspace from web browsers or locally installed Citrix Workspace app.
You can add additional cloud.com URLs. If you have defined multiple Workspace URLs, you can use these URLs as policy inputs. For example, you might want different branding, authentication methods, and resources for different divisions within your organization.
You can also use your own custom domain as an alias for your default cloud.com domain. For more information, see configure custom domain .
Each Workspace URL has a Store name. This name is displayed in the Accounts list within Citrix Workspace app.
You configure whether the user can modify the store name within Citrix Workspace app. To allow users to edit their store name from the Citrix Workspace app, users must be on the following versions of the Citrix Workspace app clients:
- Citrix Workspace app for Windows version 2405 or later
- Citrix Workspace app for iOS version 24.2.0 or later
- Citrix Workspace app for Mac version 2402
- Enable or Disable Workspace URL
You can disable all access to your Workspaces for cloud.com URLs. This affects both locally installed Citrix Workspace app and browsers. Users can continue to use a Custom Workspace URL to access the default Workspace. If you do not have a Custom Workspace URL then this blocks all access.
To disable access via cloud.com:
- Untick Workspace URL enabled . This brings up a confirmation screen.
- Select the checkboxes to confirm you understand.
- Press Disable .
- Go to Citrix Cloud and sign in with your credentials.
- Navigate to Workspace Configuration > Access . Under Workspace URL , you can find a list of existing URLs.
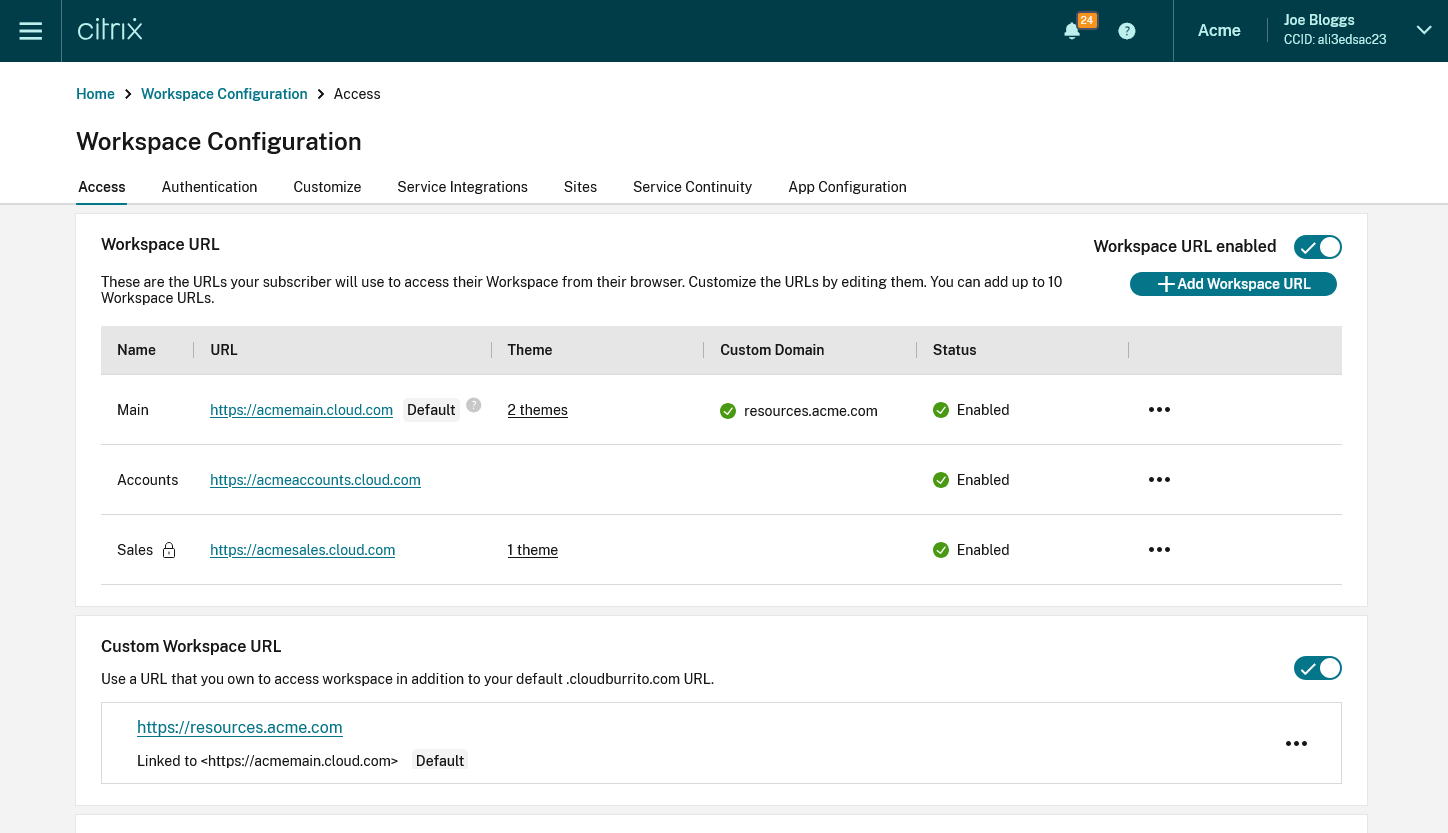
- Add Workspace URLs
You can create up to 10 URLs. The workspace URL that you select must be unique. Citrix Cloud rejects Workspace URLs that are already in use by other customers. It’s recommended to use a naming convention that contains a string that is unique to your organization.
Note: Avoid using generic URLs such as workspace.cloud.com or mystore.cloud.com .
For example, you can create URLs using the following format:
- YourOrgsales.cloud.com
- YourOrgengineering.cloud.com
- YourOrgmarketing.cloud.com
From the Access tab, to add a URL:
Click + Add Workspace URL
Enter a store name.
Choose whether you wish the user to be able to modify the store name within Citrix Workspace app.
Enter the subdomain.
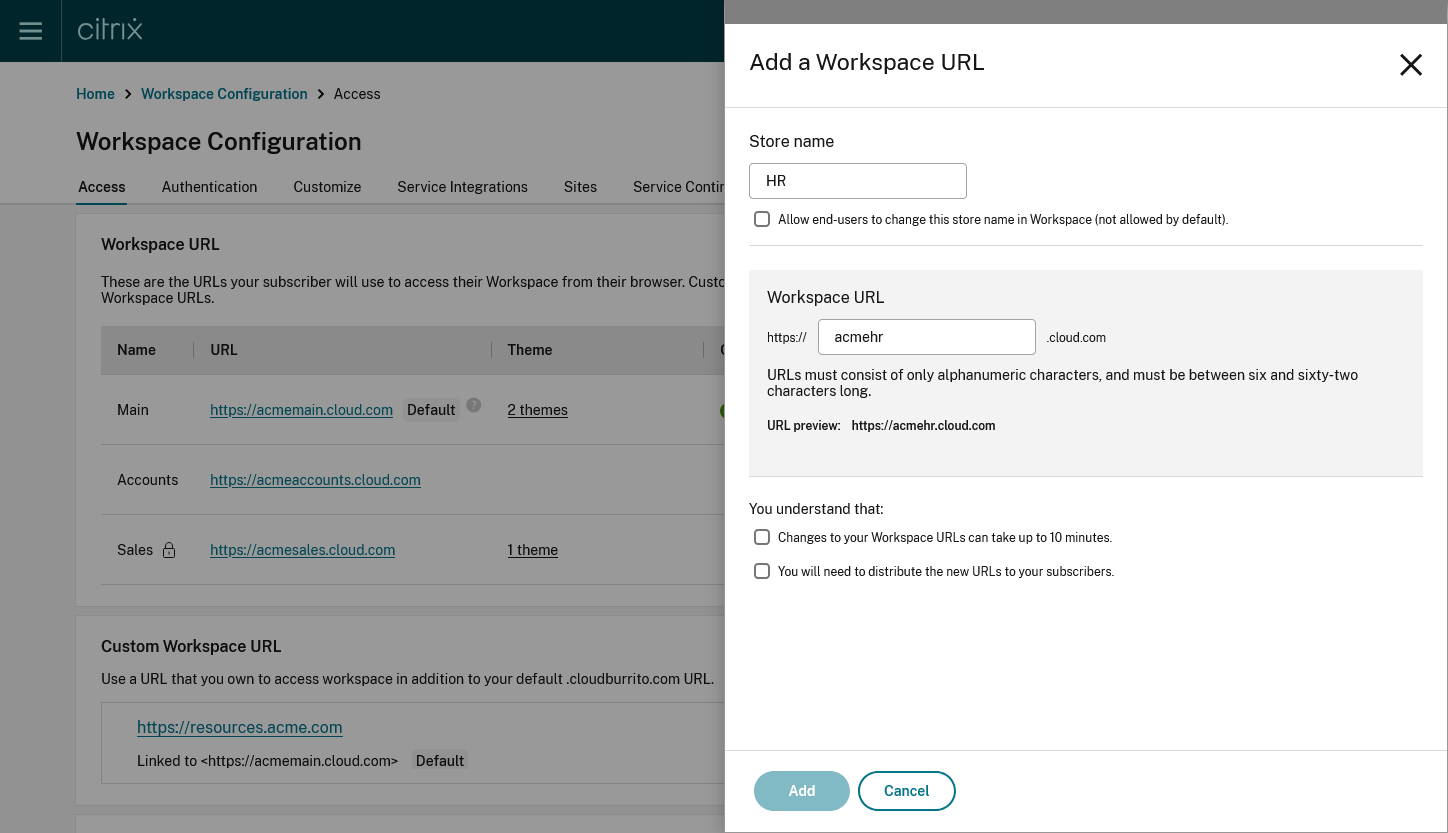
Select the checkboxes as an acknowledgment that you must provide the new URLs to your end users post configuration.
Click Add to save the URL.
- Modify Workspace URL
Warning: When you rename a URL, the old URL is immediately removed and is no longer available. Tell subscribers what the new URL is and manually update all local Citrix Workspace apps to use the new URL. The new URL will be unavailable for up to 10 minutes. If the URL is used in any policy then you must manually update that policy.
Click the … on the row of the Workspace URL you wish to edit.
Modify the Store name and Workspace URL as required.
If you modified the URL then you must tick several checkboxes to acknowledge that you understand the consequences.
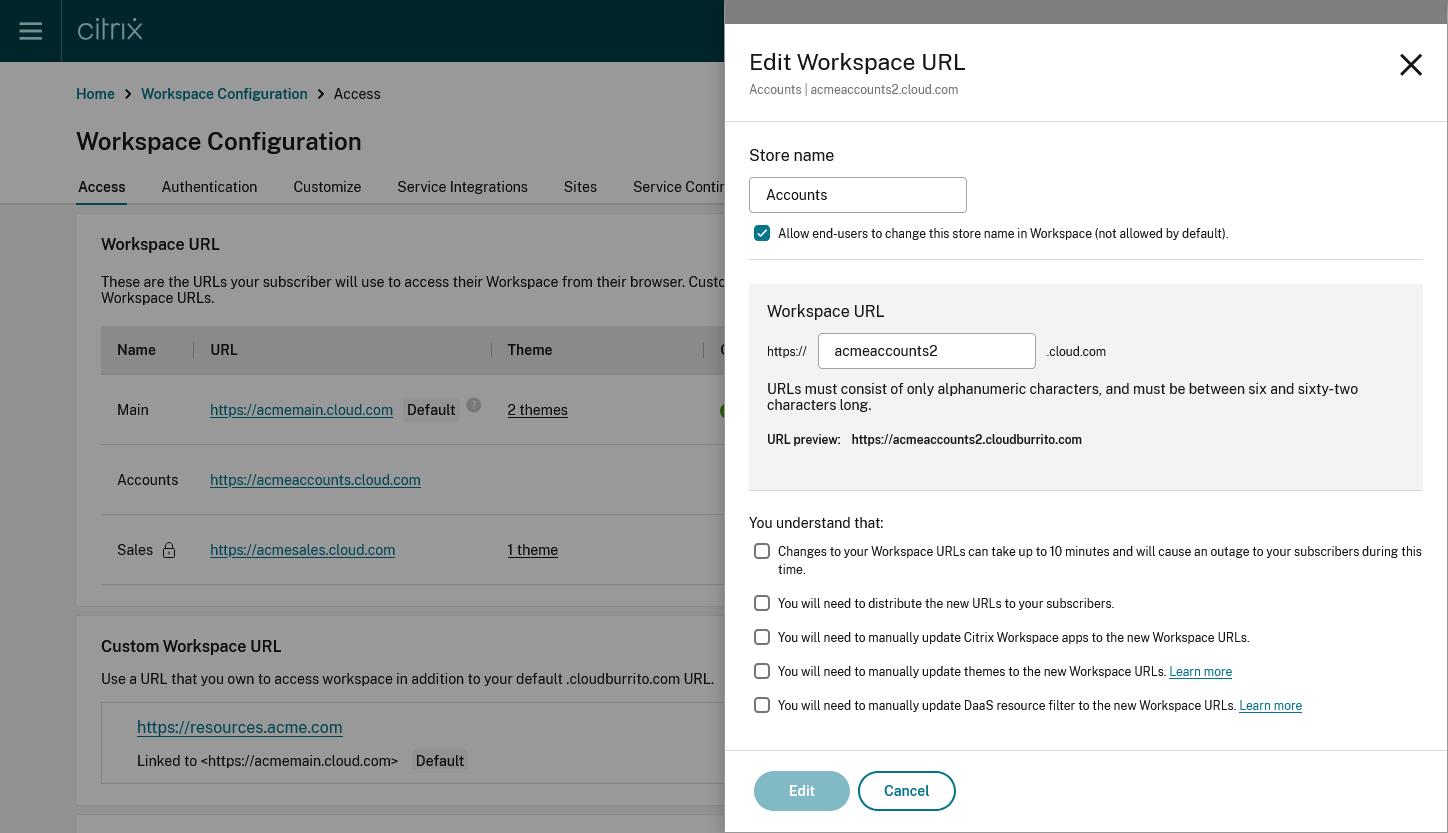
- Press Edit to save the changes
- Configure Workspace URLs using PowerShell
You can also use the PowerShell API to add or change Workspace URLs.
Run the cmdlet Set-WorkspaceCustomConfigurations with the $WorkspaceHosts list as the argument to the -WorkspaceHosts parameter to update the URL list for the workspace. Give the existing URL as the argument to the -WorkspaceUrl parameter. For example:

- Configure themes and logos based on Workspace URLs
With the multiple URL feature, you can create and assign separate Appearance themes and logos for each of the URLs. It enables you to vary the theme and logo that is visible to end users, based on the Workspace URL.
To create themes and logos based on URLs: Sign in to the Citrix Cloud Console portal.
- Navigate to Workspace Configuration > Customize > Appearance .
- Select Add theme or modify an existing theme using the edit option.
- On the AfterSign-in Appearance tab, upload the logo and select the theme colors.
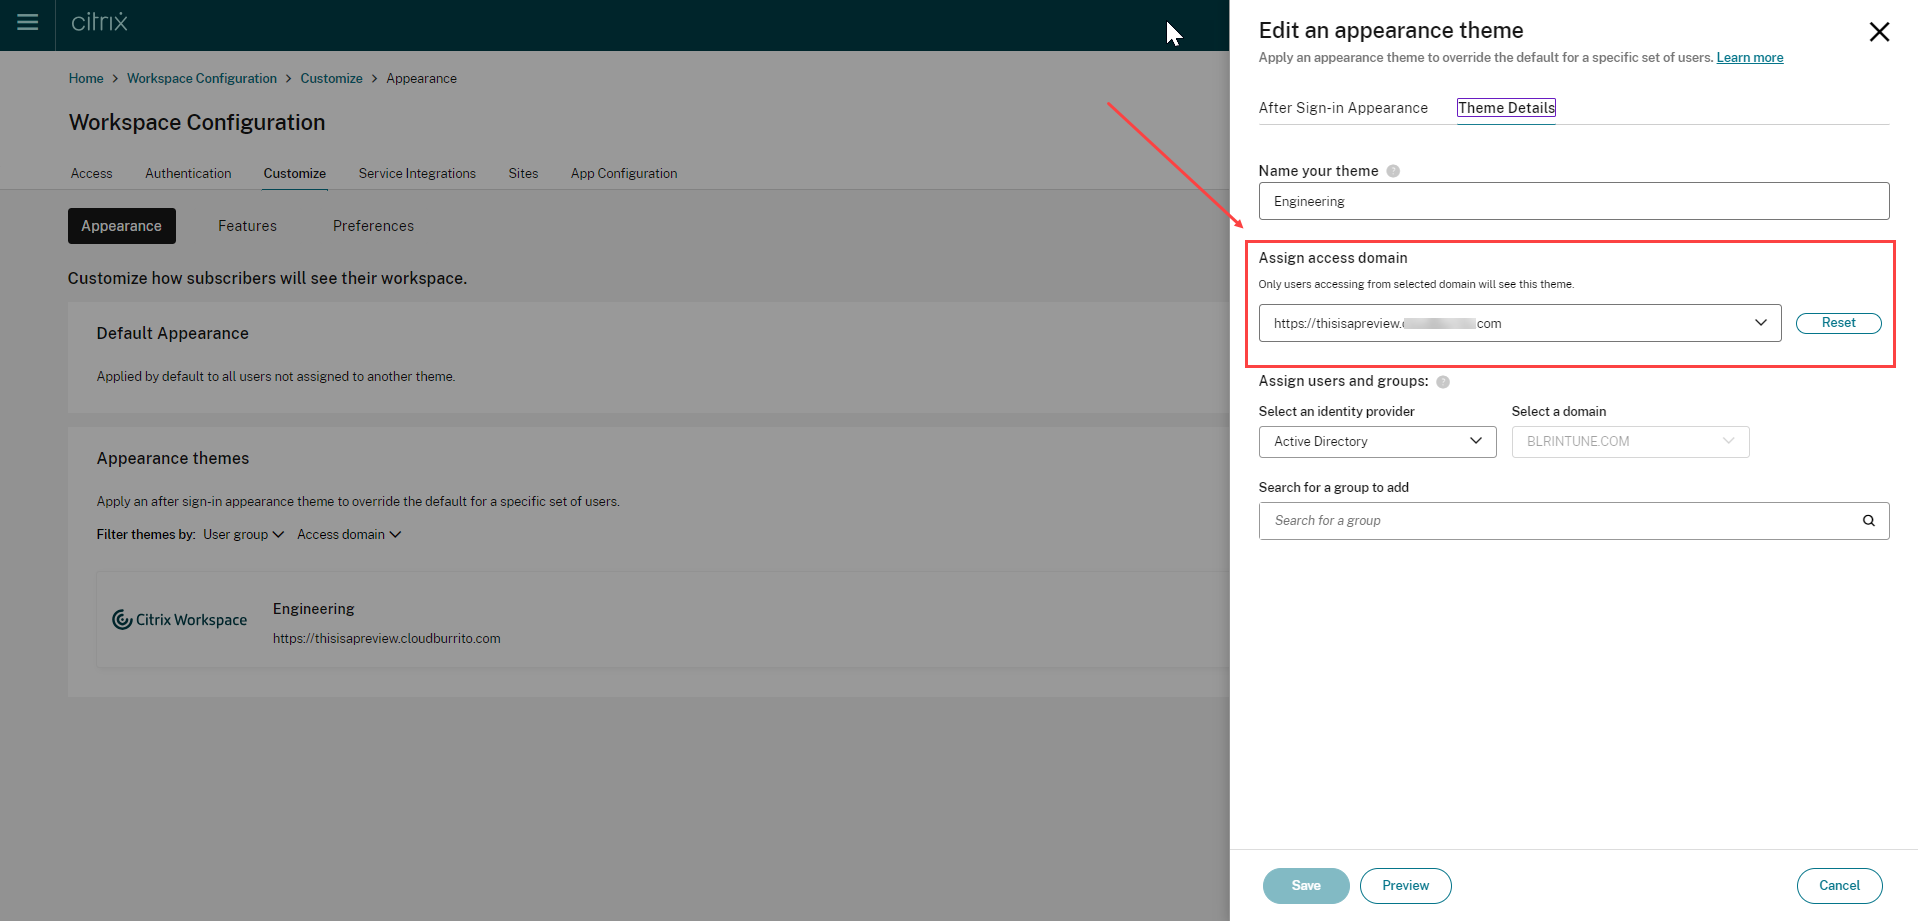
- Save your theme configuration. For more information on creating a theme, see Create multiple custom themes .
Application of themes
Themes can be configured and applied for the following use cases:
- Apply theme to a specific URL: The configured theme applies to any end user using te particular Workspace URL. The user group membership isn’t considered as a factor in these cases.
- Apply the theme to one or more user groups: The theme applies to end users who belong to any of the selected user groups. In this case, the theme is applied regardless of the URL used.
- Apply theme to a specific URL and one or more user groups: The theme applies to an end user if they belong to any of the selected user groups and are using the particular URL.
The theme prioritization mechanism is the same as before. For more information, see Prioritize custom themes
In case no theme has been configured, the default theme is applied. It’s also applied in the following scenarios:
- When viewing any pre-login messages or UI
- When viewing the sign-in screen, unless a third-party provider is used which has its own sign-in page
- After sign-in, if no appearance theme is configured for the URL
- Filter resources based on Workspace URLs
With the new multiple Workspace URL feature, you can filter and deliver resources based on the Workspace URL that the end users are using. There are two methods to filter resources based on Workspace URLs:
- Using Secure Private Access(SPA)
- Using DaaS Admin Console (Studio)
- Resource filtering using Secure Private Access
While configuring Citrix DaaS with Secure Private Access, you can control the end user’s access to resources. You can implement this by configuring Access policies based on Workspace URLs. Access Policies can be configured for delivery groups using the Workspace URL filter.
For more information, see Citrix Secure Private Access
- Resource Filtering using DaaS admin console (Studio)
You can now configure Access Policies for delivery groups based on Workspace URLs. You can control end users’ access to resources based on the Workspace URL that they’re using. To configure an Access Policy for delivery groups based on Workspace URLs, you need to apply the following SmartAccess filters. The filter values are also sent as SmartAccess tags to the DaaS service. It is applicable in both the scenarios:
- while listing apps and desktops published by DaaS
- while launching an app or desktop
| Filter | Value | Description |
|---|---|---|
| Citrix.Workspace.UsingDomain | example.cloud.com | Allows filtering of delivery group resources by Workspace URL. The value is the fully qualified domain name of the Workspace URL. |
| Citrix-Via-Workspace | True | Indicates that the end user is using the Workspace service, rather than an on-premises StoreFront deployment. |
Note: The SmartAccess tags are sent automatically. DaaS treats requests from Workspace as being not through Citrix Gateway. If you are not using Network Location or Device Posture, you need to add filter criteria for these filters to the Non-Citrix Gateway Connections rule.
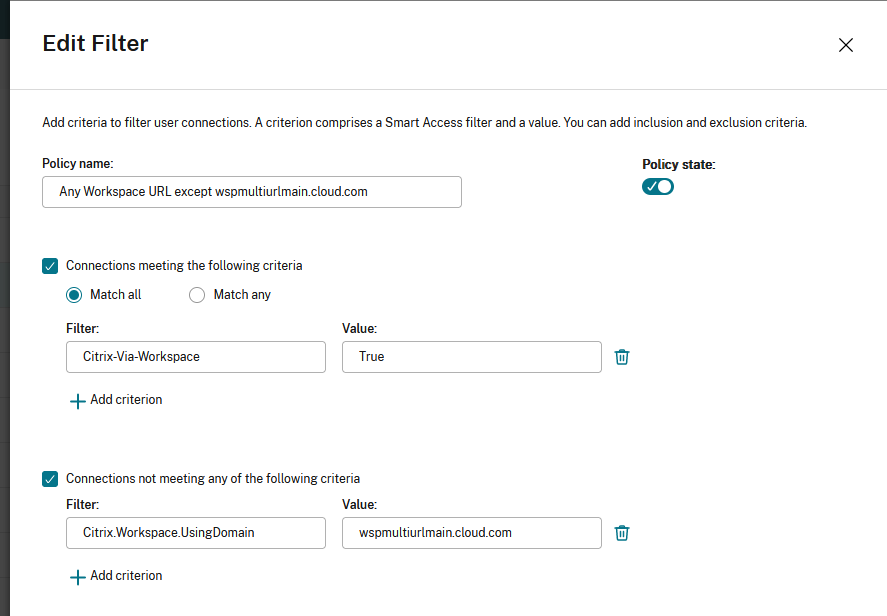
This allows filtering of apps and desktops within a delivery group, based on the following criteria:
- the workspace URL that is being used by the end users
- whether users have signed into Workspace or StoreFront
For more information on configuring an access policy for a delivery group, see Manage delivery groups .
Note: Enabling the adaptive access (Network Location or Device Posture) features causes DaaS to treat requests via Workspace as via Gateway. If either feature is switched on, the multiple URL filter criteria need to be added to the Citrix Gateway Connections rule instead. These features cause other SmartAccess tags to be sent. For more information, see Adaptive Access based on user’s network location and Device Posture .
Create an access policy rule for multiple URL workflows
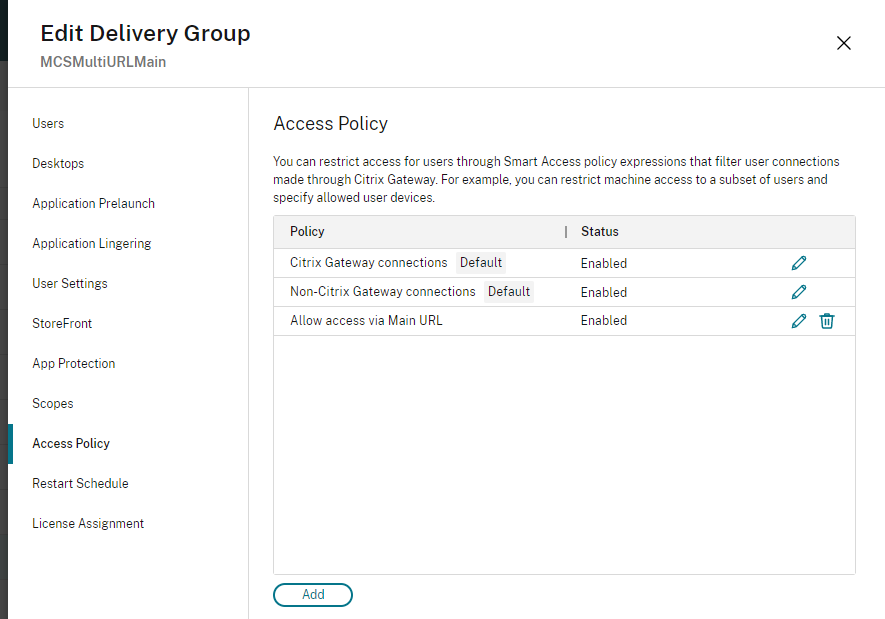
- To create an access policy rule, go to Edit Delivery Group > Access Policy , and click Add. Access policies can only be changed once a delivery group has been created.
- Add a descriptive policy name.
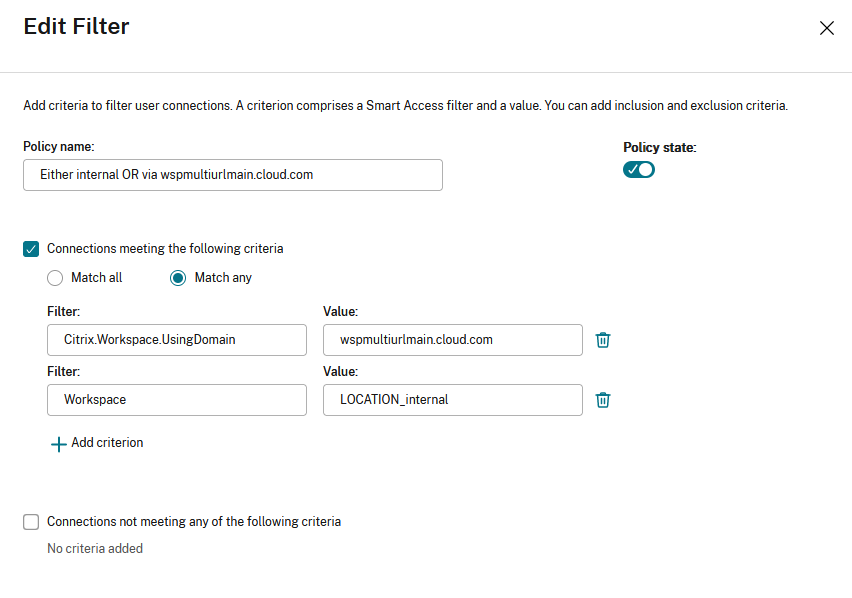
- Match any : The access policy allows access if any of the given filter criteria matches the incoming request.
- Match all : The access policy allows access only if all of the given filter criteria match the incoming request.
- Add values for the **Citrix.Workspace.UsingDomain** and **Citrix-Via-Workspace** filters.
For example, in the following scenario the use of Match any filter means that this rule allows access from either a user using , or a user connecting from an internal network (as per the Network Location configuration). For more information, see [Adaptive access based on user’s network location](/en-us/citrix-daas/manage-deployment/adaptive-access/adaptive-access-based-on-users-network-location.html).

Changing the filter to Match all would mean that the rule only allows access to a user using <wspmultiurlmain.cloud.com> from an internal network.
Once you confirm the changes, the new policy appears on the Access Policy page. For more information, see Manage Delivery Groups
- Configure nFactor authentication flows based on Workspace URLs
You can associate authentication policies with a Workspace URL using the Adaptive Authentication service. This enables you to configure different authentication policies for the end users based on the Workspace URL they’re using. You can create a policy or edit an existing one to associate it with a Workspace URL. Use one of the following methods:
Configure multiple authentication policies using UI
Configure multiple authentication policies using the Command Line interface
- Configure multiple authentication policies using the UI
The Adaptive Authentication service lets you create policies that authenticate your end users based on the Workspace URL that they’re using.
Step 1: Configure a series of authentication actions and policies that you want to use for the Workspace URLs. The policy configuration depends on the type of authentication and the authentication factors that you want to use. Any supported nFactor authentication flow can be used.
For more information, see Adaptive Authentication
For example, consider the following scenario where:
- The first URL <https://wspmultiurlmain.cloud.com> must be mapped to LDAP authentication and OTP.
- The second URL <https://wspmultiurl2.cloud.com> must be mapped to LDAP authentication.
- The third URL <https://wspmultiurl3.cloud.com> must have End User Cert authentication
Policy syntax
Check for a particular Workspace URL using exact string matching.
Check whether a particular string is contained within a Workspace URL, using substring matching.
Step 2: Configure an authentication policy and add your Workspace URL as the expression. The authentication policy is then valid for the Workspace URL that you entered in the Expression text field.
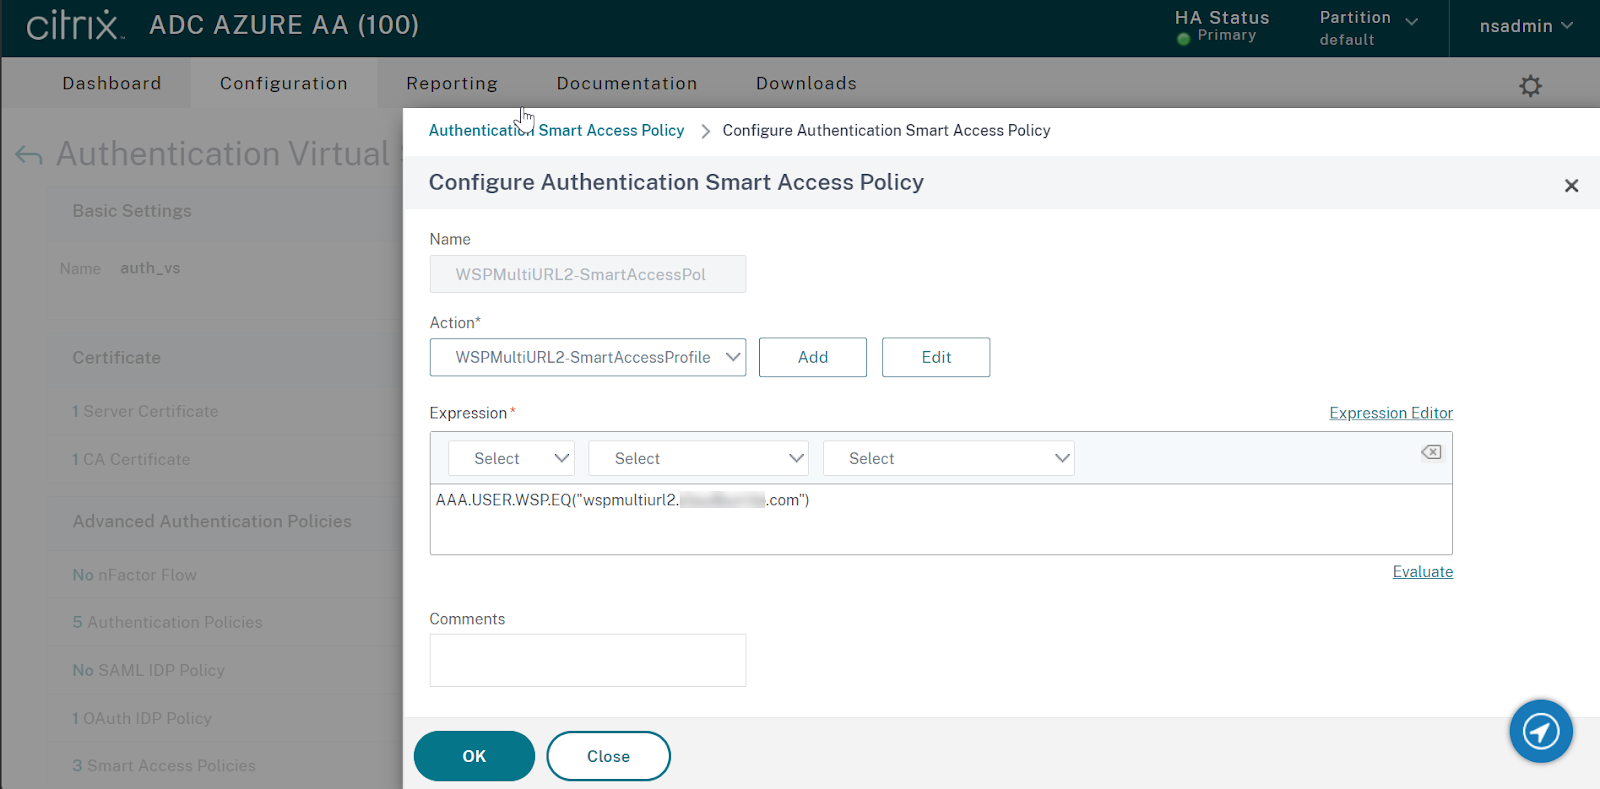
Step 3: Once you have configured authentication policies based on your URLs, you need to bind them to your authentication virtual server. For more information, see Authentication policies .
- Send SmartAccess tags to DaaS based on Workspace URL
DaaS delivery groups support SmartAccess tags based on the Workspace URL used. The tags can be a fixed set as explained in Configure Workspace to filter DaaS resources based on Workspace URL or you can use the Citrix.Workspace.UsingDomain filter or any other SmartAccess tag you want to use to influence DaaS resource enumeration behavior. The AAA admin can define multiple conditions that control when SmartAccess tags are sent to DaaS delivery groups.
Configure a SmartAccess tag profile with a tag string that you want to send to DaaS.
Configure a SmartAccess tag policy expression and link the policy to the action you created earlier.
Now bind the authentication policies to your AAA virtual server.
Configure multiple authentication policies using the Command Line Interface
Send a smartaccess tag based on the workspace url used, create the smartaccess tag profiles, create the smart access tag policies, show smart access profiles and policies, bind the policies to the adaptive authentication virtual server called “auth_vs”.
- Email Discovery to add Workspace URLs to Citrix Workspace app
Email discovery adds all the Workspace URLs configured in the list of service URLs as stores. If you want to add two or more stores through email discovery, configure each Workspace URL as a service URL. It ensures that the URLs are added as stores during the email discovery process. You can use either of the following methods to add stores:
Global App Configuration service UI: For more info, see Configure settings for cloud store
Global App Configuration API: You can use the preceding portal to make an API call to POST /aca/discovery/app/workspace/domain using your registered domain For more info, see Global App Configuration service API.
If <[email protected]> is entered in the Citrix Workspace app, the Email Discovery service adds all stores listed in service URLs. You can use a UPN, or an email address when it contains the correct domain suffix mydomain.com .
- Known limitations
The following are some limitations that impact the multiple URL feature.
- You can’t disable individual URLs. If you disable a Workspace URL within the Citrix Cloud admin console, it disables all the configured URLs.
Citrix Virtual Apps and Desktops
- Resource filtering using Workspace URL for Citrix Virtual Apps and Desktops (on-premises aggregation) isn’t supported.
Custom Workspace Domain
The workspace is limited to a single custom domain. It’s always linked to the Workspace URL marked as Default in the admin console.
Citrix Workspace app
To add multiple URLs from the same customer as stores, users must be on the following versions of the Citrix Workspace app clients:
- Citrix Workspace app for Windows version 2302 or later
- Citrix Workspace app for iOS version 2303 or later
- Citrix Workspace app for Android version 2303 or later
- Citrix Workspace app for Linux version 2303 or later
- Citrix Workspace app for Mac version 2305
- Citrix Workspace app for iOS version 2303
- Older versions of Citrix Workspace app display a Workspace domain selector menu. In this case, the end user must select the same URL they entered when adding the store. Selecting a different URL requires the user to sign in again.
Global App Configuration Service
- If the Global App Configuration service settings are configured for multiple Workspace URLs, then only one Workspace URL can be added to Citrix Workspace app at a time. Adding a second URL to Citrix Workspace app fails. For example, If GACS settings are configured for both <https://wspmultiurlmain.yourdomain.com:443> and <https://wspmultiurl2.yourdomain.com:443> , then the user can add only one URL to Citrix Workspace app.
- Account addition fails if more than one GACS configured URL is found during the Global App Configuration service discovery. For example, consider a case where a user enters <[email protected]> in Citrix Workspace app. The domain-based discovery finds two results and GACS settings are configured for both of them. The response returned is: <https://wspmultiurlmain.yourdomain.com:443> and <https://wspmultiurl2.yourdomain.com:443> . In this case, account addition fails with Citrix Workspace app as it supports adding only one account with GACS settings configuration.
In this article
This Preview product documentation is Citrix Confidential.
You agree to hold this documentation confidential pursuant to the terms of your Citrix Beta/Tech Preview Agreement.
The development, release and timing of any features or functionality described in the Preview documentation remains at our sole discretion and are subject to change without notice or consultation.
The documentation is for informational purposes only and is not a commitment, promise or legal obligation to deliver any material, code or functionality and should not be relied upon in making Citrix product purchase decisions.
If you do not agree, select I DO NOT AGREE to exit.
Machine Translation Feedback Form
Do you want to switch to the website in your browser preferred language?
Edit Article
- Stack Overflow for Teams Where developers & technologists share private knowledge with coworkers
- Advertising & Talent Reach devs & technologists worldwide about your product, service or employer brand
- OverflowAI GenAI features for Teams
- OverflowAPI Train & fine-tune LLMs
- Labs The future of collective knowledge sharing
- About the company Visit the blog
Collectives™ on Stack Overflow
Find centralized, trusted content and collaborate around the technologies you use most.
Q&A for work
Connect and share knowledge within a single location that is structured and easy to search.
Get early access and see previews of new features.
Setting user rights assignment of local security policy using powershell/cmd
I want to edit security settings of user rights assignment of local security policy using powershell or cmd.
i have tried ntrights command, but seems like not working Any command will be appreciated
- What exactly did you try and where did it fail? Please provide us with your code so that we can help you work out the kinks, not write the code for you. – Nick Commented Jun 6, 2017 at 16:40
- i have tried "cmd ntrights +r SeSystemtimePrivilege -u Administrators" @Nick – Shubham Agrawal Commented Jun 6, 2017 at 16:41
- wherea in cmd it shows ntright command does not exist – Shubham Agrawal Commented Jun 6, 2017 at 16:42
- 1 ...that means you don't have 'ntrights.exe' that exists somewhere in your $PATH statement. Considering it's a tool from the W2K3 resource kit, you probably don't have it downloaded. – thepip3r Commented Jun 6, 2017 at 16:51
2 Answers 2
Here is something i just wrote. You can make it more dynamic
- thanks for help, but my job solved [ gallery.technet.microsoft.com/scriptcenter/… ] – Shubham Agrawal Commented Jun 6, 2017 at 17:39
- Some explanation in addition to code would assist users understanding the value of your answer. Code only answers are often consider impolite and unhelpful for learners. Please use the edit button to enhance your answer. – Brian Tompsett - 汤莱恩 Commented Feb 7, 2019 at 21:54
Your Answer
Reminder: Answers generated by artificial intelligence tools are not allowed on Stack Overflow. Learn more
Sign up or log in
Post as a guest.
Required, but never shown
By clicking “Post Your Answer”, you agree to our terms of service and acknowledge you have read our privacy policy .
Not the answer you're looking for? Browse other questions tagged powershell cmd or ask your own question .
- The Overflow Blog
- Where does Postgres fit in a world of GenAI and vector databases?
- Mobile Observability: monitoring performance through cracked screens, old...
- Featured on Meta
- Announcing a change to the data-dump process
- Bringing clarity to status tag usage on meta sites
- What does a new user need in a homepage experience on Stack Overflow?
- Staging Ground Reviewer Motivation
- Feedback requested: How do you use tag hover descriptions for curating and do...
Hot Network Questions
- "TSA regulations state that travellers are allowed one personal item and one carry on"?
- The answer is not wrong
- How can judicial independence be jeopardised by politicians' criticism?
- If a trigger runs an update will it ALWAYS have the same timestamp for a temporal table?
- Why does a halfing's racial trait lucky specify you must use the next roll?
- Which version of Netscape is this, on which OS?
- How to logging Preferences library
- My supervisor wants me to switch to another software/programming language that I am not proficient in. What to do?
- What is the difference between a "Complaint for Civil Protection Order" and a "Motion for Civil Protection Order"?
- Does Vexing Bauble counter taxed 0 mana spells?
- How can I prove the existence of multiplicative inverses for the complex number system
- Whatever happened to Chessmaster?
- Do I need a level shifter in between if I want to connect 3.3 V output signals to TTL-compatible inputs?
- Which hash algorithms support binary input of arbitrary bit length?
- Can you give me an example of an implicit use of Godel's Completeness Theorem, say for example in group theory?
- 3D printed teffilin?
- Is there a phrase for someone who's really bad at cooking?
- How to remove obligation to run as administrator in Windows?
- Why is the movie titled "Sweet Smell of Success"?
- Journal keeps messing with my proof
- Why are complex coordinates outlawed in physics?
- What is opinion?
- Dutch Public Transportation Electronic Payment Options
- What are the 270 mitzvot relevant today?

IMAGES
VIDEO
COMMENTS
Personal File Server - Get-UserRights.ps1 Alternative Download Link. or. Personal File Server - Get-UserRights.txt Text Format Alternative Download Link. In order to check the Local User Rights, you will need to run the above (Get-UserRights), you may copy and paste the above script in your Powershell ISE and press play.
2. I'm new to PowerShell (PS). Currently I'm using windows server 2012 and I'm interested to know whether there is any way to export User Rights Assignment into a txt file. I tried. secedit /export /areas USER_RIGHTS /cfg d:\policies.txt. The above should should export it. So, I get this: Current Output.
9. You can use AccessChk in accomplish this task. Accesschk "domain\user" -a * will list all the permissions of a given domain user. You can call this program within a PowerShell script, concatenate the results into a text file, then filter out just the permissions you want to know about. Share.
1. 0. Managing User Rights Assignments in Powershell. Windows User Rights, also known as Windows Privileges, are traditionally managed via GPO or in the simplest of cases via the server's Local Security Policy. These assignments control special permissions that are often needed by IIS applications or other application hosting on Windows Servers.
With this method above I would have to read the file into my Powershell script, search for the privilege and delete the file afterwards. Is there any other method to do this in Powershell without external modules or executables? Thanks for your supply. Cheers. David
As with Adding a privilege, we can remove privileges as well using Remove-Privilege. Remove-Privilege -Privilege SeDebugPrivilege -AccountName boe-pc\proxb. As with Add-Privilege, you will need to log off and log back in to see the change take effect on your account. Again, you can install this module using Install-Module if running ...
What is an equivalent for ntrights.exe on Windows 10? Set and Check User Rights Assignment via Powershell You can add, remove, and check User Rights Assignment (remotely / locally) with the following Powershell scripts.
The following examples demonstrate how you can display who has specific rights on an OU. First, you have to load the ActiveDirectory module. You can then navigate to the desired domain in the PowerShell AD drive: Import-Module ActiveDirectorycd 'AD:\DC=contoso,DC=com'. For instance, if you want to find the users who have write access on the ...
Local Policies/User Rights Assignment. User rights assignments are settings applied to the local device. They allow users to perform various system tasks, such as local logon, remote logon, accessing the server from network, shutting down the server, and so on. In this section, I will explain the most important settings and how they should be ...
Is there any way or command to add user rights in group policy? Manual steps: Open Group Policy Management. Navigate to the following path in the Group Policy Object. Select Policy. Right click & Edit: Computer Configuration\Windows Settings\Security Settings\Local Policies\User Rights Assignment. Add/remove the necessary users.
I've asked a similar question like this before to get the Local User right in PowerShell of a certain domain user, now I would like to enable the right. There are a few rights I am looking to enable, but for this example I will use Logon as a Batch Job. Ntrights does not come with Windows Server 2008 by default, so I cannot use that method.
User rights are managed in Group Policy under the User Rights Assignment item. Each user right has a constant name and a Group Policy name associated with it. The constant names are used when referring to the user right in log events. You can configure the user rights assignment settings in the following location within the Group Policy ...
To view the local groups on a computer, run the command. Get-LocalGroup. To view the members of a specific group, use the Get-LocalGroupMember cmdlet. For example, to figure out who is a member of the local Administrators group, run the command Get-LocalGroupMember Administrators. You can create a new local user using the New-LocalUser cmdlet.
1 Press the Win + R keys to open Run, type secpol.msc into Run, and click/tap on OK to open Local Security Policy. 2 Expand open Local Policies in the left pane of Local Security Policy, and click/tap on User Rights Assignment. (see screenshot below step 3) 3 In the right pane of User Rights Assignment, double click/tap on the policy (ex: "Shut down the system") you want to add users and/or ...
User Rights Assignment is one of those meat and potatoes features of the operating system that we all have a cursory understanding of but rarely think about in depth. User rights include logon rights and permissions. Logon rights control who is authorized to log on to a device and how they can log on. User rights permissions control access to ...
Configure Allow log on locally user rights via Local Security Policy GUI. Follow the below steps to set Allow log on locally user rights via Local Security Policy. 1. Open the Run window by pressing ' Windows' + ' R' keys. 2. Type the command secpol.msc in the text box and click OK. 3. Now the Local Security Policy window will be open ...
As I understand this problem, you want to translate the text output produced by secedit /export /areas USER_RIGHTS /cfg d:\policies.txt command into the equivalent output "exported from gui". I borrowed the list of equivalences from the answer at this question, added a list of equivalences for each one of the terms and used they to write a Batch file that should perform such translation.
Solved. I'm trying to find a clean way to grant some local security policy user rights assignments to some service accounts in Powershell. I found two things that look promising. cSecurityOptions - This looks like it does everything I need and it's part of the Powershell gallery but it is for DSC and I'm using a regular Powershell script.
For more information about assignment policies, see Understanding management role assignment policies. You need to be assigned permissions before you can run this cmdlet. Although this topic lists all parameters for the cmdlet, you may not have access to some parameters if they're not included in the permissions assigned to you. To find the permissions required to run any cmdlet or parameter ...
<# .Synopsis Add and Remove User Right(s) for defined user(s) and computer(s). .DESCRIPTION Add and Remove User Rights via Powershell. .PARAMETER AddRight You want to Add a user right. .Parameter ComputerName Defines the name of the computer where the user right should be granted.
Configure Workspace URLs using PowerShell. ... With the multiple URL feature, you can create and assign separate Appearance themes and logos for each of the URLs. It enables you to vary the theme and logo that is visible to end users, based on the Workspace URL. ... Apply the theme to one or more user groups: The theme applies to end users who ...
I want to edit security settings of user rights assignment of local security policy using powershell or cmd. Eg: policy = "change the system time". default_security_settings = "local service,Administrators". i want to remove everything except Administrators. i have tried ntrights command, but seems like not working Any command will be appreciated.